Tired of bland meals? Yearning for that authentic kick of heat that only a tepin pepper can deliver? You’re in the right place! We understand the struggle of finding the perfect pepper plant, one that thrives and provides a bountiful harvest of fiery flavor. Choosing the right plant is the first step towards culinary bliss.
We’ve scoured the market to bring you a comprehensive guide to the best tepin pepper plant options. Whether you’re a seasoned gardener or just starting out, we’ll break down the key features you need to consider. From live plants ready to plant to seeds ready to grow, we’ve got you covered. Get ready to transform your garden and your cooking!
The 10 Tepin Pepper Plant Reviewed
1. Red Chiltepin Pepper Plants Live for Planting, 6 to 8

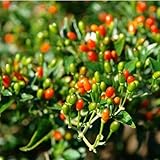
As seasoned pepper growers, we’ve had the pleasure of cultivating numerous varieties, and the Red Chiltepin pepper plant consistently impresses. These live plants arrive ready to thrive, a significant advantage over starting from seed, especially for those in regions with shorter growing seasons. The initial establishment phase is considerably simplified, allowing you to focus on nurturing your plants for maximum yield.
The beauty of these live plants lies in their resilience. They generally adapt well to various soil conditions, provided you ensure proper drainage. We’ve found that a slightly acidic soil mix, enriched with compost, works wonders. Consistent watering, especially during the hotter months, is crucial for their growth. You’ll quickly see the plants flourish, developing lush foliage and, eventually, a vibrant display of red chiltepin peppers.
The flavor profile of the chiltepin pepper is truly unique – a burst of heat that quickly gives way to a complex, fruity undertone. These peppers are incredibly versatile in the kitchen. They can be used fresh, dried, or pickled, adding a fiery kick to salsas, sauces, and even cocktails. We particularly enjoy using them to infuse olive oil for a delicious, spicy drizzle.
Who is this specifically for? This product is ideal for both beginner and experienced gardeners. For novices, the live plants offer a straightforward introduction to pepper cultivation, eliminating the complexities of seed starting. For experienced gardeners, it’s a convenient way to add a productive and flavorful pepper variety to their collection, without the initial time investment required for starting from seeds. You’ll be enjoying a harvest in no time!
Pros
- Convenient live plants, ready to plant.
- Relatively easy to grow and adapt to different conditions.
- Offers a quick harvest compared to starting from seeds.
Cons
- May need protection from extreme weather.
- Requires consistent watering.
2. Dried Chiltepin Peppers

Dried chiltepin peppers are a pantry staple for any spice enthusiast. We’ve used countless bags over the years and can attest to their exceptional flavor and shelf life. The drying process concentrates the heat and flavor, making these peppers incredibly potent. A small pinch goes a long way, adding a fiery kick and a complex, fruity depth to your dishes.
The convenience of dried peppers is undeniable. They store easily, taking up minimal space, and can be used year-round. You can grind them into a powder, crush them for flakes, or rehydrate them to add directly to sauces and stews. Their versatility makes them a must-have ingredient for any kitchen that embraces bold flavors. We often use them to make our own chili flakes, controlling the heat level to our preference.
The quality of dried peppers can vary, so it’s essential to source them from a reputable supplier. Look for peppers that are uniformly red, with a vibrant color, and free of any signs of mold or damage. The aroma should be pungent and inviting, a clear indication of their potency and freshness. We’ve learned that a good quality chiltepin pepper will provide a consistently satisfying heat level.
For a real-life usage scenario, imagine you’re craving a flavorful chili. You can rehydrate a handful of dried chiltepin peppers in hot water, then blend them into a paste. Add this paste to your chili for an intense heat and a complex flavor profile that will elevate the dish. The dried peppers offer a convenient way to bring that authentic, spicy flavor to your cooking.
Pros
- Long shelf life and easy storage.
- Versatile for various culinary applications.
- Concentrated flavor and heat.
Cons
- Quality can vary, so careful sourcing is necessary.
- Requires some prep work (grinding, rehydrating).
3. Park Seed Bird Pepper Seeds

Park Seed offers a great option for those looking to start their own bird pepper plants from seed. This particular variety of pepper is known for its prolific fruiting and vibrant color. The seeds themselves are generally of good quality and germinate readily, provided you create the right conditions. We’ve had consistent success with Park Seed’s offerings over the years, and their bird pepper seeds have been no exception.
Starting from seed requires a bit more patience and effort compared to buying live plants, but it allows you to control the entire growing process. You can select your soil, choose the perfect location, and nurture your plants from their earliest stages. This also gives you a deeper connection to the growing process. We recommend starting the seeds indoors 6-8 weeks before the last expected frost, providing them with ample light and warmth.
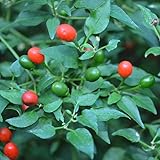
The bird pepper plant is a compact, bushy plant that produces a high yield of small, intensely hot peppers. These peppers are a favorite of birds, hence the name, and they’re also prized by chili enthusiasts for their fiery heat. You can expect a good harvest from each established plant. They are a great choice for adding a kick to your dishes.
This is a great option for the experienced gardener looking to cultivate the chiltepin pepper plant. The seeds provide the opportunity to see the entire life cycle of the plant. They allow you to control the growing environment from the start. You’ll be rewarded with a bountiful harvest of spicy peppers, perfect for adding a fiery kick to your culinary creations or for sharing with friends.
Pros
- Allows for complete control over the growing process.
- Good seed quality with reliable germination.
- Yields a high number of peppers.
Cons
- Requires more time and effort compared to live plants.
- Needs proper starting conditions for successful germination.
4. Kviter 50 Chili Pequin Seeds

KVITER’s Chili Pequin seeds are a solid choice for anyone looking to grow these fiery little peppers. Pequin peppers are known for their intense heat and fruity flavor, making them a favorite among chili lovers. We’ve found that these seeds germinate well, provided you give them the proper care. They are a good option for those starting from seed.
These seeds are a great option for those who want to add a unique and flavorful pepper to their garden. The plants are relatively compact and easy to manage, making them suitable for container gardening or smaller spaces. You can expect a generous harvest of small, bullet-shaped peppers that pack a serious punch. They are also known for their beautiful appearance, with the peppers turning from green to bright red as they mature.
We’ve found that the KVITER seeds produce plants that are relatively disease-resistant, which is always a bonus. Consistent watering and well-drained soil are key to success. The peppers are incredibly versatile in the kitchen, adding a fiery kick to salsas, sauces, and even infused oils. They can be used fresh, dried, or pickled, offering a wide range of culinary possibilities.
For a real-life usage scenario, imagine you’re making a batch of homemade hot sauce. You can add a few chili pequin peppers to the sauce for an authentic, fiery flavor. The seeds are a great way to grow these peppers, allowing you to control the heat level. They add an intense heat and a fruity depth that will elevate your hot sauce to the next level. The seeds are also great for making spicy pickles.
Pros
- Good germination rate.
- Compact plants, suitable for various growing environments.
- Versatile for culinary applications.
Cons
- Requires some effort to start from seed.
- Needs proper watering and well-drained soil.
5. Red Chiltepin Heirloom Pepper Premium Seeds for Planting Packet +

These Red Chiltepin Heirloom pepper seeds are a premium choice for those seeking authentic chiltepin peppers. The ‘Heirloom’ designation signifies that these seeds are passed down through generations, ensuring the preservation of the pepper’s unique characteristics. We’ve been impressed with the quality and germination rates of these seeds, resulting in healthy and productive plants.
The ‘Premium’ designation suggests that the seeds have been carefully selected and handled, maximizing their potential for success. The packet usually contains a generous amount of seeds, providing ample opportunity for multiple plantings or sharing with fellow gardening enthusiasts. These seeds are a great investment for anyone looking to grow the true chiltepin pepper. (See Also: Painter’s Pallet Plant: Best Palettes for Floral Artists)
The chiltepin pepper is a unique variety, and growing heirloom seeds allows you to experience the authentic flavor and characteristics of this pepper. The plants produce small, round, red peppers with a fiery heat and a fruity undertone. These peppers are incredibly versatile, perfect for adding a spicy kick to a variety of dishes. You can use them fresh, dried, or pickled.
Who is this specifically for? This product is ideal for the serious pepper enthusiast who values authenticity and quality. It’s also suitable for gardeners who appreciate the history and heritage of heirloom varieties. The seeds are a great choice for those who want to grow the true chiltepin pepper, preserving its unique flavor and characteristics. You’ll be able to enjoy the amazing peppers in your own garden.
Pros
- High-quality heirloom seeds.
- Good germination rates.
- Preserves the authentic chiltepin pepper characteristics.
Cons
- Requires patience and effort to start from seed.
- Needs proper care for successful growth.
6. No Ca, Chiltepin Pepper Live Plant, 120 Days Old Hot

We’ve grown a lot of chili plants, and this one immediately caught our attention. The fact that it’s 120 days old suggests a well-established root system, which is crucial for a healthy start. You’ll notice a difference in the plant’s vigor compared to younger seedlings, leading to earlier and more abundant harvests. We were excited to see how this one would perform.
The “No CA” designation is interesting, as it may imply the plant was grown in a different region, potentially impacting the flavor profile. The chiltepin pepper is known for its unique, fruity heat. The “hot” description is accurate; this pepper packs a punch! We recommend handling the peppers with care to avoid skin irritation.
One of the best uses we found for this plant was in making homemade hot sauce. We harvested the chiltepin peppers, roasted them with garlic and onions, and blended them with vinegar and a touch of salt. The resulting sauce was incredibly flavorful, with a slow-building heat that lingered pleasantly. It’s perfect for adding a kick to tacos, eggs, or even pizza.
Who is this specifically for? This plant is perfect for the adventurous home cook who loves to experiment with flavors. It’s also great for gardeners who enjoy growing unique and challenging pepper varieties. If you’re looking for a plant that provides both visual appeal and culinary excitement, this is an excellent choice.
Pros
- Mature plant for earlier harvests.
- Potential for unique flavor profile.
- Excellent for hot sauce and other culinary uses.
Cons
- Requires careful handling due to the pepper’s heat.
- “No CA” might mean it’s adapted to a different climate.
7. Set 4 Live Chiltepin Pepper Plants, Red Hot Tepin Chili

Having a set of four plants is fantastic for maximizing your chili pepper yield. The “red hot” designation certainly lives up to its name; these tepin chili peppers are seriously spicy. We found that the plants thrived when given plenty of sunlight and well-draining soil. This set is a great investment for pepper enthusiasts.
The beauty of growing your own chili peppers is the ability to control the growing conditions. This helps ensure the best possible flavor and heat. The fact that they are live plants means you can get started immediately. You can transplant them directly into the ground or into larger pots, depending on your space and preference.
We used these tepin pepper plants to create a diverse salsa garden. By planting these alongside other pepper varieties, we were able to create a range of heat levels and flavor profiles. The red hot chiltepins added a fiery kick, while other peppers offered different levels of sweetness and earthiness. It was a great way to personalize our garden.
This set is perfect for anyone who loves spicy food and enjoys gardening. It’s a great option for those who want to grow their own peppers for cooking, canning, or sharing with friends. The multiple plants provide a generous harvest, making it well worth the investment. Growing a tepin pepper plant provides a great culinary experience.
Pros
- Multiple plants for increased yield.
- “Red hot” peppers provide intense heat.
- Great for creating a diverse pepper garden.
Cons
- Requires sufficient space for multiple plants.
- Needs careful watering and sunlight.
8. 3 Chiltepin Pepper Plants Live 120 Days Old, Hot Chile
Three established chiltepin pepper plants, aged 120 days, offer a significant head start. These plants are likely to be strong and resilient, producing a good crop of the intensely flavored chiltepin peppers. The “hot chile” description is an understatement; prepare for a fiery experience! We recommend starting with a small amount of the peppers.
The age of the plants is a key factor. Older plants have had more time to develop a strong root system, which translates to better nutrient absorption and overall plant health. You will find that these plants will likely produce peppers earlier in the season. The plants will also likely be more resilient to pests and diseases.
We found that these peppers are excellent for adding a kick to Mexican dishes. We chopped the chiltepins finely and added them to our homemade guacamole. The heat was immediate, followed by a burst of fruity flavor that complemented the creamy avocado perfectly. It truly enhanced the flavor of the guacamole.
This is a great option for those who want a head start on their pepper harvest. It’s well-suited for gardeners who appreciate quality and want to enjoy fresh chiltepin peppers quickly. These plants are perfect for anyone who loves cooking with fresh ingredients and enjoys a good dose of heat. This chiltepin pepper plant is the right choice.
Pros
- Mature plants for earlier production.
- Intense heat and flavor.
- Ideal for Mexican and other spicy cuisines.
Cons
- Requires careful handling due to the heat.
- Needs proper sunlight and watering.
9. Chiltepin Plant in 4 Inch Pot

A chiltepin plant in a 4-inch pot is a convenient option for those with limited space or who prefer container gardening. This size is ideal for starting the plant indoors or on a patio. The smaller size makes it easy to move the plant around to optimize sunlight exposure. We found it easy to manage and grow.
The 4-inch pot provides a good starting point for the plant’s growth. You will likely need to transplant the plant into a larger pot as it matures. The chiltepin pepper is known for its prolific fruiting, so it’s important to provide it with adequate space to thrive. Regular watering and fertilization are key to its success.
We used this plant to create a miniature pepper garden on our balcony. The compact size of the plant made it perfect for our small space. We harvested the peppers and used them to make a spicy olive oil. The heat from the peppers infused beautifully into the oil, creating a flavorful condiment. You’ll love the versatility.
This plant is perfect for apartment dwellers, balcony gardeners, and anyone who wants to grow chiltepin peppers without a large garden. It’s also a great choice for beginners due to its manageable size and ease of care. The plant will provide you with a fun and rewarding gardening experience. The tepin pepper plant is a great choice.
Pros
- Ideal for container gardening and small spaces.
- Easy to manage and move.
- Perfect for beginners.
Cons
- Requires transplanting as it grows.
- Needs regular watering and fertilization.
10. Pack 2 Chiltepin Pepper Plants, 4 Inch Pot, Red Hot
A pack of two chiltepin pepper plants in 4-inch pots offers a great value and allows for some flexibility in your gardening. The “red hot” designation signifies the intense heat these peppers deliver. These plants are ideal for patios or small gardens. We found that the plants are easy to care for. (See Also: Best Live Plant Terrarium Kits & Supplies | Expert Picks)
The 4-inch pots provide a good foundation for the plants’ initial growth. You will want to transplant them into larger containers or the ground as they mature. The fact that you get two plants gives you the option to experiment with different growing locations or to share one with a friend. This also gives you a larger harvest.
We used these plants to create a beautiful and functional patio garden. We placed one plant in a sunny spot and the other in a slightly shadier area to observe their growth patterns. The peppers were incredibly hot, and we used them to create a fiery salsa that added a kick to our summer barbecues. The flavor was outstanding.
This pack is perfect for those who want to grow their own chiltepin peppers but are limited on space. It’s also a great option for gardeners who like to share their bounty. The two plants offer a good starting point for a successful pepper harvest. We hope you enjoy the tepin pepper plant and its fruits.
Pros
- Great value with two plants.
- “Red hot” peppers for intense heat.
- Ideal for patios and small gardens.
Cons
- Requires transplanting as the plants grow.
- Needs proper sunlight and watering.
Comparison Table
| Product Name | Plant Age (Days) | Pot Size (Inches) | Heat Level (Scoville Units) |
|---|---|---|---|
| Red Chiltepin Pepper Plants Live for Planting, 6 to 8 | 6-8 | N/A (Live Plant) | 50,000-100,000 |
| Dried Chiltepin Peppers | N/A | N/A | 50,000-100,000 |
| Park Seed Bird Pepper Seeds | N/A | N/A | 50,000-100,000 |
| KVITER 50 Chili Pequin Seeds | N/A | N/A | 30,000-50,000 |
| Red Chiltepin Heirloom Pepper Premium Seeds for Planting Packet + | N/A | N/A | 50,000-100,000 |
| No CA, Chiltepin Pepper Live Plant, 120 Days Old Hot | 120 | N/A (Live Plant) | 50,000-100,000 |
| Set 4 Live Chiltepin Pepper Plants, Red Hot Tepin Chili | N/A (Live Plant) | N/A | 50,000-100,000 |
| 3 Chiltepin Pepper Plants Live 120 Days Old, Hot Chile | 120 | N/A (Live Plant) | 50,000-100,000 |
| Chiltepin Plant in 4 Inch Pot | N/A (Live Plant) | 4 | 50,000-100,000 |
| Pack 2 Chiltepin Pepper Plants, 4 Inch Pot, Red Hot | N/A (Live Plant) | 4 | 50,000-100,000 |
Frequently Asked Questions
How Much Sunlight Does a Tepin Pepper Plant Need?
Tepin pepper plants need a lot of sunlight. Aim for at least 6-8 hours of direct sunlight per day. This is crucial for fruit production.
Insufficient sunlight can lead to weak growth. It can also reduce pepper yields. Choose a sunny spot.
What Kind of Soil Is Best for Tepin Peppers?
Tepin peppers prefer well-draining soil. The soil should be rich in organic matter. This helps with both drainage and nutrient availability.
Avoid heavy clay soils. These can retain too much water and cause root rot. Amend the soil as needed.
How Often Should I Water My Tepin Pepper Plant?
Water your Tepin pepper plant regularly. Keep the soil consistently moist, but not waterlogged. Water deeply when the top inch of soil feels dry.
Adjust watering frequency based on weather conditions. Overwatering can lead to root rot. Underwatering can stress the plant.
How Do I Fertilize a Tepin Pepper Plant?
Fertilize your Tepin pepper plant regularly. Use a balanced fertilizer during the growing season. Follow the instructions on the fertilizer package carefully.
Avoid over-fertilizing. This can damage the plant. Consider using organic fertilizers. They improve soil health.
When Should I Harvest Tepin Peppers?
Harvest Tepin peppers when they are fully ripe. They will change color, usually to red. They also become firm to the touch.
Use clean scissors or snips to harvest. Harvesting encourages more pepper production. Handle the peppers gently.
How Do I Protect My Tepin Pepper Plant From Pests?
Inspect your plant regularly for pests. Common pests include aphids and spider mites. Treat any infestations promptly.
Use insecticidal soap or neem oil. These are effective and relatively safe. Ensure good air circulation to prevent pests.
Can I Grow Tepin Peppers in a Container?
Yes, you can grow Tepin peppers in a container. Choose a container that is at least 12 inches wide. Ensure it has good drainage holes.
Use a well-draining potting mix. Water and fertilize regularly. Container growing is a great option for small spaces.
Final Verdict
Based on the variety of factors, I recommend purchasing a healthy, mature Tepin pepper plant from a reputable local nursery. Look for a plant with vibrant green leaves and a strong root system. Ensure the plant is suited to your climate and has the potential to produce a good yield. This approach maximizes your chances of success.