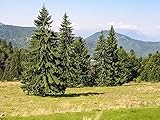
Evergreen trees are a beautiful addition to any landscape, providing year-round color and structure. But what happens when your beloved conifer outgrows its spot, or you simply wish to reposition it? Transplanting an evergreen tree, while a significant undertaking, is entirely achievable with careful planning and execution.
It’s a process that requires understanding the tree’s needs, the right timing, and the proper techniques to minimize stress and maximize its chances of thriving in its new home. This guide will walk you through every step, from assessing your tree to ensuring its successful establishment.
When Is the Best Time to Transplant an Evergreen Tree?
Timing is absolutely crucial when it comes to transplanting any tree, and evergreens are no exception. The goal is to move the tree during its dormant period, when it’s least active and therefore experiences the least amount of transplant shock. This allows the tree to focus its energy on root establishment rather than leaf production and active growth.
The Ideal Seasons for Transplanting
The two prime windows for transplanting evergreens are:
- Early Spring: This is arguably the most forgiving time. As soon as the ground thaws and before the tree begins to bud and produce new growth, you have a window of opportunity. The cool, moist conditions of spring are ideal for root recovery and establishment before the heat of summer arrives.
- Late Fall/Early Winter: Once the tree has shed its leaves (for deciduous conifers like Larch or Bald Cypress) or has completed its growth cycle and begun to harden off (for needle-bearing evergreens), late fall is another excellent time. The soil is still warm enough for some root activity, and the cooler temperatures reduce water loss from the foliage. Moving the tree before the ground freezes solid provides a buffer for root development.
Seasons to Avoid
You should generally avoid transplanting evergreens during:
- Mid-Summer: The heat and potential for drought put immense stress on a transplanted tree. Water loss from the needles can quickly overwhelm the limited root system, leading to desiccation and death.
- Deep Winter: Frozen ground makes excavation nearly impossible and can damage the root ball. Furthermore, the tree is completely dormant and has no capacity to begin healing or establishing new roots until spring.
Assessing Your Evergreen Tree for Transplant
Before you even think about digging, it’s vital to assess the health and suitability of your evergreen for transplanting. Not all trees are good candidates, and attempting to move an unhealthy or overly mature tree can be a fruitless and disappointing endeavor.
Tree Health Is Paramount
Look for:
- Vibrant Foliage: Needles or leaves should be green and full, not yellowing, brown, or sparse.
- Absence of Pests and Diseases: Inspect for any signs of insect infestations (like scale or borers) or fungal diseases (like needle cast or root rot). A tree already struggling will have a much harder time recovering from the stress of transplanting.
- Good Trunk and Branch Structure: Ensure the trunk is straight and free from wounds or decay, and that branches are well-distributed.
Size Matters
The larger the tree, the more challenging and risky the transplant becomes. Very mature trees (those with trunks 4 inches or more in diameter) often require specialized equipment and expertise, and their success rate is significantly lower. For a DIY transplant, it’s best to focus on younger, smaller trees. (See Also: How Deep Do Apple Tree Roots Grow? A Gardener’s Guide)
Root System Potential
A healthy, well-established root system is key. If the tree has been in its current location for a very long time, its roots will be extensive and deeply anchored, making it difficult to extract a significant portion of the root ball intact. Consider how long the tree has been growing where it is.
Gathering Your Essential Transplanting Tools and Supplies
Having the right tools on hand will make the process significantly smoother and more efficient. Preparation is key to minimizing the time the tree is out of the ground.
Essential Tools for Digging and Moving
- Sharp Shovel or Spade: A sturdy, pointed spade is essential for cutting through roots and excavating the soil.
- Mattock or Pickaxe: For breaking up compacted soil or tough roots.
- Pruning Saw or Loppers: To trim any damaged roots or branches.
- Tarp or Burlap: To wrap the root ball and keep it moist and intact. A heavy-duty tarp is ideal.
- Twine or Rope: To secure the burlap or tarp around the root ball.
- Wheelbarrow or Garden Cart: To move the tree if it’s small enough. For larger trees, you might need a dolly or even assistance from others.
- Gloves: To protect your hands.
- Measuring Tape: To estimate the size of the root ball.
Supplies for Planting and Aftercare
- Compost or Well-Rotted Manure: To amend the new planting hole.
- Mulch: To retain moisture and suppress weeds around the new location.
- Watering Can or Hose: For immediate and ongoing watering.
- Stakes and Ties (Optional): If the tree is tall and unstable, staking might be necessary.
Preparing the Evergreen Tree for Transplant
This phase is about setting the tree up for success by encouraging root growth and minimizing stress before the big move.
Root Pruning (optional but Recommended for Larger Trees)
For trees that have been in place for several years, root pruning can be a beneficial step. This involves carefully digging a trench around the tree at a distance that will encompass the desired root ball size, cutting off the roots with a sharp spade or saw. This process is done a few weeks to a few months before the actual transplant. The tree will then begin to grow new, finer feeder roots within the area that will become the root ball, increasing the chances of a successful transplant.
How to perform root pruning:
- Determine the desired size of your root ball. A general rule of thumb is 10-12 inches in diameter for every inch of trunk caliper (diameter measured at 6 inches above the ground).
- Using a sharp spade, carefully dig a trench around the tree at this calculated radius.
- Cut cleanly through all roots encountered.
- Backfill the trench with the original soil.
- Water the tree thoroughly and wait. The ideal waiting period is typically 4-6 weeks, but can be up to a year for very large trees.
Watering Before the Move
A day or two before you plan to transplant, water the evergreen thoroughly. This helps to hydrate the tree and makes the soil cling to the roots, creating a more cohesive root ball, which is easier to dig and move with less disturbance to the fine feeder roots.
The Transplanting Process: Step-by-Step
This is the core of the operation. Take your time, be methodical, and prioritize the integrity of the root ball. (See Also: How Many Lights for a 6.5 Foot Tree? Your Guide)
Step 1: Digging the New Planting Hole
Prepare the new location before you even start digging up the tree. Dig a hole that is:
- Twice as wide as the anticipated root ball. This allows ample space for new root growth.
- As deep as the root ball. You don’t want to plant the tree too deep, as this can lead to root rot. The top of the root ball should be level with or slightly above the surrounding soil.
Loosen the soil on the sides of the hole to encourage roots to spread outwards. Do not add amendments like compost directly into the hole at this stage; it can create a ‘pot effect’ where roots are reluctant to grow into the surrounding native soil. Amendments are best incorporated into the backfill soil.
Step 2: Excavating the Evergreen Tree
This is the most critical and physically demanding part. The goal is to extract as much of the root system as possible with the soil attached.
- Estimate the Root Ball Size: Based on the tree’s trunk caliper, estimate the diameter of the root ball you need to dig. For a young, smaller tree (e.g., 1-inch caliper), a root ball of 12-15 inches in diameter is usually sufficient.
- Digging the Trench: Begin digging a trench around the tree at the estimated radius. Dig vertically downwards, trying to keep the spade as close to the tree’s trunk as possible without damaging it.
- Severing Roots: As you dig, you will encounter roots. Use your spade to cut through them cleanly. If you encounter very thick roots, you may need to use a pruning saw.
- Undercutting the Root Ball: Once you have a complete trench around the tree, begin to carefully undercut the root ball. Work your spade underneath the root ball, gradually loosening it from the surrounding soil.
- Protecting the Root Ball: As the root ball loosens, gently tilt the tree to one side. Slide a tarp or burlap underneath the root ball. If the soil is loose, you may need to work quickly to get the material underneath before the ball collapses.
- Securing the Root Ball: Once the tarp or burlap is in place, carefully roll or tilt the tree back onto it. Gather the edges of the tarp or burlap and tie them securely around the root ball with twine or rope. This keeps the soil intact and the roots protected and moist.
Step 3: Moving the Evergreen Tree
This step depends heavily on the size and weight of the tree.
- For smaller trees: You can often lift the burlap-wrapped root ball and place it in a wheelbarrow or garden cart.
- For larger trees: You may need help from one or more people. Use dollies, moving straps, or even a small tractor with a front-end loader if available. Always lift with your legs and get assistance to avoid injury.
Move the tree as quickly as possible to its new location to minimize the time it spends out of the ground.
Step 4: Planting the Evergreen Tree
Carefully place the tree into the prepared hole. The top of the root ball should be level with or slightly above the surrounding soil. If it’s too deep, carefully remove some soil from the bottom of the hole or shave some off the top of the root ball (only if absolutely necessary and very carefully).
Once the tree is positioned correctly: (See Also: How to Measure the Circumference of a Tree Accurately)
- Remove the Tarp/Burlap (if possible): If you can, loosen and remove the burlap and twine from the top and sides of the root ball. If it’s difficult or risks damaging the root ball, you can often cut away the top portion and leave the rest, as it will eventually decompose. Never leave synthetic burlap or plastic in the hole.
- Backfill the Hole: Use the soil you excavated from the hole, mixed with a good amount of compost or well-rotted manure (about 25-30% amendment). Fill the hole gently, working the soil around the root ball to eliminate air pockets. You can gently tamp the soil with your hands or feet, but avoid heavy compaction.
- Water Thoroughly: Once the hole is about two-thirds full, water deeply to settle the soil and eliminate any remaining air pockets. Then, continue backfilling.
- Create a Watering Basin: Form a slight berm or basin around the edge of the root ball with the remaining soil. This will help direct water to the root zone.
Step 5: Post-Transplant Care for Your Evergreen
Successful establishment is as important as the transplant itself.
- Watering: This is the most critical aspect of aftercare. Water the tree deeply and regularly, especially during the first year. The soil should be kept consistently moist but not waterlogged. Check the soil moisture by sticking your finger a few inches down. Water when the top inch or two feels dry.
- Mulching: Apply a 2-3 inch layer of organic mulch (like wood chips, shredded bark, or pine needles) around the base of the tree, extending out to the drip line. Keep the mulch a few inches away from the trunk itself to prevent rot and pest issues. Mulch helps retain soil moisture, regulates soil temperature, and suppresses weeds.
- Fertilizing: Avoid fertilizing immediately after transplanting. Wait until the tree shows signs of new growth, usually in its second growing season. When you do fertilize, use a balanced evergreen fertilizer according to package directions.
- Pruning: Only prune out any broken or dead branches. Avoid heavy pruning immediately after transplanting, as the tree needs its foliage to produce energy for root establishment.
- Staking (If Necessary): If the tree is tall and unstable, it may need staking. Use wide, flexible ties and remove the stakes after one growing season, or as soon as the tree can stand on its own.
Troubleshooting Common Transplanting Issues
Even with the best intentions, challenges can arise. Knowing what to look for can help you address problems early.
Wilting and Browning Foliage
This is the most common sign of transplant shock. It indicates the tree is losing more water through its needles than its roots can absorb. Ensure consistent watering. In extreme cases, you might consider temporary shading during the hottest parts of the day.
Poor New Growth
If the tree doesn’t produce new needles or branches in its first year or two, it might be struggling to establish roots. Continue with diligent watering and mulching. Avoid fertilizing until you see signs of recovery.
Pest or Disease Infestations
A stressed tree is more susceptible to pests and diseases. Monitor your tree closely and address any issues promptly with appropriate organic or chemical treatments, depending on the severity and type of problem.
Root Rot
This is often caused by overwatering or planting the tree too deeply. Ensure the soil drains well and that the watering is appropriate for the conditions. If you suspect root rot, you may need to carefully excavate and assess the root system, removing any rotten material and replanting at the correct depth.
Conclusion
Transplanting an evergreen tree is a rewarding endeavor that, when approached with careful planning and execution, can successfully relocate your cherished conifer. By selecting the optimal time, preparing adequately with the right tools, and diligently following the step-by-step process for digging, moving, and planting, you significantly enhance your tree’s chances of thriving. Remember that consistent watering and proper aftercare are paramount in the crucial first year, helping your evergreen establish a robust root system and adapt to its new environment. Patience and attention to detail will ensure your evergreen continues to grace your landscape for years to come.
Recommended Products