Are you worried your electric fence isn’t doing its job? Protecting your property and livestock is a top priority, and a malfunctioning fence can leave you vulnerable. Knowing how to tell if electric fence is working is crucial for peace of mind. Luckily, there are several straightforward methods to check its effectiveness, from simple visual inspections to using specialized tools.
We understand the importance of a properly functioning fence. A weak or dead fence can lead to escaped animals, damaged crops, and potential security breaches. This guide provides you with practical, easy-to-follow steps to ensure your electric fence is up to par. We’ll cover everything from the basic checks to more advanced troubleshooting techniques.
So, let’s dive in and get your electric fence working at its best!
Understanding Electric Fences
Before we jump into testing, let’s briefly recap how an electric fence works. An electric fence is a physical and psychological barrier. It delivers a short, sharp pulse of electricity when an animal or intruder touches the fence. This pulse, while unpleasant, is designed to deter rather than cause lasting harm. The system consists of several key components:
- Energizer (Charger): This is the heart of the system, converting low-voltage power (from a battery, mains electricity, or solar panel) into high-voltage, low-amperage pulses.
- Fence Wire: The conductive material (usually wire or tape) that carries the electric pulse.
- Insulators: These prevent the electric current from grounding out through the fence posts.
- Grounding System: A crucial element, providing a return path for the electricity back to the energizer.
- Fence Tester: A tool to measure the voltage on the fence line.
The energizer sends a pulse of electricity through the fence wire at regular intervals (typically once per second). When an animal touches the wire, the circuit is completed, and the animal receives a brief shock. The intensity of the shock depends on the voltage of the energizer and the resistance of the animal’s body and the ground.
Why Electric Fences Fail
Electric fences can fail for a variety of reasons. Understanding these common problems can help you troubleshoot more effectively:
- Dead Energizer: The energizer itself may have failed, or the power source (battery, mains supply, or solar panel) may be depleted or disconnected.
- Grounding Issues: Poor grounding is a very common problem, preventing the circuit from completing properly.
- Wire Breaks: Broken or corroded wires interrupt the flow of electricity.
- Insulator Failures: Damaged or degraded insulators allow the current to leak to the ground.
- Vegetation Touching the Fence: Weeds and other vegetation can ground out the fence, reducing voltage.
- Component Failure: Other components, such as the fence controller or connections, can fail.
Initial Visual Inspection: The First Line of Defense
Before reaching for any tools, start with a thorough visual inspection. This can often reveal the most obvious problems. Walk the entire length of your fence, carefully looking for the following: (See Also: How to Unlock the Fence in Red Dead Redemption 2: A Step-by-Step Guide)
- Broken Wires: Examine the fence wire for any breaks, kinks, or areas where the wire has been cut or damaged. Even a small break can significantly reduce the fence’s effectiveness.
- Loose Connections: Check all connections, including those at the energizer, around corners, and where wires are joined. Ensure they are secure and free of corrosion.
- Damaged Insulators: Inspect the insulators for cracks, damage, or signs of wear. Cracked or broken insulators allow the current to leak to the ground.
- Vegetation Contact: Look for any vegetation (grass, weeds, branches) touching the fence wires. This is a common cause of short circuits and reduced voltage. Clear any vegetation that is in contact with the fence.
- Grounding System: Make sure the grounding rods are securely in the ground and that the connections to the energizer and fence wire are clean and tight.
During your visual inspection, pay close attention to areas where the fence is more susceptible to damage, such as gates, corners, and areas with heavy animal traffic or vegetation growth. This initial inspection can often identify the root cause of the problem without needing further testing.
Testing Your Electric Fence: Step-by-Step Guide
Now, let’s move on to the practical steps of testing your electric fence. You’ll need a few essential tools:
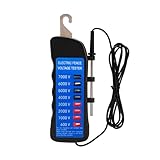
- Digital Voltmeter (Fence Tester): A specialized tool designed to measure the voltage on electric fences.
- Gloves: For safety.
- Tools for Repairs: Wire cutters, pliers, etc.
Follow these steps to test your fence:
- Safety First: Always wear appropriate safety gear, including gloves, when working with electric fences. Turn off the energizer before starting any repairs.
- Check the Energizer: Ensure the energizer is powered on and functioning. Check the power source (battery, mains supply, or solar panel). Look for any indicator lights on the energizer that might signal a fault.
- Test the Energizer Output: With the energizer on, use your fence tester to measure the voltage at the energizer terminals (output posts). The voltage should be within the energizer’s specified range (typically several thousand volts). If the voltage is low or nonexistent, the energizer may be faulty.
- Test the Fence Line Voltage: Walk along the fence line, testing the voltage at several points using your fence tester. Attach the ground clip of your tester to a grounding rod or another known ground source, and touch the probe to the fence wire. The voltage should be consistent along the entire fence line. A significant drop in voltage indicates a problem, such as a short circuit or wire break.
- Check for Shorts: If the voltage is low, look for shorts. Turn off the energizer and visually inspect the fence for any areas where the wire is touching the ground or vegetation. Also, check the insulators for damage.
- Test the Grounding System: A poor grounding system is a very common cause of fence failure. Use your fence tester to measure the voltage between the ground wire of the energizer and a grounding rod. A good grounding system should read close to zero volts. If the voltage is high, the grounding system is inadequate. You may need to add more grounding rods or improve the connections.
- Isolate Sections (If Necessary): If the voltage is low, try isolating sections of the fence by disconnecting sections. This will help you pinpoint the location of the problem. Test the voltage on the remaining sections to see if it improves.
- Repair or Replace Faulty Components: Once you’ve identified the problem, repair or replace any faulty components, such as broken wires, damaged insulators, or a faulty energizer.
- Retest: After making any repairs, retest the fence to ensure it’s functioning correctly.
Using a Digital Voltmeter (fence Tester)
A digital voltmeter (fence tester) is your essential tool for testing an electric fence. Here’s how to use it effectively:
- Turn on the Energizer: Make sure your energizer is turned on and ready to go.
- Connect the Ground Clip: Attach the ground clip of the fence tester to a known ground source, such as a grounding rod or a metal post that is in good contact with the ground.
- Touch the Probe to the Fence Wire: Carefully touch the probe of the fence tester to the fence wire. Make sure you’re wearing gloves for safety.
- Read the Voltage: The digital display on the fence tester will show the voltage reading. A healthy electric fence typically delivers several thousand volts. The exact voltage will depend on the energizer and the length and condition of the fence.
- Take Multiple Readings: Take voltage readings at several points along the fence line to ensure the voltage is consistent. If you see a significant drop in voltage, that indicates a problem.
Important Note: Never rely on touching the fence wire to determine if the fence is working. The shock can be deceptive, and the voltage may be too low to be felt but still effective. Always use a fence tester to get an accurate reading.
Troubleshooting Common Problems
Here’s how to address some common problems you might encounter when testing your electric fence: (See Also: How to Raise a Fence: A Step-by-Step Guide for Diy Success)
- Low Voltage:
- Check for Shorts: Look for vegetation touching the fence wire or damaged insulators.
- Examine the Grounding System: Make sure the grounding rods are properly installed and the connections are secure.
- Inspect the Fence Wire: Look for breaks or damage in the wire.
- Test the Energizer: The energizer might be faulty.
- Check the Power Source: Ensure the energizer is connected to a working power source (battery, mains supply, or solar panel).
- Inspect the Energizer: The energizer might be damaged.
- Check the Connections: Make sure all connections are secure.
- Locate the Problem Area: Isolate sections of the fence to pinpoint the source of the issue.
- Inspect the Wire: Look for breaks or damage in the wire in the affected section.
- Check the Insulators: Damaged insulators can cause voltage drops.
Advanced Troubleshooting Techniques
If the basic tests don’t reveal the problem, you may need to use more advanced troubleshooting techniques:
- Using a Fault Finder: A fault finder is a specialized tool that can help you pinpoint the location of a short circuit. It works by sending a signal down the fence wire and then detecting the signal’s strength at various points.
- Sectionalizing the Fence: Divide your fence into sections and test each section individually. This can help you isolate the problem area. Disconnect the fence wire at various points to isolate sections. Test each section with your fence tester. If a section tests well, you know the problem is elsewhere.
- Checking for Internal Faults in the Energizer: If you suspect the energizer is faulty, consult the manufacturer’s instructions for testing it. You may need to take the energizer to a qualified technician for repair.
- Checking the Grounding System with a Multimeter: A multimeter can be used to check the resistance of the grounding system. Disconnect the fence wire from the energizer. Connect one probe of the multimeter to the ground terminal of the energizer and the other probe to a grounding rod. A low resistance reading (less than 1 ohm) indicates a good grounding system.
Maintaining Your Electric Fence
Regular maintenance is crucial to keep your electric fence working effectively and to prevent problems from arising. Here are some key maintenance tasks:
- Regular Inspections: Perform regular visual inspections of the fence, looking for any signs of damage or wear.
- Vegetation Control: Keep vegetation trimmed back from the fence wire to prevent short circuits.
- Grounding System Maintenance: Check the grounding rods and connections regularly. Ensure the ground rods are firmly in the ground and free of corrosion.
- Tighten Connections: Periodically check and tighten all connections, including those at the energizer, corners, and joints.
- Energizer Maintenance: Follow the manufacturer’s recommendations for energizer maintenance. This may include cleaning the energizer and checking the battery (if applicable).
- Seasonal Adjustments: In areas with significant seasonal changes, adjust the fence’s voltage as needed. Vegetation growth in the summer might require more frequent clearing, while in winter, you might need to check the grounding system for frost.
- Record Keeping: Keep a record of your fence maintenance activities, including inspection dates, repairs, and voltage readings. This can help you identify trends and potential problems.
Frequently Asked Questions (people Also Ask)
Let’s address some common questions people have about electric fences:
How Often Should I Test My Electric Fence?
We recommend testing your electric fence at least once a week, or more frequently if you have livestock that are prone to escaping or if you live in an area with heavy vegetation growth. More frequent testing is also recommended during periods of high risk, such as breeding season or when introducing new animals.
What Voltage Should My Electric Fence Be?
The ideal voltage for an electric fence depends on the type of animals you are containing and the length of the fence. Generally, a voltage of at least 3,000 volts is recommended. For larger animals or longer fences, you may need a higher voltage. Always refer to your energizer’s specifications for recommended voltage levels.
How Do I Improve My Electric Fence Grounding?
To improve your electric fence grounding, ensure you have a sufficient number of grounding rods (typically three or more, spaced 10 feet apart). The rods should be driven deep into the ground. Use heavy-duty, galvanized ground wire and make sure all connections are clean and tight. Also, make sure the ground rods are in an area with consistently moist soil. (See Also: How to Build a Cat Fence: Your Ultimate Guide for Safe Outdoor Adventures)
What Happens If My Electric Fence Is Not Working?
If your electric fence is not working, your animals may escape, or intruders may enter your property. In addition, a malfunctioning fence can be a safety hazard. That’s why it is so important to test your electric fence regularly.
Can I Use Any Wire for an Electric Fence?
No, you should use specialized electric fence wire or tape designed for the purpose. Regular wire may not be suitable, and it could be dangerous. Electric fence wire is designed to be conductive and durable. Using the wrong type of wire can lead to poor performance and potential hazards.
How Can I Protect My Electric Fence From Lightning?
To protect your electric fence from lightning, install a lightning diverter. A lightning diverter is designed to shunt the lightning surge to the ground, protecting the energizer. You should also ensure your grounding system is properly installed and maintained.
Final Verdict
Effectively checking your electric fence involves regular visual inspections and voltage testing with a fence tester. Addressing issues like short circuits, grounding problems, and energizer failures is crucial for maintaining a secure and functional fence. By following these steps, you can ensure your fence effectively protects your property and livestock.
- How Much Does It Cost to Fence Your Yard? Get a Free Estimate!
- New Fence Roi: How Much Does a New Fence Add to Home Value? (expert Guide)
- Fast Growing Trees to Plant: Quick Shade & Privacy Solutions
- Best Plant Based Protein Oatmeal: Reviews & Ratings
- Plant Therapy Nature Shield: Protect Your Family Naturally
Remember, a well-maintained electric fence is a safe and reliable barrier. Don’t hesitate to troubleshoot any issues you find. Consistent monitoring and timely repairs are key to a successful electric fence system. Prioritizing these steps will help you prevent escapes, protect your property, and ensure the safety of your animals.
Recommended Products