Is your once-vibrant plant now looking droopy, with yellowing leaves and soggy soil? You might be dealing with the common plant ailment: overwatering. It’s a mistake even experienced gardeners make, and it can be devastating if not addressed quickly.
Understanding how to save a plant that’s been overwatered is crucial for any plant parent. This guide will walk you through the symptoms, the reasons behind overwatering, and the step-by-step methods to revive your beloved greenery. We’ll cover everything from diagnosis to recovery, ensuring your plants thrive once more.
Don’t despair! With the right knowledge and a little care, you can nurse your waterlogged plants back to health. Let’s dive in and learn how to bring your plants back to their former glory, preventing this issue in the future.
Identifying Overwatering: Symptoms and Diagnosis
Before you can rescue a plant, you need to correctly identify the problem. Overwatering presents a range of telltale signs that differ slightly depending on the plant species, but some common indicators are present across the board. Recognizing these symptoms early on is key to a successful recovery. Ignoring them can lead to root rot, which is often fatal.
Leaf Symptoms
The leaves are often the first place you’ll notice the effects of overwatering. Observe the following leaf characteristics closely:
- Yellowing Leaves (Chlorosis): This is perhaps the most common symptom. Leaves will turn yellow, starting at the bottom of the plant and working their way upwards. The yellowing is caused by the roots being unable to absorb nutrients effectively due to lack of oxygen.
- Drooping Leaves: Leaves may appear limp and droopy, even if the soil is still wet. This is because the roots are unable to transport water to the rest of the plant. The leaves look similar to those of a plant that is underwatered, which can be confusing.
- Brown Spots or Blisters: Brown spots, often surrounded by a yellow halo, can appear on the leaves. These indicate cell death due to waterlogged conditions. Blisters or edema (water-filled bumps) can also develop on leaves.
- Leaf Drop: In severe cases, the plant may start shedding leaves prematurely. This is a desperate attempt by the plant to conserve energy and reduce water loss. The loss can be significant and rapid.
Soil and Stem Symptoms
Examine the soil and stems for these additional clues:
- Soggy Soil: The soil will feel consistently wet to the touch. It may even have standing water on the surface, or the water may drain very slowly after watering. This lack of drainage is a major indicator.
- Foul Odor: A musty or rotten smell emanating from the soil is a sign of root rot, which is often caused by overwatering. The smell is caused by the decomposition of the roots.
- Soft, Mushy Stems: The stems of the plant may become soft and mushy, especially near the base. This indicates that the stem tissues are breaking down. This is a serious sign.
- Mold or Fungus: The surface of the soil may develop mold or fungal growth due to the consistently damp environment. This can further damage the plant.
Root Symptoms (requires Examination)
Examining the roots is the most definitive way to diagnose overwatering, but it requires carefully removing the plant from its pot. Only do this if you suspect severe root rot.
- Dark, Mushy Roots: Healthy roots are typically firm and white or light-colored. Overwatered roots will be dark brown or black and mushy. They may also be slimy.
- Lack of New Root Growth: Overwatered plants may stop producing new roots. The existing roots will be struggling to survive.
- Rotten Smell from Roots: Just as with the soil, a foul odor from the roots is a clear sign of root rot. This indicates the roots are decaying.
If you observe any combination of these symptoms, your plant is likely suffering from overwatering. Now, the question becomes how to save a plant that’s been overwatered.
Understanding the Causes of Overwatering
Overwatering isn’t always about watering too frequently; it’s often about a combination of factors that contribute to waterlogged conditions. Understanding these causes is crucial to preventing future problems. It’s important to understand the why, not just the how.
Incorrect Watering Schedule
This is the most common culprit. Many plant owners water their plants on a set schedule, regardless of the plant’s needs. Plants require different amounts of water depending on species, the time of year, and their environment. Watering too often prevents the soil from drying out sufficiently between waterings.
How to Avoid: Observe your plant’s needs. Check the soil moisture before watering. A good rule of thumb is to water only when the top inch or two of soil is dry. Adjust your watering frequency based on the plant’s specific requirements.
Poor Drainage
If the pot doesn’t have drainage holes, or if the drainage holes are blocked, excess water has nowhere to go. This leads to waterlogged soil and root rot. Even with drainage, the soil composition impacts drainage.
How to Avoid: Always use pots with drainage holes. Ensure the drainage holes are not blocked by rocks or other materials. Use a well-draining potting mix, such as one designed for the specific plant type. Consider adding perlite or vermiculite to the soil mix to improve drainage.
Type of Potting Mix
The type of potting mix you use greatly impacts the soil’s ability to drain and retain water. Dense, heavy potting mixes retain too much water and can lead to overwatering, even if you water infrequently. The wrong mix can suffocate the roots.
How to Avoid: Use a potting mix that is appropriate for the plant’s needs. Many plants thrive in a well-draining mix that contains a combination of peat moss, perlite, and vermiculite. Research the specific needs of your plant and choose a mix accordingly. (See Also: Expert Guide: How to Plant a Chestnut Tree for Bountiful Harvests)
Low Light Conditions
Plants in low-light environments use less water because they aren’t actively photosynthesizing as much. If you water them the same amount as plants in bright light, you’re likely overwatering them. Lower light slows down the plant’s metabolic rate.
How to Avoid: Adjust your watering schedule based on the amount of light your plant receives. Plants in low light require less water. Consider moving your plant to a brighter location or supplementing with grow lights. Be mindful of the plant’s specific light needs.
Pot Size and Plant Size
A plant in a pot that is too large for its root system can be easily overwatered. The excess soil retains more water, and the plant’s roots may not be able to absorb it quickly enough. The pot size should match the root ball size.
How to Avoid: Choose a pot that is only slightly larger than the plant’s root ball. When repotting, only increase the pot size by one or two inches in diameter. Avoid repotting a plant into a pot that is too large.
Lack of Air Circulation
Poor air circulation around the plant can slow down the evaporation of water from the soil. This creates a consistently damp environment, increasing the risk of overwatering. Stagnant air allows for mold and fungal growth.
How to Avoid: Ensure good air circulation around your plants. Avoid overcrowding plants and place them in areas with good airflow. Consider using a fan to gently circulate the air, especially in humid environments.
Other Factors
Time of Year: Plants require less water during the winter months when they are dormant or growing more slowly. Adjust your watering schedule accordingly. Plant Species: Some plants are naturally more susceptible to overwatering than others. Research the specific watering needs of your plant. Humidity: High humidity reduces the amount of water the plant loses through transpiration. Reduce watering frequency if the humidity is very high.
Step-by-Step Guide: How to Save a Plant That’s Been Overwatered
Now that you’ve identified the problem and understand the causes, it’s time to take action. Here’s a step-by-step guide on how to save a plant that’s been overwatered. The sooner you act, the better your chances of success.
Step 1: Assess the Damage and Remove Excess Water
Before you begin, carefully assess the severity of the situation. Examine the plant for the symptoms discussed earlier. This will help you determine the appropriate course of action.
If the soil is extremely wet, carefully tip the pot to allow excess water to drain out of the drainage holes. You may need to gently lift the plant and tilt it to encourage drainage. Do this over a sink or outdoors. Avoid letting the plant sit in standing water.
Step 2: Remove the Plant From the Pot
Gently remove the plant from its pot. If the plant is stuck, you may need to tap the sides of the pot or use a trowel to loosen the soil. Be careful not to damage the roots. This is crucial for assessing root rot.
Step 3: Inspect the Roots
Carefully examine the roots for signs of root rot. Look for dark, mushy, or slimy roots. Sniff the roots; a foul odor indicates root rot. If you find extensive root rot, you’ll need to take more drastic measures.
Step 4: Prune Damaged Roots
Using clean, sharp pruning shears or scissors, carefully trim away any dead or rotting roots. Cut back to healthy, firm, white or light-colored roots. Remove as much of the affected roots as possible without damaging the healthy ones. This encourages new root growth. Disinfect your pruning shears with rubbing alcohol before and after pruning to prevent the spread of disease.
Step 5: Replace the Soil (optional, but Recommended)
If the soil is heavily waterlogged or if you suspect root rot, it’s best to replace it. Gently remove as much of the old soil from the roots as possible. This removes the source of the problem. (See Also: Learn How Do You Plant Eggplant: A Beginner’s Guide)
Repot the plant in a clean pot with fresh, well-draining potting mix. Choose a pot that is only slightly larger than the plant’s root ball. Make sure the pot has drainage holes. This step is critical for recovery.
Step 6: Repotting the Plant
If you’re repotting, place a layer of fresh potting mix in the bottom of the pot. Center the plant in the pot and fill in around the roots with the new potting mix, gently firming it around the roots. Ensure the plant is planted at the same depth as it was previously. Do not pack the soil too tightly.
Step 7: Water Sparingly (or Not at All)
After repotting, do not water the plant immediately. Allow the soil to dry out slightly before watering again. Overwatering is the enemy here. Monitor the soil moisture carefully. You may not need to water for a week or two, depending on the plant species and the environment.
Step 8: Provide Proper Light and Air Circulation
Place the plant in a location with the appropriate amount of light for its species. Avoid direct sunlight, especially if the plant is stressed. Ensure good air circulation around the plant to help the soil dry out. Consider using a fan.
Step 9: Monitor the Plant’s Progress
Carefully monitor the plant for signs of recovery. Look for new growth, firm leaves, and a return to its normal color. Be patient; it may take several weeks or months for the plant to fully recover. Avoid fertilizing the plant until it shows signs of new growth, as this can further stress the roots.
Step 10: Adjust Watering Habits for the Future
Once the plant has recovered, adjust your watering habits to prevent overwatering in the future. Check the soil moisture regularly and water only when the top inch or two of soil is dry. Consider using a moisture meter to help you determine when to water.
Advanced Techniques for Severe Cases
In severe cases of overwatering, more drastic measures may be necessary. These techniques are for plants with significant root rot or those that are struggling to recover using the basic methods.
Root Washing
Root washing is a technique used to remove excess soil and contaminants from the roots. Gently wash the roots under cool, running water, removing all of the old soil. This allows for a fresh start. Carefully inspect the roots for any remaining rot, and prune as needed. Repot the plant in fresh potting mix and follow the recovery steps.
Stem Cuttings
If the plant has suffered significant root damage, you may want to take stem cuttings to propagate new plants. Choose healthy stems and remove the lower leaves. Place the cuttings in water or a well-draining potting mix to encourage root growth. This gives you a backup plan in case the original plant doesn’t survive.
Fungicide Treatment
If root rot is severe, you may need to use a fungicide to prevent further spread. Choose a fungicide specifically designed for root rot and follow the manufacturer’s instructions carefully. This is a last resort, as fungicides can sometimes harm the plant. Always test in a small area first.
Preventing Overwatering: Tips for Healthy Plants
Prevention is always better than cure. By implementing these tips, you can significantly reduce the risk of overwatering and keep your plants healthy and thriving. Taking preventative measures will save you time and stress.
Use the Right Pot
Choose pots with drainage holes to allow excess water to escape. The pot’s material also matters. Unglazed clay pots are porous and allow for better drainage and air circulation than plastic pots. Consider the pot’s size relative to the plant’s root ball.
Choose the Right Potting Mix
Use a well-draining potting mix that is appropriate for the plant’s species. Avoid heavy, compacted mixes that retain too much water. Add perlite or vermiculite to improve drainage. Research your plant’s specific needs to choose the best mix.
Water Properly
The most important tip is to water properly. Check the soil moisture before watering. Water thoroughly, allowing excess water to drain out of the drainage holes. Never water on a schedule. Water only when the soil is dry to the touch. (See Also: How to Plant Sweet Potatoes in the Ground: A Simple Guide)
Understand Your Plant’s Needs
Research the specific watering needs of each plant in your collection. Some plants require more water than others. Consider the plant’s light requirements, humidity preferences, and dormancy periods. Tailor your care to each plant’s unique needs.
Monitor Your Plants Regularly
Regularly inspect your plants for signs of overwatering or underwatering. Look for changes in leaf color, drooping, or other symptoms. Early detection is key to preventing serious problems. Observe your plants closely on a weekly basis.
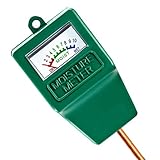
Consider Using a Moisture Meter
A moisture meter can help you accurately gauge the moisture level in the soil. This can be especially helpful for beginners or for plants with specific watering requirements. Moisture meters take the guesswork out of watering. They are a valuable tool.
Adjust Watering for the Seasons
Plants require less water during the winter months when they are dormant or growing more slowly. Reduce your watering frequency accordingly. Increase watering during the active growing season. The environment changes the watering needs.
Provide Adequate Light
Plants in low-light environments require less water. Ensure your plants receive the appropriate amount of light for their species. Insufficient light can lead to overwatering because the plant uses less water. Consider moving your plants to brighter locations.
Ensure Good Air Circulation
Good air circulation helps the soil dry out more quickly. Avoid overcrowding plants and ensure there is adequate space between them. Use a fan to circulate the air in humid environments. Air circulation is essential for plant health.
Don’t Fertilize Overwatered Plants
Overwatered plants are often stressed and may not be able to absorb nutrients effectively. Fertilizing an overwatered plant can further damage the roots. Wait until the plant has recovered before fertilizing. Give the plant time to recover before adding fertilizer.
Common Questions About Overwatering
Here are some frequently asked questions about overwatering and how to handle it:
Can a Plant Recover From Overwatering?
Yes, in most cases, a plant can recover from overwatering if the problem is addressed quickly. The chances of survival depend on the severity of the damage and how quickly you take action. The sooner you act, the better your chances of saving your plant.
How Long Does It Take for a Plant to Recover From Overwatering?
The recovery time varies depending on the severity of the overwatering and the plant species. It can take several weeks or even months for a plant to fully recover. Be patient and continue to monitor the plant’s progress.
What Should I Do If My Plant Has Root Rot?
If your plant has root rot, you’ll need to take more aggressive action. Remove the plant from its pot and carefully examine the roots. Prune away any dead or rotting roots. Repot the plant in fresh, well-draining potting mix. Consider using a fungicide. Root rot is a serious issue that requires prompt attention.
How Often Should I Water My Plants?
The watering frequency depends on the plant species, the environment, and the season. As a general rule, water only when the top inch or two of soil is dry. Research the specific watering needs of each plant in your collection. Avoid watering on a schedule. Always check the soil moisture first.
Can I Save a Plant If It Has Completely Lost Its Leaves?
It’s challenging, but not impossible, to save a plant that has completely lost its leaves due to overwatering. Examine the roots for root rot and prune away any dead or rotting roots. Repot the plant in fresh potting mix and provide proper light and air circulation. If the roots are healthy, there’s still a chance the plant can regrow leaves. Patience is key. The plant might still have reserves.
Conclusion
Knowing how to save a plant that’s been overwatered is an essential skill for any plant enthusiast. By recognizing the symptoms, understanding the causes, and following the step-by-step guide, you can successfully revive your waterlogged plants. Remember to adjust your watering practices, choose the right potting mix, and provide proper care to prevent this issue from happening again. With a little care and attention, your plants can thrive. Don’t give up on your plants; they can often be saved!
Recommended Products