Are your snake plants multiplying like crazy? If you’ve noticed little baby snake plants, also known as pups, popping up around the base of your established plant, congratulations! You’re witnessing the natural propagation of these incredibly resilient and popular houseplants. These pups can be separated and repotted, allowing you to expand your collection or share these low-maintenance beauties with friends.
This comprehensive guide will walk you through everything you need to know about how to repot snake plant pups successfully. We’ll cover optimal timing, necessary supplies, and step-by-step instructions to ensure your new snake plants thrive. Get ready to multiply your snake plant family and enjoy even more of their air-purifying benefits and striking architectural appeal!
Whether you’re a seasoned plant parent or a beginner, this guide will provide you with the knowledge and confidence to propagate your snake plants with ease. We’ll delve into the best practices for soil, light, and watering, ensuring your pups establish strong root systems and flourish. Let’s get started!
Understanding Snake Plant Pups
Before diving into the repotting process, it’s essential to understand what snake plant pups are and why they appear. Snake plants, scientifically known as *Sansevieria trifasciata* (now often classified under *Dracaena trifasciata*), are known for their ability to produce new plants through rhizomes. These rhizomes, which are underground stems, spread outwards and eventually sprout new shoots, forming the pups.
These pups are genetically identical to the parent plant. They emerge from the soil, resembling miniature versions of the adult snake plant. The emergence of pups is a sign of a healthy and thriving snake plant, indicating that the plant is well-established and has sufficient energy to reproduce. This natural propagation method is a key reason why snake plants are so easy to multiply.
Identifying Pups
Identifying snake plant pups is relatively straightforward. They appear as small, independent plants growing from the base of the parent plant. They’ll have their own leaves, although they’ll be smaller than the adult plant’s leaves. You’ll typically find them clustered around the base, sometimes tightly packed together.
Look for distinct, separate leaves emerging from the soil. You might also notice a slight swelling or bulging of the soil surface where the pup is developing. Careful observation will reveal the presence of the pups, ready for separation and repotting.
Why Snake Plants Produce Pups
Snake plants produce pups as a natural method of propagation. This asexual reproduction allows the plant to expand its colony and colonize its environment. The pups share the same genetic makeup as the parent plant, ensuring the continuation of desirable traits.
The energy that the parent plant expends to create pups is a sign of overall health and vitality. A healthy snake plant is more likely to produce pups than a stressed or unhealthy one. The production of pups is also influenced by environmental factors such as light, water, and nutrient availability.
Timing Is Everything: When to Repot Snake Plant Pups
The success of repotting snake plant pups largely depends on timing. Repotting at the wrong time can stress the plants and hinder their growth. The ideal time to repot is during the active growing season, which is typically spring and summer.
During these months, the plant has more energy to dedicate to root development and new growth. This gives the pups the best chance to establish themselves in their new pots. Repotting during the dormant season (fall and winter) can be done, but it may slow down the pup’s growth.
Signs Pups Are Ready to Repot
Several signs indicate that your snake plant pups are ready to be repotted. The most obvious sign is when the pup has developed a sufficient root system. Gently remove the plant from its pot and observe the roots. If the roots are tightly packed and circling the pot, it’s time to repot.
Another sign is the size of the pup. The pup should be large enough to handle independently, with several established leaves. Generally, pups that are at least one-third to one-half the size of the parent plant are ready for repotting. If you see multiple pups crowded together, it’s a good time to separate and repot them.
Avoiding Repotting During Dormancy
While snake plants are resilient, repotting during their dormant season can increase the risk of root rot and slow growth. During fall and winter, the plant’s metabolic processes slow down, and it’s less able to cope with the stress of repotting. Avoid repotting if the plant is showing signs of stress, such as yellowing leaves or stunted growth.
If you must repot during dormancy, be extra careful. Use a well-draining potting mix, water sparingly, and provide bright, indirect light. Monitor the plant closely for any signs of distress. If possible, wait until spring to repot for the best results. (See Also: Unlocking Plant Growth: How Does a Plant Get Minerals?)
Gathering Your Supplies
Before you begin the repotting process, gather all the necessary supplies. Having everything readily available will make the process smoother and more efficient. Here’s a list of essential items:
- New Pots: Choose pots with drainage holes that are slightly larger than the root ball of the pups.
- Potting Mix: Use a well-draining potting mix specifically formulated for succulents or cacti.
- Gloves: Optional, but recommended to protect your hands and prevent the spread of bacteria.
- Trowel or Small Shovel: For gently removing the pups from the parent plant and handling the soil.
- Scissors or Knife: For separating the pups from the parent plant if necessary.
- Watering Can or Bottle: For watering the newly repotted pups.
- Optional: Horticultural charcoal (to improve drainage) and rooting hormone (to encourage root growth).
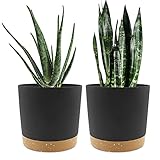
Choosing the Right Pots
Selecting the right pots is crucial for the health and well-being of your snake plant pups. Choose pots that are only slightly larger than the root ball of the pup. Overly large pots can lead to overwatering and root rot, as the excess soil retains too much moisture.
Terracotta pots are a good option because they are porous and allow excess moisture to evaporate. Plastic pots are also suitable, but ensure they have drainage holes to prevent waterlogging. Consider the aesthetic of the pot as well, as it will be a decorative element in your home.
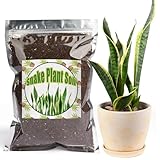
Selecting the Best Potting Mix
Snake plants thrive in well-draining soil. A potting mix specifically designed for succulents or cacti is ideal. These mixes typically contain a blend of ingredients that promote drainage and aeration, such as perlite, sand, and bark. Avoid using regular potting soil, as it retains too much moisture.
You can also create your own potting mix by combining equal parts of potting soil, perlite, and coarse sand. Horticultural charcoal can also be added to improve drainage and prevent root rot. The goal is to create a mix that allows excess water to drain quickly, preventing the roots from sitting in water.
Step-by-Step Guide to Repotting Snake Plant Pups
Now that you have your supplies ready, it’s time to repot your snake plant pups. Follow these step-by-step instructions for a successful repotting process.
- Prepare the New Pots: Fill the new pots with the succulent or cactus potting mix, leaving about an inch or two of space at the top.
- Gently Remove the Parent Plant: Carefully remove the parent plant from its current pot. You may need to gently loosen the soil around the edges of the pot.
- Locate the Pups: Identify the pups you want to repot. Gently separate them from the parent plant.
- Separate the Pups (if necessary): If the pups are tightly clustered, you may need to gently separate them. Use your hands or a clean knife to carefully separate the roots.
- Plant the Pups: Make a small hole in the potting mix of the new pot and carefully place the pup in the hole. Ensure the base of the leaves is at the soil level.
- Fill in the Soil: Gently fill in the soil around the roots of the pup, making sure to support the plant.
- Water Sparingly: Water the newly repotted pups lightly, allowing the excess water to drain out of the drainage holes.
- Provide Bright, Indirect Light: Place the newly repotted pups in a location with bright, indirect light. Avoid direct sunlight, which can scorch the leaves.
- Monitor and Care: Monitor the pups for any signs of stress, such as wilting or yellowing leaves. Water only when the soil has dried out completely.
Separating Pups From the Parent Plant
Separating the pups from the parent plant requires a gentle touch. If the pups are loosely attached, you may be able to gently pull them apart by hand. However, if the pups are tightly clustered or have intertwined roots, you may need to use a clean knife or scissors to separate them.
Carefully cut through the connecting roots, making sure to leave as much root system attached to the pup as possible. Be gentle to avoid damaging the roots. If you are separating pups from a parent plant, try to take a portion of the rhizome with each pup, as this will help them establish faster.
Planting the Pups: Depth and Placement
When planting the pups in their new pots, ensure you plant them at the correct depth. The base of the leaves should be at the soil level. Avoid burying the leaves, as this can lead to rot. Gently firm the soil around the roots to provide support for the plant.
Make sure the plant is stable in the pot. If it’s wobbly, add more soil to provide additional support. The goal is to create a stable environment that encourages root growth. Make sure to space the pups appropriately if you are repotting multiple pups in the same pot.
Post-Repotting Care: Nurturing Your New Snake Plants
After repotting your snake plant pups, proper care is essential to ensure their success. Provide them with the right environment and care to help them thrive. This includes proper watering, lighting, and fertilization.
Consistent care will help your pups establish strong root systems and grow into healthy, mature snake plants. The following are crucial steps to take in the weeks after repotting.
Watering After Repotting
Watering is a crucial aspect of post-repotting care. Avoid overwatering, as this is a common cause of root rot in snake plants. Water the newly repotted pups sparingly, allowing the soil to dry out completely between waterings. The frequency of watering will depend on the environment, including temperature and humidity.
When you do water, water thoroughly until water drains from the drainage holes. Ensure the pot isn’t sitting in water. If you notice the leaves are yellowing or the soil is consistently soggy, reduce watering frequency. Monitor the soil moisture regularly. (See Also: Expert Guide: How to Take Care of a Grape Plant for Bumper Harvests)
Light Requirements and Placement
Snake plants thrive in bright, indirect light. After repotting, place the pups in a location with this type of light. Avoid direct sunlight, especially during the hottest parts of the day, as it can scorch the leaves.
If you don’t have a spot with bright, indirect light, you can supplement with a grow light. Rotate the pot occasionally to ensure even light exposure. Observe the plant for signs of insufficient light, such as leggy growth or pale leaves. Adjust the placement accordingly.
Fertilizing Your Snake Plants
Snake plants are not heavy feeders, so fertilizing is not always necessary, especially in the first few months after repotting. However, during the growing season (spring and summer), you can fertilize them sparingly to encourage growth.
Use a balanced liquid fertilizer diluted to half strength. Apply the fertilizer once a month during the growing season. Avoid over-fertilizing, as this can lead to salt buildup in the soil, which can harm the plant. Reduce or eliminate fertilization during the dormant season (fall and winter).
Common Problems and Solutions
Even with the best care, you may encounter some problems when repotting snake plant pups. Here are some common issues and how to address them:
- Root Rot: This is often caused by overwatering. Symptoms include yellowing leaves and a mushy stem. To fix it, allow the soil to dry out completely. If the rot is severe, you may need to repot the plant in fresh, well-draining soil.
- Yellowing Leaves: This can be caused by overwatering, underwatering, or insufficient light. Assess the watering habits and light exposure, and adjust accordingly.
- Wrinkled Leaves: This is a sign of underwatering. Water the plant thoroughly when the soil is dry.
- Pests: Snake plants are generally pest-resistant, but they can occasionally be affected by mealybugs or spider mites. Treat any infestations with insecticidal soap or neem oil.
Troubleshooting: Addressing Common Issues
Despite your best efforts, problems may arise when repotting snake plant pups. Recognizing and addressing these issues promptly can help you save your plants. Here’s a deeper dive into common problems and their solutions.
Root Rot: Identification and Treatment
Root rot is a serious issue that can quickly kill a snake plant. It’s usually caused by overwatering or poor drainage. The first signs of root rot are often yellowing leaves, which may also be soft and mushy. The stem near the soil line may also become soft and discolored.
To address root rot, remove the plant from its pot. Examine the roots. Healthy roots are firm and white or light-colored, while rotten roots are brown or black and mushy. Cut away any rotten roots with a clean knife or scissors. Repot the plant in fresh, well-draining soil and a clean pot. Allow the soil to dry completely between waterings.
Leaf Problems: Yellowing, Browning, and Spotting
Leaf problems can indicate a variety of issues. Yellowing leaves can be caused by overwatering, underwatering, or insufficient light. Browning leaves may be a sign of sunburn or dry air. Spots on the leaves can be caused by fungal infections or pest infestations.
To address leaf problems, assess the plant’s environment and care routine. If the leaves are yellowing, check the soil moisture. If it’s consistently wet, reduce watering. If the leaves are browning, move the plant away from direct sunlight or increase humidity. For spots, treat with a fungicide or insecticidal soap, depending on the cause.
Pest Infestations: Prevention and Control
While snake plants are relatively pest-resistant, they can still be affected by mealybugs, spider mites, and scale. These pests can weaken the plant and cause damage to the leaves. Inspect your plants regularly for any signs of infestation.
To prevent pest infestations, quarantine new plants before introducing them to your existing collection. Keep the plant clean by wiping the leaves with a damp cloth. If you notice pests, treat them with insecticidal soap, neem oil, or other appropriate insecticides. Repeat treatments as necessary until the infestation is gone.
Advanced Propagation Techniques
While separating pups is the most common method of propagating snake plants, there are other techniques you can try. These advanced methods can be useful for propagating snake plants without pups or for experimenting with different propagation methods.
Experimenting with different methods can be an exciting way to expand your snake plant collection or to learn more about the plant’s characteristics. Remember to be patient, as these methods can sometimes take longer than separating pups. (See Also: How to Plant Catnip in a Pot: A Complete Guide)
Leaf Cuttings Propagation
Leaf cuttings are a popular method of propagating snake plants. Cut a healthy leaf from the parent plant and let it callous over for a few days. Then, place the cutting in water or directly in soil. When using water, ensure the bottom of the leaf is submerged, but not the entire leaf.
If you’re using soil, plant the cutting in well-draining potting mix. Keep the soil slightly moist. Roots will develop from the base of the cutting. This method can take several weeks or months. Be patient, and keep the cutting in a warm, bright location.
Division Propagation
Division propagation involves separating the rhizomes of the snake plant. This method is best done during the active growing season. Remove the plant from its pot and gently separate the rhizomes with your hands or a clean knife.
Each section of rhizome should have at least a few leaves. Plant each section in its own pot with well-draining soil. Water sparingly until new growth appears. This method is similar to separating pups, but it allows you to propagate plants that haven’t produced pups yet.
Propagation Success: Factors to Consider
The success of your propagation efforts depends on several factors. These include the health of the parent plant, the timing of the propagation, and the care you provide to the new plants. Here are some key factors to consider.
- Plant Health: Start with a healthy parent plant. A healthy plant will have more energy to dedicate to propagation.
- Timing: Propagate during the active growing season (spring and summer) for best results.
- Soil: Use a well-draining potting mix.
- Light: Provide bright, indirect light.
- Watering: Water sparingly, allowing the soil to dry out between waterings.
- Patience: Propagation can take time. Be patient and consistent with your care.
The Importance of Drainage
Proper drainage is critical for the health and longevity of your snake plants. Snake plants are susceptible to root rot, and poor drainage is a major contributing factor. Ensure your pots have drainage holes, and use a well-draining potting mix. Consider adding a layer of gravel or other drainage material to the bottom of the pot.
Proper drainage ensures that excess water can escape the pot, preventing the roots from sitting in water. This will help prevent root rot and allow the roots to breathe. Drainage is a fundamental aspect of snake plant care, promoting healthy growth and preventing common problems.
Choosing the Right Soil
The type of soil you use plays a pivotal role in the health of your snake plants. The soil should drain well and provide adequate aeration for the roots. A soil mix designed for succulents or cacti is usually ideal, but you can also create your own mix.
The goal is to create a well-draining soil that doesn’t retain too much moisture. Soil that is too dense can lead to root rot. Well-draining soil also allows the roots to access oxygen, which is essential for their health. Soil choice is paramount for the long-term health of your plants.
Reaping the Rewards: Enjoying Your New Snake Plants
Once your snake plant pups are successfully repotted and established, you can enjoy the many benefits they offer. Snake plants are not only visually appealing but also provide numerous advantages for your home and health. From purifying the air to requiring minimal care, snake plants are an excellent choice for any plant lover.
As your new snake plants grow, you’ll witness their resilience and adaptability. They can thrive in various conditions, making them a low-maintenance option for busy individuals. You can also share your propagated snake plants with friends and family, spreading the joy and beauty of these plants.
Conclusion: Mastering the Art of Repotting
Learning how to repot snake plant pups is a rewarding experience that allows you to multiply your collection and enjoy the many benefits of these resilient plants. By following the steps outlined in this guide, you can successfully propagate your snake plants and watch them thrive. Remember to prioritize proper timing, use a well-draining potting mix, and provide bright, indirect light. With patience and care, you’ll soon have a thriving collection of snake plants, adding beauty and air-purifying qualities to your home.
Recommended Products