Are you captivated by the elegant, umbrella-like foliage of the Schefflera plant, also known as the umbrella tree? Do you dream of multiplying your existing plant collection without spending a fortune? This comprehensive guide will teach you exactly how to propagate a Schefflera plant, transforming a single plant into a thriving indoor jungle or a generous gift for fellow plant enthusiasts.
Schefflera plants are relatively easy to propagate, making them an excellent choice for beginner and experienced gardeners alike. This guide dives deep into the various methods, from stem cuttings to air layering, offering step-by-step instructions and essential tips for maximizing your success. Get ready to unlock the secrets of Schefflera propagation and watch your collection flourish.
Understanding Schefflera Propagation: The Basics
Propagating a Schefflera plant involves creating new plants from existing parts of the parent plant. This is a rewarding process that allows you to expand your collection or share your love of plants with others. It’s also a cost-effective way to acquire new Schefflera plants, as you’re essentially getting them for free.
There are several methods for propagating Schefflera, each with its own advantages and disadvantages. The most common and generally easiest method is stem cuttings. Other methods include air layering and, less commonly, seed propagation. This guide will focus primarily on stem cuttings, as they offer the highest success rate for the average home gardener.
Why Propagate Schefflera?
There are many compelling reasons to learn how to propagate a Schefflera plant. First, it allows you to create more plants at little to no cost, effectively multiplying your plant collection. Second, propagation is an excellent way to rejuvenate an older or leggy plant by taking cuttings from healthy growth. Finally, propagating Schefflera allows you to share your plants with friends and family, spreading the joy of these beautiful indoor trees.
Timing Is Key: The Best Time to Propagate
The optimal time to propagate Schefflera is during the active growing season, typically spring and early summer. During this period, the plant is actively producing new growth, and the cuttings will root more readily. The warmer temperatures and increased sunlight also contribute to faster root development.
While you can attempt propagation at other times of the year, the success rate may be lower. Avoid propagating during the dormant winter months, as the plant’s resources are focused on survival rather than growth. If you must propagate outside of the ideal season, provide supplemental light and warmth to improve your chances of success.
Method 1: Propagating Schefflera From Stem Cuttings
Propagating from stem cuttings is the most popular and generally easiest method for Schefflera. This involves taking a cutting from a healthy stem, encouraging it to develop roots, and then planting it in soil. This method is relatively straightforward and usually yields excellent results.
What You’ll Need:
- A healthy Schefflera plant (the parent plant)
- Sharp, clean pruning shears or a knife
- A clean container or jar for rooting
- Water (preferably filtered or dechlorinated)
- Rooting hormone (optional, but recommended)
- Well-draining potting mix (e.g., a mix of peat moss, perlite, and vermiculite)
- Small pots or containers for planting
- Optional: Clear plastic bag or humidity dome
Step-by-Step Guide: Taking and Rooting Cuttings
- Prepare Your Tools: Sterilize your pruning shears or knife with rubbing alcohol to prevent the spread of diseases. This is crucial for the health of your cuttings and the parent plant.
- Select Your Cuttings: Choose healthy stems with several leaves. Ideally, select stems that are approximately 4-6 inches long and have several leaf nodes (the points where leaves grow). Avoid stems that are too woody or too soft and new.
- Take the Cutting: Make a clean cut just below a leaf node. Remove the leaves from the lower 1-2 inches of the stem. This will be the part that goes into the water or rooting medium.
- Apply Rooting Hormone (Optional): Dip the cut end of the stem into rooting hormone powder. This is not essential, but it can significantly boost root development. Tap off any excess powder.
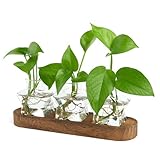
- Rooting in Water: Place the cutting in a clean container or jar filled with water, ensuring that the leaf nodes are submerged. Make sure no leaves are in the water, as this can lead to rot.
- Rooting in Soil: Alternatively, you can directly plant the cutting in a pot filled with a well-draining potting mix. Make a hole in the soil with a pencil or your finger and insert the cutting, ensuring that at least one or two nodes are buried.
- Provide Ideal Conditions: Place the cutting in a location with bright, indirect light. Avoid direct sunlight, which can scorch the leaves. If rooting in water, change the water every few days to keep it fresh and prevent bacterial growth. If rooting in soil, keep the soil consistently moist but not waterlogged.
- Maintain Humidity: To increase humidity and promote root development, you can cover the cutting with a clear plastic bag or place it under a humidity dome. This helps to retain moisture around the cutting.
- Wait for Roots to Develop: Rooting in water typically takes 2-4 weeks. Rooting in soil may take slightly longer. You’ll know roots have formed when you see them in the water or when you gently tug on the cutting and feel resistance.
- Transplant (if rooting in water): Once the roots are a few inches long, carefully transplant the cutting into a pot with well-draining potting mix. Water thoroughly after transplanting.
Troubleshooting Common Issues with Stem Cuttings
- Rotting: This is often caused by bacteria. Ensure your tools and containers are clean. If rooting in water, change the water frequently. If rooting in soil, avoid overwatering.
- Failure to Root: This can be due to several factors, including insufficient light, unsuitable temperatures, or unhealthy cuttings. Ensure you’re providing the right conditions and selecting healthy stems. Try using rooting hormone.
- Leaf Drop: Some leaf drop is normal. However, excessive leaf drop could indicate stress. Adjust the lighting, humidity, or watering practices.
Method 2: Air Layering Schefflera
Air layering is a slightly more advanced propagation method, but it can be very effective, especially for larger Schefflera plants. This technique involves encouraging roots to grow on a stem while it’s still attached to the parent plant. Once roots have formed, the stem can be cut and planted. (See Also: Expert Guide: How to Take Care of a Venus Fly Trap Plant)
What You’ll Need:
- A healthy Schefflera plant
- Sharp knife or pruning shears
- Sphagnum moss
- Rooting hormone (optional)
- Plastic wrap or a clear plastic bag
- Twine or tape
- Water
Step-by-Step Guide: Air Layering Schefflera
- Select the Layering Site: Choose a healthy stem, preferably one with several leaves, that you want to propagate. The ideal spot is usually a few inches below a leaf node.
- Prepare the Stem: Make a shallow cut around the stem, about an inch long, just below a leaf node. Be careful not to cut through the entire stem.
- Apply Rooting Hormone (Optional): Dip a cotton swab in rooting hormone and apply it to the cut. This will encourage root growth.
- Wrap with Sphagnum Moss: Moisten the sphagnum moss with water, then squeeze out the excess. Wrap the moistened moss around the cut area, ensuring it completely covers the cut.
- Seal the Moss: Wrap plastic wrap or a clear plastic bag around the moss, creating a tight seal. Secure the wrap with twine or tape at both ends, ensuring the moss stays moist.
- Monitor and Water: Check the moss regularly (every few weeks) to ensure it remains moist. You may need to add water if it dries out.
- Wait for Roots to Develop: Root formation can take several months, sometimes up to a year. You’ll know roots have formed when you can see them through the plastic wrap or when you feel them when gently squeezing the moss.
- Sever the Layer: Once roots are well-developed, carefully cut the stem below the rooted area.
- Plant the Layered Stem: Remove the plastic wrap and plant the rooted stem in a pot with well-draining potting mix. Water thoroughly.
Advantages and Disadvantages of Air Layering
Air layering is advantageous because it can produce a larger plant more quickly than stem cuttings, as the new plant is already partially developed. However, it’s a more involved process and requires more patience. It’s also less common for Schefflera propagation compared to stem cuttings.
Method 3: Seed Propagation (less Common)
Propagating Schefflera from seeds is less common than stem cuttings or air layering, but it’s still a viable option. However, it requires patience and access to viable seeds. The seeds may be difficult to obtain, as they are not always readily available.
What You’ll Need:
- Schefflera seeds (obtained from a mature plant or seed supplier)
- Seed-starting mix (a lightweight, well-draining mix)
- Small pots or a seed tray
- Water
- Humidity dome or clear plastic wrap
Step-by-Step Guide: Propagating Schefflera From Seeds
- Prepare the Seed-Starting Mix: Moisten the seed-starting mix thoroughly.
- Sow the Seeds: Sow the Schefflera seeds on the surface of the moistened seed-starting mix. Lightly cover them with a thin layer of the mix.
- Provide Humidity: Cover the seed tray or pots with a humidity dome or clear plastic wrap to retain moisture.
- Provide Warmth and Light: Place the seed tray or pots in a warm location with bright, indirect light.
- Keep the Soil Moist: Keep the seed-starting mix consistently moist but not waterlogged.
- Wait for Germination: Germination can take several weeks or even months.
- Transplant Seedlings: Once the seedlings have developed a few sets of true leaves, transplant them into individual pots with well-draining potting mix.
- Care for Seedlings: Care for the seedlings as you would a mature Schefflera plant, providing bright, indirect light and regular watering.
Challenges of Seed Propagation
Seed propagation can be challenging because seed viability can be an issue. Also, the process is slower than other methods. You’ll need patience and a good environment to encourage germination and growth. The results can also vary from the parent plant.
Choosing the Right Method for You
The best propagation method for you depends on your experience level, available resources, and the size of your Schefflera plant. Stem cuttings are generally the easiest and most accessible method for beginners. Air layering is a good option if you want a larger plant more quickly. Seed propagation is less common and requires more patience.
Consider these factors when choosing a method:
- Your Experience: Beginners may prefer stem cuttings.
- Time Commitment: Air layering and seed propagation take longer.
- Available Resources: Ensure you have the necessary materials and equipment.
- Desired Outcome: Consider how quickly you want new plants and how large you want them to be.
Caring for Your Newly Propagated Schefflera
Once your Schefflera cuttings or layered plants have rooted, it’s time to care for them properly to ensure they thrive. Proper care involves providing the right light, water, and nutrients.
Light Requirements
Schefflera plants thrive in bright, indirect light. Avoid placing them in direct sunlight, which can scorch the leaves. An east-facing window is often ideal. If you don’t have enough natural light, consider using grow lights to supplement the lighting.
Watering
Water your Schefflera plant thoroughly when the top inch of soil feels dry to the touch. Avoid overwatering, which can lead to root rot. Ensure the pot has drainage holes to allow excess water to escape. During the growing season (spring and summer), you may need to water more frequently than during the dormant season (fall and winter). (See Also: Lavender Watering Guide: How Often Do You Water a Lavender Plant?)
Soil and Potting
Use a well-draining potting mix, such as a mix of peat moss, perlite, and vermiculite. Choose a pot with drainage holes to prevent waterlogging. Repot your Schefflera plant every 1-2 years, or when it becomes root-bound.
Fertilizing
Fertilize your Schefflera plant during the growing season (spring and summer) with a balanced liquid fertilizer, diluted to half strength. Avoid fertilizing during the dormant season. Follow the instructions on the fertilizer package carefully.
Humidity
Schefflera plants prefer moderate to high humidity. If you live in a dry climate, you can increase humidity by misting the leaves regularly, using a humidifier, or placing the pot on a tray filled with pebbles and water (make sure the pot isn’t sitting in the water).
Pruning
Prune your Schefflera plant to maintain its shape, remove dead or damaged leaves, and encourage bushier growth. Pruning is best done during the growing season. You can also use the pruned stems for propagation!
Common Pests and Diseases
Schefflera plants are generally not prone to many pests or diseases, but they can be susceptible to mealybugs, spider mites, and scale. Inspect your plant regularly for any signs of infestation. Treat infestations with insecticidal soap or neem oil. Overwatering can lead to root rot. Ensure proper drainage and avoid overwatering.
Addressing Common Questions About Schefflera Propagation
Many people have questions when they first start learning how to propagate a Schefflera plant. Here are some of the most frequently asked questions and their answers:
How Long Does It Take for Schefflera Cuttings to Root?
It typically takes 2-4 weeks for Schefflera cuttings to root in water or soil. The exact time can vary depending on the environmental conditions, the health of the cutting, and whether you use rooting hormone.
Can I Propagate Schefflera in Water Only?
Yes, you can propagate Schefflera cuttings in water. This is a popular and straightforward method. Once the roots have developed, you can transplant the cutting into a pot with potting mix. Many people prefer this method because they can see the roots developing. (See Also: Essential Guide: How to Care for a Cilantro Plant for Thriving Growth)
What Is the Best Type of Soil for Propagating Schefflera?
The best type of soil for propagating Schefflera is a well-draining potting mix. A mix of peat moss, perlite, and vermiculite is a good choice. This type of mix allows for good aeration and drainage, which is crucial for root development. Avoid using heavy soils that retain too much moisture.
How Do I Know If My Schefflera Cutting Has Rooted?
If you’re propagating in water, you’ll see roots developing in the water. If you’re propagating in soil, you can gently tug on the cutting. If you feel resistance, it means roots have formed. You can also carefully remove the cutting from the soil to check for roots, but be gentle so you don’t damage them.
Why Are My Schefflera Cuttings Not Rooting?
There are several reasons why your Schefflera cuttings might not be rooting. The most common reasons include insufficient light, improper watering (either too much or too little), unhealthy cuttings, or unsuitable temperatures. Make sure you’re providing the right conditions and selecting healthy cuttings. Rooting hormone can also help.
Can I Propagate a Schefflera From a Single Leaf?
No, you cannot propagate a Schefflera plant from a single leaf. You need to use stem cuttings, which include a portion of the stem with several leaves and leaf nodes.
Conclusion: Your Schefflera Propagation Journey Begins Now
You’ve now learned the essential techniques for how to propagate a Schefflera plant. Armed with this knowledge, you can confidently embark on your propagation journey. Remember to be patient, provide the right conditions, and enjoy the process. With a little care and attention, you’ll soon have a thriving collection of Schefflera plants to admire and share. Start propagating today and watch your green thumb flourish!
Recommended Products