Are you fascinated by the ancient beauty of the coontie plant and eager to cultivate your own? This guide is your comprehensive resource for learning how to plant coontie seeds and nurture these unique cycads from seed to maturity. Known for their resilience and striking foliage, coontie plants offer a touch of the prehistoric to any landscape. This guide will walk you through every step, ensuring you have the knowledge to successfully propagate these captivating plants.
Coontie plants, also known as Zamia floridana, are native to Florida and the Bahamas. They are a fantastic choice for xeriscaping and require minimal maintenance once established. Learning how to plant coontie seeds is a rewarding experience. It allows you to witness the fascinating life cycle of these ancient plants firsthand. With the right techniques, you can enjoy these beautiful plants in your garden for years to come.
Understanding the Coontie Plant
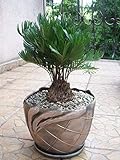
Before diving into how to plant coontie seeds, it’s essential to understand the plant itself. Coontie plants are cycads, a group of ancient plants that predate the dinosaurs. They are not true ferns or palms, though they may resemble them. Their slow growth and unique characteristics make them a special addition to any garden. This section will delve into the plant’s biology, its natural habitat, and why it’s a great choice for your garden.
The Biology of Coontie Plants
Coontie plants are dioecious, meaning they have separate male and female plants. The female plants produce seeds in cones, which resemble small pine cones. These cones turn a vibrant red or orange when ripe, signaling that the seeds are ready for collection. The seeds themselves are large and fleshy, containing a significant amount of starch. The coontie plant’s structure makes it well-suited to its native environment.
The leaves of the coontie plant are pinnate, meaning they have leaflets arranged along a central stem. These leaflets are typically dark green and leathery, providing a striking contrast to other plants in a garden. The roots of the coontie plant are also unique, forming a symbiotic relationship with nitrogen-fixing cyanobacteria. This relationship allows the plant to thrive in nutrient-poor soils.
Natural Habitat and Distribution
Coontie plants are native to Florida and the Bahamas, where they thrive in well-drained, sandy soils. They are often found in pine rocklands, scrub habitats, and coastal areas. They are highly adaptable to drought conditions, making them an excellent choice for xeriscaping. Understanding their natural habitat provides important clues about how to plant coontie seeds successfully.
In their natural environment, coontie plants often grow under the shade of taller trees, protecting them from the intense sun. They are also adapted to fire, with their underground stems allowing them to resprout after a fire. Their resilience and adaptability are key reasons for their survival over millions of years.
Why Grow Coontie Plants?
There are many reasons to grow coontie plants. They are relatively low-maintenance, drought-tolerant, and pest-resistant. They also add a unique aesthetic to any landscape, with their prehistoric appearance and striking foliage. They are a beautiful addition to any garden.
Furthermore, coontie plants are a host plant for the Atala butterfly, a beautiful and endangered species. By planting coontie plants, you can contribute to the conservation of this butterfly and support local ecosystems. Growing coontie plants is a rewarding experience that benefits both your garden and the environment.
Collecting and Preparing Coontie Seeds
The success of how to plant coontie seeds hinges on proper seed collection and preparation. This section will cover the best practices for harvesting seeds from mature plants, cleaning them, and preparing them for germination. Proper preparation is essential for successful germination.
Identifying Ripe Seeds
The most important step in collecting coontie seeds is identifying when they are ripe. The female plants produce cones that turn from green to a vibrant red or orange color when the seeds are ready. These cones will also begin to open slightly, revealing the seeds inside. It’s crucial to harvest the seeds when they are fully ripe, but before the cones completely disintegrate and seeds fall out.
Gently touch the cones to see if the seeds are easily dislodged. If they are, it’s a good indication they’re ready for collection. The color and texture of the cones are the best indicators. Monitor the plants regularly, as the ripening process can be relatively quick once it begins. Waiting for the right moment is key to maximizing germination rates.
Harvesting and Cleaning Seeds
Once the cones are ripe, carefully harvest them from the plant. Use gloves when handling the seeds, as they can be irritating to some people. Gently remove the seeds from the cone, taking care not to damage them. If the cone hasn’t opened fully, you may need to gently pry it apart.
After harvesting, clean the seeds. Remove any remaining fleshy parts of the cone from the seeds. Soaking the seeds in water for a day or two can help to soften and remove any remaining pulp. This cleaning process helps prevent fungal growth and improves germination rates. Rinse the seeds thoroughly after soaking. (See Also: Mastering Maranta Care: How to Care for a Maranta Plant)
Seed Scarification and Soaking
Coontie seeds have a hard seed coat that can inhibit germination. Scarification, the process of breaking or softening the seed coat, can improve germination rates. There are several methods for scarifying coontie seeds, including gently filing a small portion of the seed coat or soaking the seeds in warm water.
Soaking the seeds in warm water (around 80-90°F) for 24-48 hours is a common and effective method. This helps to soften the seed coat and allows water to penetrate the seed. This also helps to hydrate the embryo. Changing the water every 12 hours can help prevent fungal growth. Once scarified and soaked, the seeds are ready for planting.
Planting Coontie Seeds: Step-by-Step Guide
This section provides a detailed, step-by-step guide on how to plant coontie seeds. Following these instructions will increase your chances of successful germination and healthy plant growth. Proper planting techniques are crucial for success.
Choosing the Right Planting Medium
The planting medium is the foundation for successful germination. Coontie plants prefer a well-draining, sandy soil that mimics their natural habitat. A mixture of sand, perlite, and a small amount of compost works well. Avoid heavy clay soils, as they can retain too much moisture and lead to root rot. Good drainage is essential.
Consider using a seed-starting mix, which is specifically designed for delicate seedlings. Ensure the planting medium is sterile to prevent fungal diseases. You can sterilize the medium by baking it in the oven at a low temperature (around 200°F) for an hour. This ensures a clean environment for the seeds to germinate.
Planting the Seeds
Once you have prepared your planting medium, it’s time to plant the seeds. Plant the seeds about 1-2 inches deep. The depth is important for providing enough moisture and protection. Space the seeds a few inches apart if planting in a tray or container. If planting directly in the ground, space them at least 1 foot apart.
Gently cover the seeds with the planting medium and lightly water them. Avoid overwatering, as this can lead to rot. Keep the soil consistently moist but not waterlogged. Consider using a spray bottle to water the seeds, as this provides gentle and even moisture. The planting process is now complete.
Providing Optimal Conditions for Germination
Germination requires specific environmental conditions. Coontie seeds prefer warm temperatures (around 75-85°F) and high humidity. Place the seed trays or containers in a warm, sheltered location, such as a greenhouse or a warm room indoors. Consistent temperature is crucial.
To maintain high humidity, you can cover the seed trays or containers with a clear plastic dome or plastic wrap. This helps to trap moisture and create a humid environment. Monitor the soil moisture regularly and water as needed. Germination can take several weeks or even months, so patience is key.
Caring for Coontie Seedlings
Once the coontie seeds germinate, the young seedlings require special care. This section provides detailed information on how to care for your seedlings to ensure they grow into healthy, mature plants. Proper care is essential for long-term health.
Watering and Sunlight Requirements
Watering is crucial for young seedlings. Keep the soil consistently moist but not waterlogged. Water deeply when the top inch of soil feels dry. Seedlings are more susceptible to drying out than mature plants. Monitor the soil moisture closely, and adjust your watering schedule accordingly.
Coontie seedlings need bright, indirect sunlight. Direct sunlight can scorch their delicate leaves. Place the seedlings in a location where they receive filtered sunlight or partial shade. As the seedlings grow, they can tolerate more sunlight. Gradually increase the amount of sunlight as the plants mature.
Fertilizing Seedlings
Fertilizing is essential to provide the nutrients seedlings need for vigorous growth. Use a balanced, slow-release fertilizer formulated for palms or cycads. Follow the instructions on the fertilizer package carefully, as over-fertilizing can damage the seedlings. Fertilization helps with strong root development. (See Also: Learn How to Care for Zebra Plant: A Simple Guide)
Apply the fertilizer sparingly, especially during the early stages of growth. You can also supplement with a liquid fertilizer diluted to half strength. Apply the liquid fertilizer every few weeks during the growing season. Avoid fertilizing during the dormant winter months.
Transplanting Seedlings
Once the seedlings have developed a few sets of leaves, they are ready for transplanting. Choose a well-draining location with partial shade. Prepare the planting hole by amending the soil with compost or other organic matter. Transplanting helps establish strong roots.
Gently remove the seedlings from their containers, taking care not to damage the roots. Place the seedlings in the planting hole and backfill with soil. Water the transplanted seedlings thoroughly. Mulch around the base of the plants to help retain moisture and suppress weeds.
Ongoing Care and Maintenance of Coontie Plants
Once your coontie plants are established, they require minimal maintenance. This section will cover essential care practices to ensure your plants thrive for years to come. Proper care will ensure long-term beauty.
Watering Established Plants
Established coontie plants are drought-tolerant but still benefit from occasional watering, especially during dry periods. Water deeply but infrequently, allowing the soil to dry out between waterings. Overwatering can lead to root rot. Water around the base of the plant.
The frequency of watering depends on your climate and soil conditions. In hot, dry climates, you may need to water once a week or every two weeks. In cooler, wetter climates, you may need to water less often. Monitor the soil moisture and adjust your watering schedule accordingly.
Fertilizing Mature Plants
Mature coontie plants benefit from periodic fertilization. Apply a slow-release fertilizer formulated for palms or cycads in the spring and fall. Avoid over-fertilizing, as this can lead to excessive growth and weaken the plants. Fertilizing strengthens the plant.
You can also supplement with a liquid fertilizer diluted to half strength during the growing season. Follow the instructions on the fertilizer package carefully. Be sure to fertilize around the base of the plant. Avoid fertilizing during the dormant winter months.
Pruning and Pest Control
Pruning is generally not required for coontie plants, but you can remove any dead or damaged leaves. Pruning will improve the appearance of the plant. Use clean, sharp pruning shears to make clean cuts. Cut the leaves close to the base.
Coontie plants are relatively pest-resistant. However, they can sometimes be affected by scale insects or mealybugs. Inspect your plants regularly for any signs of pests. If you notice any pests, treat them with an appropriate insecticide or insecticidal soap. Prompt treatment is crucial.
Common Problems and Solutions
Even with the best care, coontie plants can sometimes encounter problems. This section addresses common issues and provides solutions to help you troubleshoot and maintain healthy plants. Knowing these issues will help you address problems quickly.
Yellowing Leaves
Yellowing leaves can be caused by various factors, including overwatering, underwatering, nutrient deficiencies, or pest infestations. Inspect the plant carefully to determine the cause. Adjust your watering schedule if you suspect overwatering or underwatering. Yellowing leaves can signal a problem.
If you suspect a nutrient deficiency, fertilize the plant with a balanced fertilizer. If you find pests, treat them with an appropriate insecticide or insecticidal soap. Prune away affected leaves to prevent the spread of disease. Addressing the problem quickly is essential. (See Also: Mastering How to Cut Cilantro Plant for Cooking)
Root Rot
Root rot is a common problem caused by overwatering or poor drainage. The roots become soft and mushy, and the leaves may turn yellow or brown. To prevent root rot, ensure your plants are planted in well-draining soil and avoid overwatering. Preventing root rot is essential for survival.
If you suspect root rot, carefully examine the roots. If the roots are severely rotted, you may need to repot the plant in fresh, well-draining soil. Remove any affected roots before replanting. Improving drainage and adjusting watering practices is key.
Pest Infestations
Scale insects and mealybugs can infest coontie plants, sucking sap from the leaves and stems. Inspect your plants regularly for any signs of pests, such as small, brown bumps (scale) or white, cottony masses (mealybugs). Pest infestations can cause significant damage.
Treat pest infestations with an appropriate insecticide or insecticidal soap. You may need to repeat the treatment several times to eliminate the pests completely. You can also try wiping the pests off the plant with a cotton swab dipped in rubbing alcohol. Early intervention is best.
Frequently Asked Questions (faq)
This section addresses frequently asked questions about how to plant coontie seeds and care for coontie plants. This will help you find quick answers.
How Long Does It Take for Coontie Seeds to Germinate?
Germination can take anywhere from a few weeks to several months. The germination rate depends on the age of the seeds, the environmental conditions, and the preparation methods used. Patience is key. Proper seed preparation can help speed up germination.
Can I Grow Coontie Plants Indoors?
While coontie plants can be grown indoors, they prefer outdoor conditions. If you choose to grow them indoors, provide bright, indirect sunlight and well-draining soil. Ensure proper drainage to avoid root rot. Indoor plants require more monitoring.
Are Coontie Plants Poisonous?
Yes, all parts of the coontie plant are poisonous if ingested. Keep children and pets away from the plants. The seeds, in particular, contain toxins. It’s important to take precautions.
How Do I Know If My Coontie Plant Is Male or Female?
You can only determine the sex of a coontie plant when it flowers. Male plants produce pollen-bearing cones, while female plants produce seed-bearing cones. The cones are the easiest way to tell the difference. Cones will distinguish male from female plants.
Where Can I Buy Coontie Seeds?
You can purchase coontie seeds from online nurseries, specialized seed suppliers, or local nurseries. Make sure to purchase seeds from a reputable source to ensure good quality. Sourcing seeds from reputable vendors is important.
Conclusion
Successfully learning how to plant coontie seeds and cultivating these ancient plants is a rewarding experience. By following the steps outlined in this guide, you can enjoy the beauty and resilience of coontie plants in your garden. From collecting ripe seeds to nurturing seedlings, you’ll witness a fascinating journey. Remember to be patient, diligent, and observant. Your garden will be enriched by these beautiful cycads.
Recommended Products