Are you dreaming of a vibrant, evergreen landscape with a touch of elegance? The Blue Point Juniper, with its stunning blue-green foliage and graceful conical shape, is a fantastic choice for adding beauty and structure to your garden. This hardy shrub is relatively low-maintenance, making it a popular option for both novice and experienced gardeners. However, proper planting is crucial for ensuring its long-term health and vibrant appearance.
This comprehensive guide will walk you through every step of the process, from selecting the perfect Blue Point Juniper to providing the ongoing care it needs to thrive. We’ll delve into soil preparation, planting techniques, and essential maintenance practices. By following these guidelines, you can cultivate a thriving and beautiful Blue Point Juniper, transforming your outdoor space into a captivating haven.
Choosing the Right Blue Point Juniper
Before you even think about digging a hole, the first step in successful Blue Point Juniper planting is selecting the right plant. This involves considering several factors, including the plant’s size, health, and the specific conditions of your planting site. A healthy plant will have vibrant foliage and a well-developed root system. Avoid plants with any signs of disease or pest infestation.
Understanding Blue Point Juniper Characteristics
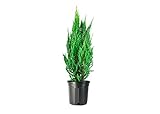
The Blue Point Juniper (Juniperus chinensis ‘Blue Point’) is known for its dense, pyramidal growth habit. It typically reaches a height of 12-15 feet and a width of 4-6 feet at maturity. This shrub is prized for its bluish-green needles, which provide year-round color and texture. It is a relatively slow-growing conifer, which means it requires less pruning and maintenance compared to some faster-growing alternatives. Its mature size is essential for ensuring that it will fit well in its designated space.
Assessing Your Planting Site
Blue Point Junipers thrive in full sun, meaning they require at least six hours of direct sunlight per day. They are adaptable to a wide range of soil types, but they prefer well-drained soil. Poor drainage can lead to root rot, which can be fatal. Consider your local climate and soil conditions, as these factors will influence the success of your planting. Understanding the microclimate of your garden is also important. For example, a sheltered location will protect the plant from harsh winds.
Here’s a checklist to help you assess your planting site:
- Sunlight: Does the area receive at least six hours of direct sunlight daily?
- Soil Drainage: Does water drain away quickly after a rainfall?
- Soil Type: Is the soil well-draining, or does it tend to stay wet?
- Space: Does the planting location provide enough space for the mature size of the juniper?
- Wind Exposure: Is the area protected from strong winds?
Selecting a Healthy Plant at the Nursery
When purchasing your Blue Point Juniper, choose a plant that appears healthy and vigorous. Inspect the foliage for any signs of discoloration, pests, or diseases. Gently examine the root ball by removing the plant from its container if possible. The roots should be firm and not tightly bound. Avoid plants with root-bound conditions, as they can struggle to establish after planting. Also, check the overall shape and density of the plant. A well-shaped juniper will have a symmetrical and dense form.
Preparing the Planting Site
Proper site preparation is crucial for the successful establishment of your Blue Point Juniper. This involves amending the soil, creating the planting hole, and ensuring adequate drainage. Taking the time to prepare the site correctly will significantly improve the plant’s chances of thriving. Good site prep is crucial to preventing future problems.
Soil Preparation and Amendment
Blue Point Junipers prefer well-drained soil. If your soil is heavy clay, you’ll need to amend it to improve drainage. This can be achieved by incorporating organic matter, such as compost or well-rotted manure, into the soil. Organic matter improves soil structure, aeration, and drainage. It also adds essential nutrients that support healthy growth. Loosen the soil in the planting area to a depth of at least 12-18 inches.
Here’s a step-by-step guide to soil preparation: (See Also: Expert Guide: How to Pot a Cactus Plant Successfully)
- Clear the Area: Remove any grass, weeds, or debris from the planting site.
- Test the Soil: Conduct a soil test to determine the pH and nutrient levels. This will help you identify any deficiencies and amend the soil accordingly.
- Amend the Soil: Mix in a generous amount of organic matter, such as compost or well-rotted manure, to improve drainage and fertility.
- Loosen the Soil: Use a garden fork or tiller to loosen the soil to a depth of 12-18 inches.
- Level the Surface: Rake the soil surface to create a level planting area.
Digging the Planting Hole
The planting hole should be twice as wide as the root ball and just as deep. This provides ample space for the roots to expand and establish. Ensure the sides of the hole are not compacted, as this can restrict root growth. Make sure the hole is wide enough to accommodate the roots without crowding them. The depth is equally important; the top of the root ball should be level with or slightly above the surrounding soil surface.
Here’s how to dig the planting hole correctly:
- Measure the Root Ball: Determine the width and depth of the root ball.
- Dig the Hole: Dig the hole twice as wide as the root ball and just as deep.
- Loosen the Sides: Use a garden fork or trowel to loosen the sides of the hole.
- Check Drainage: Pour water into the hole to check for proper drainage. The water should drain away within a few hours. If the water doesn’t drain, amend the soil or choose a different location.
Planting Your Blue Point Juniper
With the site prepared, you’re now ready to plant your Blue Point Juniper. This process involves carefully removing the plant from its container, positioning it in the hole, and backfilling with soil. Proper planting techniques will ensure the plant’s roots establish well and the juniper thrives. Careful handling of the root system is particularly important.
Removing the Juniper From Its Container
Before removing the juniper from its container, water the plant thoroughly. This will help keep the root ball intact. Gently tip the container on its side and slide the plant out. If the plant is root-bound, gently loosen the roots with your fingers or a trowel. Be careful not to damage the roots during this process. If the plant is severely root-bound, you may need to score the root ball with a knife or pruning shears to encourage root growth.
Positioning the Juniper in the Hole
Place the juniper in the center of the planting hole, ensuring the top of the root ball is level with or slightly above the surrounding soil surface. This prevents water from pooling around the base of the plant, which can lead to root rot. Make sure the plant is oriented in the direction you want it to grow. Straighten the plant and ensure it stands upright. Backfill the hole with the soil you removed, gently tamping it down to eliminate air pockets.
Backfilling and Watering
Once the juniper is in place, begin backfilling the hole with the amended soil. Fill the hole halfway and gently tamp the soil down to eliminate air pockets. Continue backfilling the hole, watering the soil as you go to help settle it. Avoid burying the trunk of the juniper, as this can lead to rot. Once the hole is filled, create a small berm or ring of soil around the base of the plant to help retain water. Water the newly planted juniper thoroughly, ensuring the soil is evenly moist.
Post-Planting Care and Maintenance
After planting your Blue Point Juniper, it’s essential to provide proper care to ensure its long-term health and beauty. This includes regular watering, mulching, fertilization, and pruning. Consistent care is vital to help the juniper establish and thrive. Paying attention to these maintenance tasks will greatly improve the appearance and lifespan of your plant.
Watering Requirements
Newly planted Blue Point Junipers require consistent watering, especially during the first growing season. Water deeply and regularly, allowing the soil to dry slightly between waterings. Avoid overwatering, as this can lead to root rot. As the juniper matures, it will become more drought-tolerant. The frequency of watering will depend on weather conditions, but it’s generally best to water deeply but infrequently. Check the soil moisture by inserting your finger a few inches into the soil. If it feels dry, it’s time to water.
Mulching Benefits
Mulching around the base of your Blue Point Juniper offers several benefits. It helps retain moisture in the soil, suppresses weed growth, and regulates soil temperature. Apply a 2-4 inch layer of organic mulch, such as wood chips or shredded bark, around the base of the plant, keeping it a few inches away from the trunk. Mulch will also break down over time, improving soil fertility. Avoid using inorganic mulches, like gravel, as they don’t provide the same benefits. (See Also: How to Identify a Female Hemp Plant: A Complete Guide)
Fertilizing Your Juniper
Blue Point Junipers generally don’t require heavy fertilization. However, a light feeding in early spring can promote healthy growth. Use a balanced, slow-release fertilizer formulated for evergreen trees and shrubs. Follow the manufacturer’s instructions for application rates. Avoid over-fertilizing, as this can damage the plant. A soil test will help determine if your juniper needs fertilizer.
Pruning Techniques
Pruning is essential for maintaining the shape and health of your Blue Point Juniper. Prune in late winter or early spring, before new growth begins. Remove any dead, damaged, or diseased branches. You can also prune to shape the plant or control its size. Avoid pruning more than one-third of the plant’s growth in a single year. Pruning will also improve air circulation, reducing the risk of fungal diseases.
Here’s a guide to pruning:
- Timing: Late winter or early spring.
- Tools: Use sharp pruning shears or loppers.
- Remove: Dead, damaged, or diseased branches.
- Shape: Prune to shape the plant or control its size.
- Avoid: Pruning more than one-third of the plant in a single year.
Protecting Against Pests and Diseases
Blue Point Junipers are relatively resistant to pests and diseases, but they can still be susceptible to certain problems. Common pests include spider mites, aphids, and scale. Common diseases include fungal infections like juniper blight. Inspect your juniper regularly for any signs of pests or diseases. If you notice any problems, take action immediately to prevent them from spreading. Proper air circulation and sunlight can help prevent some diseases. Use insecticidal soap or horticultural oil to control pests. Fungicides can be used to treat fungal infections, but prevention is key.
Here are some common problems and solutions:
| Problem | Symptoms | Solutions |
|---|---|---|
| Spider Mites | Yellowing needles, webbing | Insecticidal soap, horticultural oil |
| Aphids | Deformed new growth, sticky substance | Insecticidal soap, horticultural oil |
| Juniper Blight | Brown tips on needles | Fungicides, improve air circulation |
Dealing with Common Problems
Even with proper care, your Blue Point Juniper may occasionally encounter problems. Addressing these issues promptly is crucial for maintaining the plant’s health. Understanding the causes and treatments for these issues can help ensure your juniper thrives. Early detection is often the key to successful treatment.
Yellowing Needles: Yellowing needles can be caused by several factors, including overwatering, underwatering, nutrient deficiencies, or pest infestations. Inspect the plant for signs of pests and check the soil moisture. Adjust your watering schedule as needed and consider a soil test to check for nutrient deficiencies.
Brown Needles: Brown needles can be a sign of drought stress, winter burn, or fungal disease. Ensure the plant receives adequate water, especially during dry periods. Protect the plant from harsh winter winds and consider using a fungicide if a fungal disease is suspected.
Pests: Spider mites, aphids, and scale can infest Blue Point Junipers. Inspect the plant regularly for these pests and treat them with insecticidal soap or horticultural oil if necessary. Early detection and treatment are essential to prevent widespread infestations. (See Also: Master the Art: How to Plant Garlic Chives for Abundant Harvests)
Troubleshooting Planting Issues
Even with careful planning and execution, problems can sometimes arise during or shortly after planting. Addressing these issues promptly is crucial for the successful establishment of your Blue Point Juniper. Identifying the root causes of these issues allows for effective solutions. Knowing what to watch out for will prepare you for any challenges.
Addressing Poor Drainage Issues
Poor drainage is a common problem that can lead to root rot and the decline of your Blue Point Juniper. If you notice standing water around the plant after rainfall, the soil may not be draining properly. This can be addressed by amending the soil with organic matter, such as compost or well-rotted manure, to improve drainage. You can also consider planting the juniper on a slight mound to elevate the root ball above the surrounding soil level. Proper drainage is crucial for preventing root rot.
Dealing with Sunburn
Young Blue Point Junipers, especially those recently transplanted, can be susceptible to sunburn, particularly in hot, sunny climates. This can manifest as browning or discoloration of the needles. To prevent sunburn, provide some shade during the hottest part of the day, especially during the first few years after planting. You can use shade cloth or plant the juniper in a location where it receives some afternoon shade. Adequate watering can also help mitigate the effects of sunburn.
Correcting Planting Depth Problems
Planting your Blue Point Juniper too deep can lead to root rot and the death of the plant. The top of the root ball should be level with or slightly above the surrounding soil surface. If you suspect that your juniper is planted too deep, carefully excavate the soil around the base of the plant to expose the root ball. Ensure the crown of the plant is not buried. Correcting planting depth issues early on can save your plant.
Long-Term Care and Success
Achieving long-term success with your Blue Point Juniper requires consistent care and attention. This involves ongoing maintenance, monitoring for potential problems, and adapting your care practices as the plant matures. Continued vigilance will help ensure the juniper continues to thrive for years to come. Investing in the long-term health of your plant pays off with beauty and resilience.
Ongoing Maintenance and Monitoring
Regularly inspect your Blue Point Juniper for any signs of pests, diseases, or stress. Monitor the soil moisture levels and adjust your watering schedule as needed. Prune the plant annually to maintain its shape and remove any dead or damaged branches. Consistent monitoring will allow you to address any problems early on, preventing them from escalating. Adapt your care practices to the changing seasons and the plant’s growth.
Adapting to Changing Conditions
As your Blue Point Juniper matures, its needs may change. Adjust your watering and fertilization practices as the plant grows and the climate changes. Monitor the plant’s response to your care and make adjustments as needed. Be prepared to adapt to changing environmental conditions, such as droughts or extreme temperatures. Flexibility in your care routine is essential for long-term success.
Enjoying Your Thriving Juniper
The rewards of planting and caring for a Blue Point Juniper are substantial. This beautiful evergreen shrub will enhance your landscape with its striking blue-green foliage and elegant shape. Enjoy the beauty and tranquility it brings to your garden. The satisfaction of nurturing a plant and watching it thrive is a rewarding experience. Your dedication will be rewarded with a stunning and healthy juniper that will grace your garden for many years.
Conclusion
Planting a Blue Point Juniper can be a rewarding experience, transforming your landscape with its beauty and resilience. Remember that proper site selection, careful planting, and consistent maintenance are key to success. By following the guidelines in this guide, you can confidently cultivate a thriving Blue Point Juniper. Enjoy the beauty and elegance this evergreen shrub brings to your garden. Your hard work will pay off with a stunning and healthy juniper for years to come.
Recommended Products