Dreaming of a majestic black walnut tree gracing your property? It all starts with a single seed! This guide will walk you through the fascinating process of growing your own black walnut trees, from seed to sapling. Discover the secrets to successful germination and nurture your seedlings into thriving trees.
Black walnuts are known for their delicious nuts and valuable timber. Planting your own is a rewarding experience. We will cover everything you need to know, from proper seed selection and stratification to planting techniques and ongoing care.
Get ready to embark on a journey that will connect you with nature and provide a lasting legacy for future generations. Learn how to plant black walnut seeds and enjoy the fruits of your labor!
Understanding Black Walnut Trees and Their Value
Black walnut trees (Juglans nigra) are majestic native North American trees prized for their delicious nuts, valuable timber, and aesthetic appeal. They are a long-lived species, capable of reaching impressive heights and widths, making them a significant presence in any landscape. Planting black walnut seeds is a rewarding endeavor, contributing to both environmental sustainability and potential future economic benefits.
Black walnut trees provide numerous benefits. Their nuts are highly sought after for culinary uses, while the wood is a premium material used in furniture making, cabinetry, and gunstocks. Furthermore, these trees offer habitat for wildlife, help prevent soil erosion, and contribute to cleaner air by absorbing carbon dioxide. Successfully planting black walnut seeds requires careful attention to detail, from seed selection to planting techniques.
Seed Selection and Preparation
The success of planting black walnut seeds hinges on starting with high-quality seeds. Choosing the right seeds and preparing them correctly maximizes the chances of germination and healthy seedling development. This involves careful consideration of the source, viability, and proper handling of the seeds before planting.
Selecting the Right Seeds
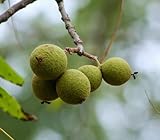
The best seeds come from mature, healthy trees that exhibit desirable traits. Look for trees with a history of producing high-quality nuts and exhibiting resistance to common diseases. Collecting seeds from your own property or a trusted source is preferable. Avoid seeds from trees that show signs of disease or damage.
Choose nuts that are free of cracks, holes, or other signs of insect infestation or fungal infection. The nuts should be fully ripe, indicated by a dark, green husk that is beginning to split. Gather the nuts as soon as they fall from the tree in the fall. This typically occurs from late September to October, depending on your location. (See Also: Learn How to Plant Callaloo Seeds: A Complete Guide)
Seed Preparation: Stratification
Black walnut seeds require a period of cold, moist stratification to break dormancy and germinate successfully. This process mimics the natural conditions the seeds would experience over winter. Stratification involves exposing the seeds to cold temperatures and moisture for a specific duration.
- Husk Removal: Remove the outer husk from the nuts as soon as possible after collection. This can be done by hand, using a nut cracker, or by soaking the nuts in water for a few days to soften the husk. Wear gloves, as the husk can stain your skin.
- Cleaning: Thoroughly clean the nuts to remove any remaining husk fragments. This helps prevent fungal growth during stratification.
- Stratification Method: There are several ways to stratify black walnut seeds. The most common method involves placing the cleaned nuts in a plastic bag or container with moist (not soaking wet) sand, peat moss, or a mixture of both. A ratio of 3:1 (sand/peat moss to nuts) is recommended.
- Refrigeration: Store the bag or container in a refrigerator at a temperature between 33°F and 40°F (1°C and 4°C) for 90 to 120 days. Check the moisture level regularly and add water if the medium starts to dry out. However, be careful not to overwater, which can lead to mold growth.
- Alternative Method: Another method involves burying the nuts in a well-drained area outdoors during the winter months, protecting them from rodents. Ensure the area is protected from direct sunlight and extreme weather conditions.
Planting Black Walnut Seeds
Once the seeds have undergone stratification, it’s time to plant them. Proper planting techniques are crucial for ensuring successful germination and the establishment of healthy seedlings. This involves selecting the right planting site, preparing the soil, and using appropriate planting methods.
Choosing the Right Planting Site
Black walnut trees thrive in well-drained soil with plenty of sunlight. They prefer a deep, fertile soil that retains moisture but does not become waterlogged. The planting site should also have adequate space for the tree to grow to its mature size, considering both height and spread.
Avoid planting black walnut trees in areas where they will compete with other trees for sunlight and nutrients. Ensure the site is free from obstructions like power lines or buildings that could interfere with the tree’s growth. Consider the long-term impact of the tree’s root system on nearby structures.
Soil Preparation
Preparing the soil before planting is essential for creating an optimal environment for seed germination and root development. This involves improving soil drainage, adding organic matter, and ensuring the soil has the correct pH level. Proper soil preparation sets the stage for healthy seedling growth.
- Soil Testing: Conduct a soil test to determine the soil’s pH level and nutrient content. Black walnut trees prefer a slightly acidic to neutral pH (6.0 to 7.0).
- Soil Amendment: Amend the soil with organic matter, such as compost or well-rotted manure, to improve drainage, water retention, and nutrient availability. Incorporate the organic matter into the top 12 inches of soil.
- Weed Control: Remove any existing weeds or grass from the planting area. Weeds compete with seedlings for resources.
- Tilling: Till the soil to loosen it and improve aeration. This makes it easier for the roots to penetrate the soil and establish themselves.
Planting Methods
There are two main methods for planting black walnut seeds: direct seeding and planting pre-grown seedlings. Direct seeding involves planting the seeds directly into the ground, while planting seedlings involves transplanting young trees that have been started in containers or nurseries. Direct seeding can be cost-effective, while planting seedlings offers a head start.
- Direct Seeding:
- Planting Depth: Plant the stratified seeds approximately 2 to 3 inches deep.
- Spacing: Space the seeds at least 15 to 20 feet apart to allow for the tree’s mature size. If planting multiple rows, space the rows at least 20 feet apart.
- Planting: Place the seeds in the prepared holes, with the pointed end of the nut facing down.
- Backfilling: Cover the seeds with soil and gently tamp it down.
- Watering: Water the area thoroughly after planting.
- Planting Seedlings:
- Digging: Dig a hole that is slightly larger than the root ball of the seedling.
- Placement: Place the seedling in the hole, ensuring that the top of the root ball is level with the ground.
- Backfilling: Backfill the hole with soil, gently tamping it down to remove air pockets.
- Watering: Water the seedling thoroughly after planting.
Ongoing Care and Maintenance
After planting, ongoing care and maintenance are essential for the survival and healthy growth of black walnut trees. This involves regular watering, weed control, protection from pests and diseases, and pruning. Consistent care ensures the trees thrive and reach their full potential. (See Also: Unveiling Beauty: How to Plant a Bleeding Heart Root)
Watering
Young black walnut trees require regular watering, especially during dry periods. Water the trees deeply and infrequently, allowing the soil to dry out slightly between waterings. This encourages the roots to grow deep into the soil. Avoid overwatering, which can lead to root rot.
Water young trees weekly, or more often during periods of drought. As the trees mature, they will become more drought-tolerant. Observe the trees for signs of water stress, such as wilting leaves or stunted growth, and adjust your watering schedule accordingly.
Weed Control
Weeds compete with young trees for water, nutrients, and sunlight. Consistent weed control is critical for the survival and growth of black walnut seedlings. This involves manual weeding, mulching, and the use of herbicides, if necessary.
Mulch around the base of the trees with organic materials, such as wood chips or shredded bark. Mulch helps suppress weeds, retain moisture, and regulate soil temperature. Apply mulch to a depth of 2 to 4 inches, keeping it away from the tree trunk. Regularly inspect the area for weeds and remove them promptly.
Protecting From Pests and Diseases
Black walnut trees are susceptible to several pests and diseases. Protecting the trees from these threats is essential for their health and longevity. This involves monitoring the trees for signs of infestation or infection and taking appropriate action when necessary.
Common pests include walnut husk maggot, which damages the nuts, and various borers, which can damage the wood. Diseases include walnut anthracnose and thousand cankers disease. Regularly inspect the trees for signs of pests or diseases, such as leaf spots, wilting, or holes in the bark. Take appropriate action, such as applying insecticides or fungicides, if necessary, and consult with local experts.
Pruning
Pruning is an important aspect of caring for black walnut trees. Pruning helps shape the tree, remove dead or damaged branches, and improve air circulation. It should be done during the dormant season, typically in late winter or early spring. (See Also: Learn How to Plant Dianthus Seeds: A Complete Guide)
Remove any dead, damaged, or crossing branches. Thin out the canopy to improve air circulation and sunlight penetration. Prune the tree to promote a strong central leader and well-spaced branches. Use sharp pruning tools and make clean cuts to prevent disease.
Pro Tip: Consider fencing young trees to protect them from deer and other animals that may browse on the seedlings.
Common Mistakes to Avoid
Successfully planting black walnut seeds requires avoiding common mistakes that can hinder germination and seedling survival. Being aware of these pitfalls can significantly improve the chances of success and ensure the trees thrive. Careful planning and execution are key.
- Planting Poor Quality Seeds: Using seeds from unknown sources or that are not properly stored or prepared can lead to poor germination rates.
- Insufficient Stratification: Failing to stratify the seeds for the required duration or at the correct temperature can prevent them from breaking dormancy.
- Improper Planting Depth: Planting the seeds too shallowly or too deeply can negatively affect germination and root development.
- Neglecting Weed Control: Allowing weeds to compete with young seedlings for resources can stunt their growth and even kill them.
- Ignoring Pests and Diseases: Failing to monitor the trees for pests and diseases and taking appropriate action can lead to significant damage and even tree death.
Conclusion
Planting black walnut seeds is a fulfilling activity that can provide both aesthetic and economic benefits for years to come. By carefully selecting seeds, preparing them correctly, and following the proper planting and maintenance techniques, you can significantly increase your chances of success. Embrace the process, be patient, and enjoy watching these magnificent trees grow, enriching your landscape and potentially providing valuable resources.
Recommended Products