Imagine the aroma of freshly harvested bay leaves, infusing your culinary creations with a subtle, yet distinct, flavor. Growing your own bay laurel tree, Laurus nobilis, provides this luxury and is easier than you might think. This guide will walk you through every step, from selecting the right plant to harvesting your first batch of aromatic leaves.
Whether you have a sprawling garden or a sunny balcony, you can cultivate this versatile herb. We’ll explore the ideal conditions, propagation methods, and essential care tips to ensure your bay leaf plant thrives. Say goodbye to store-bought leaves and hello to a constant supply of fresh, flavorful bay.
Choosing the Right Bay Leaf Plant
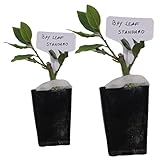
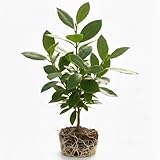
The first step in learning how to plant bay leaves is selecting a healthy plant. This choice sets the stage for success. You can start with a seedling, a young plant, or even propagate from cuttings. Consider your climate and available space when making your decision.
Seedlings vs. Established Plants
Bay laurel seedlings are less expensive but require more patience and care. They are more susceptible to environmental stressors. Established plants, on the other hand, offer a head start, often providing leaves within the first year. These are typically more expensive but save you time.
Where to Buy
You can find bay leaf plants at local nurseries, garden centers, and online retailers. When purchasing, inspect the plant carefully. Look for vibrant green leaves, avoid any signs of pests or diseases, and check the root system. A healthy root system is crucial for long-term growth.
Choosing the Right Variety
While Laurus nobilis is the most common bay leaf variety, other cultivars exist, though they aren’t as widely available. Ensure you’re getting the true bay laurel, as other plants are sometimes incorrectly labeled as bay. Consider the size the tree will grow to and choose a pot or planting location accordingly.
Ideal Growing Conditions
Bay laurel trees thrive in specific conditions. Understanding these requirements is key to healthy growth and a bountiful harvest. Proper sunlight, soil, and watering are crucial for thriving plants.
Sunlight Requirements
Bay laurel trees need at least six hours of direct sunlight per day. If you’re growing your plant indoors, place it near a south-facing window. Insufficient sunlight can lead to leggy growth and reduced leaf production. Supplement with artificial grow lights if necessary, particularly during the winter months.
Soil Preferences
Well-draining soil is essential for bay laurel trees. They don’t tolerate waterlogged conditions, which can lead to root rot. A loamy soil mix, rich in organic matter, is ideal. Amend heavy clay soils with compost and sand to improve drainage. Use a potting mix specifically designed for herbs if growing in containers.
Watering Guidelines
Water your bay leaf plant regularly, especially during the growing season. Allow the soil to dry slightly between waterings to prevent overwatering. In the winter, reduce watering frequency. Monitor the soil moisture by inserting your finger a couple of inches into the soil. Water when the top inch or two feels dry.
Temperature and Climate Considerations
Bay laurel trees are relatively cold-hardy, tolerating temperatures down to about 20°F (-6°C) for short periods. However, they prefer warmer climates. In colder regions, grow your plant in a container that can be moved indoors during winter. Protect them from harsh winds and extreme temperatures. (See Also: Planting Water Lilies: How Deep to Plant Water Lily for Success)
Planting Your Bay Leaf Tree
Once you’ve chosen your plant and prepared your location, it’s time to plant. Proper planting techniques ensure the plant establishes itself quickly and thrives. The steps involved are straightforward, but each contributes to the overall success.
Planting in the Ground
Choose a sunny spot with well-draining soil. Dig a hole twice as wide and just as deep as the root ball. Gently remove the plant from its container and loosen any circling roots. Place the plant in the hole, ensuring the top of the root ball is level with the soil surface. Backfill the hole with soil, gently tamping it down. Water thoroughly after planting.
Planting in a Container
Select a container with drainage holes. Choose a pot that is at least 12 inches in diameter initially. Fill the container with a well-draining potting mix. Remove the plant from its nursery pot and gently loosen the roots. Place the plant in the pot and fill the remaining space with potting mix, leaving about an inch of space at the top. Water thoroughly after planting.
Spacing Requirements
If planting multiple bay laurel trees, space them at least 10-12 feet apart to allow for mature growth. In container gardening, ensure each plant has enough space to thrive without overcrowding. Overcrowding reduces airflow, increasing the risk of diseases.
Caring for Your Bay Leaf Plant
Consistent care is essential for maintaining a healthy and productive bay leaf tree. This includes regular watering, fertilizing, pruning, and protection from pests and diseases. Proper care maximizes leaf production.
Watering and Fertilizing
Water regularly, especially during dry spells. Fertilize your bay leaf plant during the growing season (spring and summer) with a balanced, slow-release fertilizer or a liquid fertilizer diluted to half strength. Avoid over-fertilizing, which can burn the roots.
Pruning Techniques
Prune your bay laurel tree annually to maintain its shape and encourage new growth. Pruning is best done in late winter or early spring. Remove any dead, damaged, or crossing branches. You can also prune to control the size of the tree. The leaves are best used when young, so pruning promotes the harvest of the best leaves.
Pest and Disease Management
Bay laurel trees are relatively pest-resistant, but they can occasionally be affected by scale insects, spider mites, or aphids. Inspect your plant regularly for any signs of infestation. Treat infestations with insecticidal soap or neem oil. Good air circulation also helps prevent the development of fungal diseases. Ensure the plant receives proper sunlight and avoid overwatering to minimize disease risk.
Common Problems and Solutions
Yellowing leaves can indicate overwatering, underwatering, or nutrient deficiencies. Brown leaf tips can be a sign of insufficient humidity or salt buildup from fertilizer. Addressing these issues early can prevent further damage to the plant. Root rot is a common problem caused by waterlogged soil; ensure proper drainage.
Propagating Bay Leaf Trees
Propagating bay leaf trees allows you to expand your collection or share plants with friends. This can be achieved through various methods, including cuttings, layering, and seed propagation. Propagation ensures you have a readily available supply of bay leaf plants. (See Also: Minecraft Pe: How to Plant Cocoa Beans for Chocolate)
Propagation From Cuttings
Take softwood cuttings in spring or early summer. Select healthy, non-flowering stems that are about 4-6 inches long. Remove the leaves from the bottom half of the cutting. Dip the cut end in rooting hormone and plant it in a pot filled with a well-draining potting mix. Keep the soil moist and provide bright, indirect light. Roots should develop in a few weeks.
Layering Techniques
Layering involves bending a low-growing branch down to the soil and burying a portion of it. Make a small cut on the underside of the branch where it will be buried. Bury the cut portion in the soil, securing it with a wire or a rock. Keep the soil moist. Once roots develop, usually within a few months, you can sever the branch from the parent plant and transplant it.
Seed Propagation
Bay laurel seeds are not readily available and can be slow to germinate. If you obtain seeds, sow them in a well-draining potting mix. Keep the soil consistently moist and provide warmth. Germination can take several weeks or months. Seed propagation is less common due to the lengthy process and lower success rates.
Harvesting and Using Bay Leaves
Once your bay leaf tree is established, you can begin harvesting leaves. Proper harvesting techniques ensure you obtain the best flavor and quality. The use of harvested bay leaves elevates culinary experiences.
When to Harvest
Harvest bay leaves when they are mature and have a rich green color. You can harvest leaves year-round, but the flavor is often strongest in the spring and summer. Avoid harvesting during periods of extreme heat or cold.
Harvesting Methods
Simply snip leaves from the branches using clean scissors or pruning shears. Avoid taking too many leaves at once, as this can stress the plant. Harvest the older leaves first, leaving the younger leaves to continue growing. Harvest from different areas of the plant to maintain its shape.
Drying and Storing Bay Leaves
Dry bay leaves to preserve their flavor. You can air-dry them by hanging sprigs upside down in a well-ventilated area, or you can dry them in a dehydrator or oven at a low temperature. Store dried bay leaves in an airtight container in a cool, dark place. Properly dried and stored leaves can retain their flavor for up to a year.
Culinary Uses of Bay Leaves
Bay leaves are a versatile herb used in a wide range of dishes. They add a subtle, savory flavor to soups, stews, sauces, and braised meats. Remove the leaves before serving, as they are not meant to be eaten. Experiment with different recipes to discover the full potential of bay leaves.
Troubleshooting Common Issues
Even with proper care, bay leaf plants can sometimes encounter issues. Understanding how to diagnose and address these problems is crucial for plant health and productivity. Addressing problems early minimizes their impact.
Yellowing Leaves
Yellowing leaves can be caused by various factors, including overwatering, underwatering, or nutrient deficiencies. Check the soil moisture and adjust your watering accordingly. Test the soil pH and consider a balanced fertilizer if nutrient deficiencies are suspected. (See Also: Unveiling: How a Natural Gas Cryogenic Plant Works)
Brown Leaf Tips
Brown leaf tips can indicate insufficient humidity, salt buildup from fertilizer, or sunburn. Increase humidity by misting the plant or placing it on a tray of pebbles filled with water. Flush the soil occasionally to remove excess fertilizer salts. Ensure the plant receives adequate shade during the hottest part of the day.
Pests and Diseases
Inspect your plant regularly for pests and diseases. Common pests include scale insects, spider mites, and aphids. Treat infestations with insecticidal soap or neem oil. Fungal diseases can be prevented by ensuring good air circulation and avoiding overwatering.
Frequently Asked Questions (paa Integration)
How Do You Propagate Bay Leaves?
You can propagate bay leaves from cuttings, layering, or seeds. Cuttings are the most common and easiest method. Take softwood cuttings in spring or early summer, dip them in rooting hormone, and plant them in a well-draining potting mix. Layering involves bending a branch to the soil and burying a portion of it. Seed propagation is possible but slow and less reliable.
How Long Does It Take for a Bay Leaf Tree to Produce Leaves?
A bay leaf tree can start producing leaves within the first year, particularly if you start with an established plant. Seedlings may take longer. The amount of leaf production will increase as the tree matures and grows larger. Factors like sunlight, water, and fertilization also influence leaf production.
Can Bay Leaves Be Grown Indoors?
Yes, bay leaves can be grown indoors, especially in colder climates where outdoor conditions are not suitable. Place your bay leaf plant near a south-facing window or use grow lights to provide sufficient sunlight. Ensure the plant receives proper watering and fertilization. Regular pruning helps maintain its shape and encourages growth.
What Is the Best Soil for Bay Leaf Trees?
The best soil for bay leaf trees is a well-draining mix that is rich in organic matter. A loamy soil is ideal. Avoid heavy clay soils, which can lead to waterlogging and root rot. Amend clay soils with compost and sand to improve drainage. A potting mix specifically designed for herbs can also be used, especially for container gardening.
How Do You Water a Bay Leaf Tree?
Water your bay leaf tree regularly, especially during the growing season. Allow the soil to dry slightly between waterings to prevent overwatering. In the winter, reduce watering frequency. Monitor the soil moisture by inserting your finger a couple of inches into the soil. Water when the top inch or two feels dry.
Conclusion: Cultivating Your Own Bay Leaf Bounty
Learning how to plant bay leaves is a rewarding experience. By following these guidelines, you can cultivate a thriving bay leaf tree and enjoy fresh, flavorful leaves for years to come. From selecting the right plant to harvesting and using the leaves, the process is manageable and enjoyable. Embrace the journey of growing your own bay leaves and savor the culinary rewards. Enjoy the fragrant aroma and delicious flavor that fresh bay leaves bring to your kitchen. Happy gardening!
Recommended Products