Are you dreaming of a majestic black walnut tree gracing your property, providing shade, beauty, and a bounty of delicious nuts? Planting a black walnut seed is a rewarding endeavor, connecting you with nature and offering a lasting legacy. However, successful cultivation requires understanding the specific needs of this magnificent tree species.
This comprehensive guide delves into the intricacies of how to plant a black walnut seed, providing step-by-step instructions, expert tips, and essential information to maximize your chances of success. We’ll cover everything from seed selection and preparation to planting techniques and ongoing care, ensuring you have the knowledge to nurture your walnut seed into a thriving tree. Get ready to embark on a journey that will yield years of enjoyment.
Black walnut trees are known for their valuable timber, their delicious nuts, and their important role in the ecosystem. By following this guide, you’ll be well on your way to adding this remarkable tree to your landscape and enjoying all its benefits. Let’s get started!
Choosing and Preparing Your Black Walnut Seeds
The foundation of a successful black walnut tree starts with selecting high-quality seeds. The characteristics of the seed will directly impact the tree’s future health and vigor. Poor quality seeds will likely lead to stunted growth or complete failure. Take your time and follow these important steps.
Seed Source and Selection
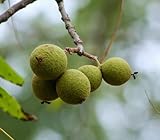
The best seeds come from mature, healthy black walnut trees. Look for trees that exhibit robust growth, are free from diseases, and produce abundant nuts. Ideally, source your seeds from a tree that is adapted to your local climate and soil conditions, as this will increase the chances of successful germination and long-term survival. Consider the mature size of the tree you are sourcing from to make sure it will fit well in your yard.
If you’re collecting nuts yourself, gather them in the fall when they have naturally fallen from the tree. Avoid collecting nuts that have been damaged by pests or diseases. If you are purchasing seeds, choose a reputable nursery or seed supplier known for providing high-quality black walnut seeds. Check for freshness and viability before making your purchase. Check reviews to make sure you are getting the best seeds.
Seed Cleaning and Storage
Once you’ve collected or purchased your black walnut seeds, the next step is to clean and store them properly. This process is crucial for preventing mold and ensuring the seeds remain viable until planting time. This will help prevent disease and ensure successful germination.
- Remove the Hull: The outer husk, or hull, of the black walnut fruit should be removed promptly after collection. This can be done by hand, using a nutcracker, or by soaking the nuts in water for a few days to soften the hull. Wear gloves to protect your hands from the staining properties of the hull.
- Wash the Nuts: Thoroughly wash the cleaned nuts to remove any remaining debris or hull particles. This helps prevent fungal growth during storage. Use clean water and gently scrub the nuts.
- Dry the Nuts: Allow the cleaned nuts to air dry completely. Spread them out in a single layer in a well-ventilated area, away from direct sunlight. This is important to prevent mold.
- Storage: Store the dried nuts in a cool, dry place. A refrigerator or a cool basement is ideal. Place the nuts in a breathable container, such as a burlap bag or a mesh bag, to allow for air circulation. This will prevent mold and rot.
Seed Viability Test
Before planting, it’s a good idea to test the viability of your seeds. This helps you determine the percentage of seeds that are likely to germinate, allowing you to adjust your planting strategy accordingly. This will help you avoid disappointment later on.
There are a few methods you can use to test seed viability:
- Float Test: Place the nuts in a bucket of water. Nuts that sink are generally viable, while those that float are likely non-viable. This is a quick and easy test but not always completely accurate.
- Cutting Test: Carefully cut open a few nuts and examine the kernels. A healthy kernel will be firm, plump, and a creamy white color. If the kernel is shriveled, discolored, or shows signs of insect damage, the seed is likely not viable.
- Germination Test: For a more accurate test, place a small number of seeds on a moist paper towel inside a plastic bag. Keep the paper towel moist and the bag in a warm location. Check the seeds regularly for germination. This will give you a good indication of the overall viability of your seed lot.
Stratification: Preparing the Seeds for Germination
Black walnut seeds require a period of cold, moist stratification to break dormancy and trigger germination. This process mimics the natural conditions the seeds would experience during winter. This is a critical step for successful germination.
The Importance of Stratification
Stratification is essential for several reasons. It softens the seed coat, allowing water to penetrate and initiate the germination process. It also helps break down chemical inhibitors that prevent premature germination. Without proper stratification, the seeds may not germinate at all, or they may germinate sporadically and unevenly. (See Also: How to Plant Food Plots for Deer: A Comprehensive Guide)
Stratification Methods
There are two primary methods for stratifying black walnut seeds:
- Outdoor Stratification: This is the most natural method. Plant the seeds outdoors in the fall, about 2-4 inches deep, in a well-drained bed or container. Protect the seeds from rodents and other animals by covering the planting area with hardware cloth or chicken wire. The natural freeze-thaw cycles of winter will provide the necessary stratification.
- Refrigerated Stratification: This method involves mimicking the winter conditions in a refrigerator. Place the seeds in a moist medium, such as damp sand or peat moss, inside a plastic bag or container. Keep the medium consistently moist but not waterlogged. Store the seeds in the refrigerator at a temperature of 33-40°F (1-4°C) for 60-90 days. Check the seeds periodically for any signs of mold or rot.
Monitoring and Troubleshooting
Regardless of the stratification method you choose, it’s important to monitor the seeds regularly. Check for mold, rot, or any signs of premature germination. If you notice any problems, adjust the conditions accordingly. For example, if the seeds are too wet, you can improve ventilation or reduce the moisture level. If the seeds are drying out, add more moisture.
Planting Your Black Walnut Seeds
Once your seeds have been properly stratified, it’s time to plant them. Proper planting techniques are crucial for ensuring successful germination and the healthy development of your seedlings. Follow these guidelines for optimal results.
Timing and Site Selection
The best time to plant black walnut seeds is in the spring, after the last frost has passed. This gives the seedlings a full growing season to establish their roots before the following winter. Choose a planting site that receives full sun or partial shade. Black walnuts thrive in well-drained soil that is rich in organic matter. Avoid planting in areas with poor drainage or where water tends to pool.
Consider the mature size of the black walnut tree when selecting your planting site. Black walnuts can grow to be quite large, so ensure there is enough space for the tree to spread its branches without interfering with buildings, power lines, or other structures. Also, consider the impact of the tree’s allelopathic properties (see below) on nearby plants.
Soil Preparation and Planting Depth
Before planting, prepare the soil by loosening it and removing any weeds, rocks, or debris. Amend the soil with compost or other organic matter to improve drainage and fertility. This will help the roots grow well. The right soil is very important.
Plant the seeds 2-4 inches deep, with the pointed end of the nut facing downward. Space the seeds at least 15-20 feet apart to allow for adequate growth. If planting in rows, space the rows at least 20 feet apart. Cover the seeds with soil and gently tamp it down.
Watering and Mulching
After planting, water the seeds thoroughly to settle the soil and provide moisture for germination. Keep the soil consistently moist but not waterlogged during the germination period. Once the seedlings have emerged, water them regularly, especially during dry spells. Mulch around the seedlings with wood chips or other organic material to help retain moisture, suppress weeds, and regulate soil temperature.
Avoid using mulches that are too close to the seedling’s trunk, as this can encourage rot. Keep the mulch a few inches away from the base of the seedling. Mulch will help protect your seed.
Protecting From Pests and Animals
Young black walnut seedlings are vulnerable to pests and animals. Protect your seedlings from deer, rabbits, squirrels, and other animals by using fencing, tree guards, or repellents. Inspect your seedlings regularly for any signs of pest damage or disease. Take action promptly if you notice any problems. (See Also: Master the Art: How to Plant Passion Fruit for Bountiful Harvests)
Ongoing Care for Your Black Walnut Seedling
Once your black walnut seedlings have emerged and established themselves, ongoing care is essential for their long-term health and growth. This includes regular watering, fertilization, pruning, and protection from pests and diseases. Following these steps will help ensure a healthy tree.
Watering and Fertilization
Water your young black walnut trees regularly, especially during dry periods. Water deeply, allowing the water to penetrate the soil around the roots. Avoid shallow, frequent watering, which can encourage shallow root growth. Fertilize your seedlings annually in the spring with a balanced fertilizer designed for trees. Follow the manufacturer’s instructions for application rates.
Pruning and Training
Prune your black walnut trees annually in late winter or early spring, before new growth begins. Remove any dead, damaged, or crossing branches. Also, prune out any branches that are competing with the central leader. This helps to promote strong growth and a desirable tree shape. Proper pruning is very important.
Train your trees to develop a strong central leader and a well-balanced crown. This helps to ensure the tree’s structural integrity and resistance to wind damage. You can use stakes and ties to help train young trees. Remove the stakes and ties once the tree is established.
Pest and Disease Management
Black walnut trees are susceptible to certain pests and diseases. Monitor your trees regularly for any signs of infestation or disease. Common pests include walnut husk maggots, walnut caterpillars, and aphids. Common diseases include walnut anthracnose and thousand cankers disease.
Take preventative measures to minimize the risk of pests and diseases. This includes maintaining good tree health through proper watering, fertilization, and pruning. Remove any fallen leaves and nuts promptly to reduce the spread of diseases. If you notice any pests or diseases, take action promptly. Contact a local arborist or extension office for advice on appropriate treatments.
Allelopathy and Companion Planting
Black walnut trees exhibit allelopathy, meaning they release a chemical called juglone into the soil. Juglone can inhibit the growth of certain other plants. This is important to consider when planting other plants around your black walnut tree. Understanding this will help you plan your landscaping.
Some plants are tolerant of juglone, while others are sensitive. Plants that are tolerant of juglone include many grasses, some vegetables (such as beans and squash), and some ornamental plants (such as hostas and daylilies). Plants that are sensitive to juglone include tomatoes, peppers, potatoes, and azaleas. When planning your landscape, choose plants that are compatible with the black walnut tree’s allelopathic properties.
Troubleshooting Common Problems
Even with careful planning and execution, you may encounter some challenges when planting and growing black walnut trees. Here are some common problems and how to address them.
Poor Germination
If your seeds are not germinating, there could be several reasons. The seeds may not have been properly stratified. Ensure that the seeds were exposed to the required period of cold, moist conditions. The seeds may have been planted too deep or too shallow. The soil may be too dry or too wet. Pests or animals may have damaged the seeds. Check your planting depth and soil moisture levels. If necessary, replant with new seeds, ensuring you follow all the steps outlined above. (See Also: Planting Liatris Bulbs: How Deep to Plant & Thrive)
Slow Growth
If your seedlings are growing slowly, there could be several factors contributing to this. The soil may be lacking in nutrients. The seedlings may not be receiving enough sunlight. The seedlings may be competing with weeds for resources. Pests or diseases may be affecting the seedlings. Amend the soil with compost or fertilizer. Ensure the seedlings are receiving adequate sunlight. Control weeds. Inspect the seedlings for pests and diseases. Provide the proper nutrients.
Pest and Disease Issues
Pests and diseases can significantly impact the health and growth of your black walnut trees. Inspect your trees regularly for any signs of infestation or disease. Common pests include walnut husk maggots, walnut caterpillars, and aphids. Common diseases include walnut anthracnose and thousand cankers disease. Take preventative measures to minimize the risk of pests and diseases. This includes maintaining good tree health through proper watering, fertilization, and pruning. Remove any fallen leaves and nuts promptly to reduce the spread of diseases. If you notice any pests or diseases, take action promptly. Contact a local arborist or extension office for advice on appropriate treatments.
Harvesting and Utilizing Black Walnuts
Once your black walnut tree matures, you’ll be able to enjoy the fruits of your labor – delicious and nutritious black walnuts. Harvesting and utilizing these nuts can be a rewarding experience. Be patient; it takes many years for the tree to produce nuts.
Harvesting the Nuts
Black walnuts typically ripen in the fall. The nuts will fall from the tree when they are ready to harvest. Gather the nuts promptly after they fall to prevent them from being eaten by squirrels or other animals. Wear gloves to protect your hands from the staining properties of the hulls. Remove the hulls as soon as possible after harvesting.
Processing the Nuts
After removing the hulls, wash the nuts thoroughly to remove any remaining debris. Allow the nuts to air dry completely. Store the dried nuts in a cool, dry place. Black walnuts have a hard shell, so you’ll need a nutcracker to crack them open. There are specialized black walnut crackers available that can make the process easier. Be careful when cracking the nuts to avoid damaging the kernels.
Culinary Uses
Black walnuts have a rich, distinctive flavor that makes them a versatile ingredient in a variety of culinary dishes. They can be used in baked goods, such as cookies, cakes, and breads. They can also be added to salads, ice cream, and other desserts. Black walnuts can be used to make walnut oil, which has a unique flavor and aroma. Experiment with different recipes and enjoy the delicious flavor of black walnuts.
Other Uses
In addition to their culinary uses, black walnuts have other valuable applications. The wood of the black walnut tree is highly prized for its strength, beauty, and durability. It is used in furniture making, cabinetry, and other woodworking projects. The hulls of the black walnut are used to make dyes and stains. Black walnuts can also be used in crafts and other creative projects. The tree is very versatile.
Conclusion: Nurturing Your Black Walnut Legacy
Planting a black walnut seed is a commitment, but it’s a deeply rewarding one. By following this guide, you’ve gained the knowledge needed to nurture your seed into a thriving tree. Remember that patience and consistent care are key. Over time, you’ll witness the transformation of a small seed into a majestic tree, providing shade, beauty, and a harvest of delicious nuts for generations to come. Enjoy the journey, and celebrate your connection with nature!
Recommended Products