Dreaming of a peaceful afternoon swinging under the shade of your favorite tree? A tree swing is a timeless source of joy for all ages. But what happens when your ideal tree has a branch that isn’t perfectly horizontal? Don’t let an angled branch deter you from creating your backyard oasis. It’s entirely possible to hang a tree swing safely and securely, even on a slope.
This guide will walk you through the process, addressing the unique challenges an angled branch presents. We’ll cover everything from choosing the right spot and materials to the step-by-step installation. Get ready to transform your backyard into a haven of relaxation and fun, no matter your tree’s quirky angles.
Mastering the Angled Branch: How to Hang a Tree Swing
Hanging a tree swing is a fantastic project that can bring years of enjoyment. While a perfectly level branch might seem ideal, many beautiful, sturdy branches have a natural angle. This doesn’t mean you can’t proceed! With the right approach and a little know-how, you can successfully hang your swing on an angled branch, ensuring it’s both safe and fun.
Why Angled Branches Present a Challenge (and How to Overcome It)
The primary concern with an angled branch is ensuring the swing hangs level and doesn’t put undue stress on the anchor points. A swing hanging on a perfectly horizontal branch will naturally sit level. However, on an angled branch, gravity pulls downwards. If you simply attach ropes or chains directly, the swing seat will likely tilt, making it uncomfortable and potentially unsafe. The goal is to counteract this tilt.
The solution lies in adjusting the hanging points. By strategically placing your anchor points, you can compensate for the branch’s angle and achieve a level swing. This often involves using two separate anchor points on the branch, or a single anchor point with a specialized hanging kit designed for such situations.
Choosing the Right Tree and Branch
Before you even think about tools, let’s talk about the foundation: your tree and the branch itself. Not all trees or branches are created equal when it comes to supporting a swing.
Tree Health and Species
- Healthy Tree: The tree must be mature and healthy. Look for signs of disease, rot, or damage. A qualified arborist can assess your tree’s health if you’re unsure.
- Strong Wood: Hardwoods like oak, maple, and beech are generally excellent choices. Avoid softer woods like pine or poplar, which might not be as strong.
- Mature Tree: Ensure the tree has a well-established root system and a strong trunk. Young trees are still growing and may not be able to support the weight.
Branch Selection Criteria
When assessing a branch for your swing, consider the following: (See Also: How Long Does a Cherry Tree Live? Unveiling Its Lifespan)
- Diameter: The branch should be at least 8 inches in diameter, preferably larger, to safely support the weight of the swing and its occupants.
- Length: The branch should extend far enough from the trunk to allow for ample swinging space without hitting the tree.
- Angle and Slope: While we’re focusing on angled branches, evaluate the degree of the angle. A moderate angle is manageable. An extremely steep angle might be too difficult to compensate for or could indicate a weaker branch structure.
- Clearance: Ensure there are no obstructions below or around the swing area, such as fences, other branches, or rocks.
- Attachment Points: Look for a section of the branch that is relatively smooth and free of bark damage where you’ll attach your hardware.
Essential Tools and Materials
Gathering the right supplies is crucial for a successful and safe installation. For hanging a swing on an angled branch, you’ll need:
Hardware Options
- Heavy-Duty Rope: Look for strong, weather-resistant rope like polyester or nylon, with a weight capacity far exceeding your expected load. For a single-point suspension, you might need a longer, thicker rope.
- Heavy-Duty Chain: Galvanized steel chain is a popular and durable choice. Ensure it’s rated for outdoor use and has a sufficient weight capacity.
- Eye Bolts or Lag Screws: These are essential for attaching ropes or chains to the branch. Choose ones that are galvanized or stainless steel to prevent rust. Ensure they are long and strong enough to penetrate deep into the wood.
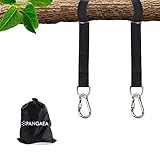
- Swing Hangers/Brackets: Specialized swing hangers can simplify the process and offer good support. Some are designed to accommodate angled branches.
- Carabiners or Quick Links: These are useful for connecting ropes/chains to the eye bolts or hangers and for making adjustments.
- Tree Straps (Optional but Recommended): For protecting the tree’s bark and distributing weight, tree straps are a great addition. They wrap around the branch and have loops for attaching your hardware.
- Swinging Seat: Choose a seat material that suits your needs – wood, plastic, or fabric.
- Tools: You’ll need a drill with appropriate drill bits, a socket wrench or adjustable wrench, a tape measure, a level, a ladder, safety glasses, and gloves.
Step-by-Step Guide to Hanging Your Swing on an Angled Branch
Now that you have your materials and a chosen branch, let’s get to work. The key here is to compensate for the angle to ensure your swing hangs level.
Method 1: Two Anchor Points on the Angled Branch
This is often the most straightforward method for angled branches. By creating two distinct anchor points on the branch, you can adjust the lengths of the ropes or chains to achieve a level seat.
- Determine the Swing’s Position: Decide exactly where you want the swing to hang. Measure the desired distance from the trunk and consider the clearance needed for swinging.
- Mark Anchor Points: Place your swing seat on the ground directly below where it will hang. Measure the distance between the two points on the seat where the ropes or chains will attach. This will be the approximate distance between your two anchor points on the branch.
- Prepare the Branch: If using eye bolts or lag screws, you’ll need to pre-drill holes. The size of the drill bit should be slightly smaller than the diameter of the screw. For a branch with a significant angle, it’s often best to drill the holes at a slight angle themselves, perpendicular to the surface of the branch at that specific point. This ensures the bolt or screw is driven straight into the wood’s grain. Pre-drilling is crucial to prevent splitting the branch.
- Install Anchor Hardware:
- Eye Bolts/Lag Screws: Screw the eye bolts or lag screws securely into the pre-drilled holes. Ensure they are deeply embedded for maximum strength. If using lag screws, you might need a wrench to tighten them fully.
- Tree Straps: If using tree straps, wrap them around the branch at your marked points and secure them according to the manufacturer’s instructions. Then, attach your eye bolts or carabiners to the loops on the straps.
- Attach Ropes or Chains:
- Measure and Cut: Measure the distance from each anchor point to where you want the swing seat to hang. For an angled branch, you will likely need to adjust the lengths. Start with one side. Attach one end of your rope or chain to the anchor point (using a carabiner or quick link if necessary).
- Connect to Seat: Thread the other end of the rope or chain through the attachment point on your swing seat.
- Adjust for Level: This is the critical step for angled branches. Hang the seat temporarily. Use a level to check if the seat is horizontal. You will almost certainly need to adjust the length of the ropes/chains. For the side that is higher up the angled branch (closer to the trunk), you might need a slightly longer rope/chain. For the side lower down the angled branch, you might need a slightly shorter rope/chain. Experiment with different lengths until the seat hangs perfectly level.
- Secure the Ropes/Chains: Once the seat is level, permanently secure the ropes or chains to the swing seat. This might involve tying strong knots (like a bowline or figure-eight knot) or using clamps, depending on your seat’s design.
- Test the Swing: Before allowing anyone to sit on the swing, gently pull down on it with your weight. Listen for any creaking or unusual noises. Gradually increase the weight to ensure it’s stable and secure.
Method 2: Single Anchor Point with a Specialized Hanger
Some specialized swing hangers are designed to allow for a level hang even from an angled branch. These often involve a swivel mechanism and a way to adjust the attachment points of the seat.
- Choose the Right Hanger: Research and purchase a swing hanger specifically designed for angled branches or that offers significant adjustability. These often have a central pivot point and two separate attachment points for the seat.
- Install the Hanger: Follow the manufacturer’s instructions carefully. This will likely involve installing a single, robust anchor point (like a heavy-duty eye bolt or lag screw) into the angled branch.
- Attach the Seat: Connect your swing seat to the hanger’s adjustable arms or ropes using the provided hardware.
- Adjust for Level: Use a level to ensure the seat is horizontal. Most specialized hangers will have a mechanism to adjust the length of the ropes or chains on either side of the seat until it hangs perfectly level.
- Test Thoroughly: As with Method 1, test the swing’s stability and security with increasing weight before use.
Important Considerations for Safety and Longevity
Hanging a swing is more than just attaching it; it’s about ensuring it’s safe for everyone who uses it and that it lasts for years to come.
Protecting Your Tree
- Use Tree Straps: As mentioned, tree straps are highly recommended. They prevent the rope or chain from cutting into the bark, which can damage the tree and weaken the attachment point over time.
- Avoid Girdling: Never wrap ropes or chains directly around the branch without protection, as this can girdle the branch, cutting off its nutrient flow and potentially killing it.
- Regular Inspection: Periodically inspect the tree for any signs of stress or damage around the anchor points.
Weight Limits and Usage
- Know the Limits: Always adhere to the weight limits specified by your hardware and swing manufacturer. Overloading the swing can lead to failure.
- Supervise Children: Always supervise children when they are using the swing.
- One at a Time: For most swings, especially those hung from a single branch, it’s best to limit use to one person at a time to prevent excessive stress.
Maintenance and Inspection
- Regular Checks: Before each use, do a quick visual inspection. Look for frayed ropes, rusted chains, loose hardware, or any signs of wear and tear.
- Seasonal Maintenance: At least once a year, perform a thorough inspection. Tighten any loose bolts or screws. Check ropes for signs of rot or UV damage. Clean chains and lubricate any moving parts if necessary.
- Weather Considerations: In harsh weather conditions, consider removing the swing seat to prevent damage from ice, snow, or strong winds.
Troubleshooting Common Issues
Even with careful planning, you might encounter a few hiccups. Here’s how to address them: (See Also: How to Grow Cherry Tree Minecraft: Your Ultimate Guide!)
- Swing Tilting: If your swing consistently tilts despite your best efforts, re-examine your anchor point lengths. Small adjustments can make a big difference. Ensure the branch itself isn’t twisting or shifting.
- Squeaking Noises: Squeaking often comes from the hardware rubbing. Try lubricating the connections with a silicone-based lubricant. If it’s from the ropes rubbing on the branch (even with straps), you might need to adjust the position slightly or add extra padding.
- Hardware Loosening: Over time, vibrations can loosen hardware. Regularly check and tighten all bolts, screws, and clamps.
- Uneven Swing Path: If the swing path is erratic, ensure your anchor points are equidistant from the center of the swing and that the ropes/chains are not twisted.
Alternative Hanging Methods for Angled Branches
While the two-point suspension is common, here are other ideas to consider:
1. The “v” Shape Hanger
Some specialized hangers create a “V” shape, allowing the two attachment points to spread out and compensate for the branch’s angle. These are often designed with adjustable lengths.
2. The Single Heavy-Duty Eye Bolt with Extended Ropes
In some cases, if the angle is moderate and the branch is exceptionally strong, a single, very heavy-duty eye bolt can be used. The key here is to use very long ropes that can be adjusted to hang level. You’d essentially be creating your own adjustable two-point system from a single anchor.
3. Using an a-Frame or Swing Set Frame
If your angled branch proves too challenging, or you want a more permanent and adjustable solution, consider building or buying an A-frame or a standalone swing set. This bypasses the need to hang directly from the tree branch altogether.
Calculating Rope/chain Lengths for Angled Branches
This is where things can get a little mathematical, but a good approximation is usually sufficient. Let’s say your branch has an angle of 15 degrees. If you attach your swing seat directly below the branch, gravity will pull it downwards, causing a tilt.
To compensate, you need to shorten the rope/chain on the side that is lower on the angle and potentially lengthen it on the side higher on the angle. Imagine drawing a horizontal line where you want your seat to be. The distance from the branch to this line will be different for each attachment point. (See Also: Your Ultimate Guide: How to Set Up a Family Tree)
Practical Approach:
- Start by attaching one side of the swing with a reasonable length of rope/chain.
- For the second side, attach it and let the swing hang.
- Use your level. If the swing is tilted, you’ll need to adjust.
- If the front of the swing is lower than the back (assuming the branch slopes down from back to front), you’ll need to shorten the front rope/chain or lengthen the back rope/chain.
- Make small adjustments (a few inches at a time) and re-level until it’s perfect.
Table: Hardware Load Ratings
| Hardware Type | Typical Safe Working Load (SWL) | Notes |
|---|---|---|
| 1/2″ Galvanized Steel Chain | ~2,000 lbs | Per link. Ensure overall chain rating is sufficient. |
| 3/8″ Galvanized Steel Chain | ~1,000 lbs | Per link. |
| 3/8″ Galvanized Lag Screw (Eye Bolt) | ~1,500 – 3,000 lbs | Depends heavily on wood penetration and species. |
| 1/2″ Galvanized Lag Screw (Eye Bolt) | ~2,500 – 5,000 lbs | For larger branches and heavier loads. |
| Heavy-Duty Rope (Polyester/Nylon) | ~500 – 2,000 lbs | Per strand. Check manufacturer’s rating. Braided ropes are often stronger. |
| Tree Straps | ~3,000 – 5,000 lbs | Typically rated for high loads. Always check product specifics. |
Important: These are *typical* ratings. Always check the manufacturer’s specifications for the exact load rating of the hardware you purchase. Double the expected maximum weight of users for safety.
Verdict
Hanging a tree swing on an angled branch is absolutely achievable with careful planning and the right techniques. By using two anchor points or specialized hardware, and meticulously adjusting rope or chain lengths, you can ensure your swing hangs level and safely. Remember to prioritize tree health, use sturdy, weather-resistant materials, and always perform thorough safety checks before enjoying your new swing. Your backyard oasis awaits!
Recommended Products