The majestic Sweet Gum tree (Liquidambar styraciflua) is a stunning addition to any landscape, renowned for its star-shaped leaves that erupt in a fiery spectacle of color come autumn. While often propagated through nursery stock, there’s a unique satisfaction in nurturing this magnificent specimen from its very beginnings – a tiny seed.
Embarking on the journey of how to grow Sweet Gum tree from seeds can seem daunting, but with a little patience and the right knowledge, you can successfully cultivate your own vibrant, towering tree. This guide will walk you through every step, from seed collection to the first promising sprout, ensuring your success.
Collecting and Preparing Sweet Gum Seeds
The first crucial step in learning how to grow Sweet Gum tree from seeds is to acquire viable seeds. These seeds are found within the tree’s distinctive, spiky, ball-like fruits, often referred to as “gumballs.” These gumballs typically mature and begin to split open in the late fall or early winter, releasing their winged seeds.
When to Collect Your Gumballs
Timing is everything when it comes to seed collection. You want to collect the gumballs after they have fully matured and begun to dry out on the tree. This usually occurs from late autumn through winter. Look for gumballs that are brown and starting to crack open. Avoid green, immature gumballs, as these seeds will likely not be viable. It’s best to collect more than you think you’ll need, as not all seeds will germinate.
Gathering the Gumballs
You can collect gumballs directly from the tree by shaking branches or by gathering those that have fallen to the ground. If collecting from the ground, ensure they are not overly decayed or damaged by pests. Wearing gloves is advisable, as the “gum” from the tree can be sticky.
Extracting the Seeds
Once you have a good collection of gumballs, the next step is to extract the seeds. This process is relatively straightforward:
- Drying: Spread the collected gumballs on a dry, well-ventilated surface, like a tray or a piece of newspaper, in a warm, dry location. Allow them to dry completely for several days to a week. This will help them split open further.
- Breaking Open: Gently break open the dried gumballs. You can do this by hand, or by placing them in a sturdy bag and lightly tapping them with a hammer or rolling pin. Be careful not to crush the seeds themselves.
- Separating Seeds: Inside the gumballs, you’ll find small, winged seeds. Carefully pick out these seeds, discarding any debris or broken pieces of the gumball. The wings are part of the seed and should be kept intact.
- Cleaning: It’s a good idea to gently clean the seeds to remove any remaining pulp or debris. You can do this by lightly rubbing them between your fingers or with a soft brush.
Stratification: The Key to Germination
Sweet Gum seeds, like many temperate climate tree seeds, require a period of cold, moist stratification to break dormancy and prepare them for germination. This mimics the natural winter conditions they would experience outdoors.
Cold Stratification Process
The cold stratification process is essential for successful germination. Here’s how to do it:
- Moisten a Medium: Take a sterile medium such as peat moss, vermiculite, or sand. Moisten it thoroughly until it is damp but not waterlogged. Squeeze out any excess water.
- Mix Seeds with Medium: Combine the extracted Sweet Gum seeds with the moistened medium. Ensure the seeds are evenly distributed within the medium.
- Bagging: Place the seed-and-medium mixture into a resealable plastic bag or a container with a lid. Ensure the bag is not completely airtight; a small amount of air exchange is beneficial.
- Refrigeration: Store the bag in the refrigerator. The ideal temperature for stratification is between 34°F and 41°F (1°C and 5°C). This is typically the crisper drawer of your refrigerator.
- Duration: Stratify the seeds for a minimum of 60 to 90 days. Some sources suggest up to 120 days for optimal results. Check the medium periodically to ensure it remains consistently moist. If it starts to dry out, lightly mist it with water.
Monitoring During Stratification
While the seeds are stratifying, it’s important to check on them regularly. Look for any signs of mold or rot. If you notice any, carefully remove the affected seeds and medium, and consider replacing the medium with fresh, sterilized material. You may also see some seeds begin to sprout during this period, which is a good sign!
Sowing Your Stratified Sweet Gum Seeds
Once the stratification period is complete, your Sweet Gum seeds are ready to be sown. This is an exciting phase where you’ll see your efforts begin to bear fruit, or rather, sprouts! (See Also: How to Anchor an Artificial Christmas Tree Safely)
Choosing the Right Potting Mix
A well-draining potting mix is crucial for young seedlings. You can use a commercial seed-starting mix or create your own by combining equal parts of peat moss, perlite, and compost. The goal is to provide a light, airy medium that prevents waterlogging, which can lead to root rot.
Sowing the Seeds
When sowing your stratified seeds, follow these steps:
- Prepare Containers: Use small pots, seed trays, or even biodegradable seedling pots. Ensure they have drainage holes at the bottom.
- Fill Containers: Fill your chosen containers with the prepared potting mix, leaving about an inch of space at the top.
- Planting Depth: Sow the stratified seeds about 1/4 inch deep into the soil. You can sow them individually or in small clusters, depending on the size of your containers.
- Watering: Gently water the soil after sowing. A spray bottle is ideal for this initial watering to avoid disturbing the seeds. The soil should be kept consistently moist but not soggy.
- Covering: You can cover the containers with a clear plastic lid or plastic wrap to create a humid environment that aids germination. Ensure there are some small holes for ventilation.
Providing the Right Germination Environment
The environment in which you place your sown seeds plays a significant role in their germination success. Sweet Gum seeds prefer warmth and light.
Temperature and Light Requirements
Place your sown seeds in a warm location. An ideal temperature range for germination is between 70°F and 75°F (21°C and 24°C). A heat mat designed for seedlings can be very beneficial in maintaining consistent warmth. Once the seeds have germinated and seedlings have emerged, they will need bright, indirect light. A sunny windowsill or grow lights will suffice.
Humidity and Ventilation
Maintaining consistent humidity is important during the germination phase. If you’ve covered your containers, continue to monitor the moisture. Once seedlings emerge, it’s a good idea to gradually introduce more ventilation by removing the plastic cover for increasing periods each day. This helps to prevent damping-off disease, a common problem for young seedlings.
Caring for Your Sweet Gum Seedlings
Once your Sweet Gum seeds have germinated and you see those first delicate shoots, the real nurturing begins. Proper care at this stage will ensure your seedlings grow into healthy young trees.
Watering and Light
Continue to keep the soil consistently moist but not waterlogged. Allow the top layer of soil to dry slightly between waterings. As the seedlings grow, they will require more light. Gradually expose them to brighter, indirect sunlight. If you notice seedlings becoming leggy and pale, it indicates they need more light.
Fertilizing
Young seedlings do not require heavy fertilization. Once they have developed a few sets of true leaves, you can begin to feed them with a diluted, balanced liquid fertilizer. Follow the instructions on the fertilizer packaging, typically diluting it to half or quarter strength. Fertilize sparingly, perhaps once every 4-6 weeks.
Transplanting Seedlings
As your Sweet Gum seedlings grow larger, they will eventually outgrow their initial containers. Transplanting them into larger pots or directly into their permanent outdoor location is a crucial step. (See Also: How to Trim an Apple Tree in the Fall: A Complete Guide)
When to Transplant
You’ll know it’s time to transplant when the seedlings have several sets of true leaves and their roots are starting to fill the pot, perhaps even emerging from the drainage holes. This typically occurs a few months after germination.
Transplanting Into Larger Pots
For transplanting into larger pots, use a slightly larger container than the current one and a good quality potting mix. Gently remove the seedling from its original pot, disturbing the roots as little as possible. Place the seedling in the new pot, fill in with soil, water thoroughly, and place in a location with appropriate light. Gradually acclimate them to outdoor conditions if they have been indoors.
Transplanting Outdoors
When transplanting Sweet Gum seedlings outdoors, choose a location that receives full sun to partial shade and has well-draining soil. Dig a hole that is twice as wide as the root ball and just as deep. Gently place the seedling in the hole, backfill with soil, and water thoroughly. Ensure the seedling is planted at the same depth it was in its previous container.
Hardening Off
Before planting your seedlings outdoors permanently, it’s essential to “harden them off.” This process gradually acclimates them to outdoor conditions, such as direct sunlight, wind, and fluctuating temperatures. Start by placing them in a sheltered outdoor location for a few hours each day, gradually increasing the duration and exposure over a week or two. Bring them indoors at night if frost is expected.
Common Issues and Troubleshooting
Even with the best care, you might encounter some challenges when growing Sweet Gum trees from seed. Being aware of potential problems can help you address them quickly.
Damping-Off Disease
This fungal disease affects young seedlings, causing them to rot at the soil line and collapse. It thrives in overly wet conditions and poor air circulation. To prevent it, ensure good drainage, avoid overwatering, and provide adequate ventilation. If you notice it, remove affected seedlings immediately and improve air circulation.
Pests and Diseases
Young seedlings can be susceptible to common garden pests like aphids or spider mites. Regularly inspect your seedlings for any signs of infestation. Small infestations can often be managed with a strong spray of water or insecticidal soap. As the trees mature, they are generally quite hardy and resistant to many pests and diseases.
Slow Growth
Sweet Gum trees can be slow-growing, especially in their first few years. Patience is key. Ensure they have adequate light, water, and nutrients, and they will eventually establish themselves and begin to grow more vigorously.
Long-Term Care and Considerations
Once your Sweet Gum tree is established, its care requirements become less intensive, but understanding its needs will help it thrive for decades to come. (See Also: How to Remove a Christmas Tree Stand Safely and Easily)
Soil and Sunlight Preferences
Sweet Gum trees are adaptable to a variety of soil types, but they perform best in moist, well-draining, slightly acidic to neutral soils. They thrive in full sun but can tolerate partial shade. In full sun, you’ll often get the most vibrant fall color.
Watering Mature Trees
Mature Sweet Gum trees are relatively drought-tolerant once established. However, during prolonged dry spells, occasional deep watering will benefit the tree. Avoid consistently waterlogged conditions, as this can lead to root problems.
Pruning
Pruning is generally minimal for Sweet Gum trees. The main reason for pruning is to remove dead, damaged, or crossing branches, or to shape the tree when it is young to encourage a strong central leader. The best time to prune is typically in late winter or early spring before new growth begins.
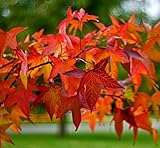
Fall Color
One of the most celebrated features of the Sweet Gum tree is its spectacular fall foliage. The star-shaped leaves transform into a breathtaking array of reds, oranges, purples, and yellows. The intensity of the fall color can be influenced by factors such as temperature fluctuations, sunlight exposure, and soil conditions. Generally, cooler nights and sunny days contribute to more vibrant displays.
The Gumball Challenge
It’s worth noting that Sweet Gum trees produce those distinctive gumballs. While beautiful from a botanical perspective, they can be a nuisance on lawns or walkways, as they are spiky and can be difficult to mow over. If this is a significant concern, consider the tree’s placement carefully or opt for a variety known to produce fewer gumballs, though this is less common when growing from seed.
Enjoying Your Homegrown Sweet Gum
Growing a Sweet Gum tree from seed is a rewarding endeavor that connects you deeply with the natural world. From the initial collection of gumballs to the first unfurling of leaves, you’re nurturing a living piece of art. With patience and consistent care, you’ll soon have a magnificent tree that provides shade, beauty, and a vibrant display of color for years to come.
Conclusion
Growing a Sweet Gum tree from seeds is a deeply satisfying process for any gardening enthusiast. By carefully collecting and stratifying the seeds, you prepare them for germination. Sowing them in well-draining soil and providing adequate warmth and light will encourage sprouting. Consistent care, including proper watering and occasional feeding, will nurture your seedlings into robust young trees. Transplanting and hardening them off are crucial steps before they can flourish outdoors. While challenges like damping-off can arise, understanding and addressing them ensures healthy growth. With patience, you’ll cultivate a beautiful, colorful Sweet Gum tree for your landscape.
Recommended Products