Ever looked at that avocado pit and wondered if you could actually grow a tree from it? The answer is a resounding yes! It’s a surprisingly simple and incredibly rewarding process that can bring a touch of the tropics right into your home.
While you might not get fruit for several years (or ever, indoors), the journey of nurturing a seedling into a young tree is a fantastic project for anyone, especially those with a green thumb or a desire to cultivate something unique. We’re going to walk you through every single step, demystifying the process and setting you up for success.
Forget complicated gardening jargon; this is about patience, observation, and a little bit of nature’s magic. Let’s get started on your avocado-growing adventure!
Embarking on Your Avocado Seed Journey
There’s a certain charm in taking something as common as an avocado pit and transforming it into a living, growing plant. It’s a testament to the power of nature and a delightful project that can be undertaken by anyone, regardless of their prior gardening experience. The visual appeal of an avocado seedling, with its large, glossy leaves and graceful stem, is enough to captivate any plant enthusiast.
This guide will take you from the humble pit you just scooped out of your guacamole to a thriving young avocado tree. We’ll cover everything from selecting the right seed to providing the optimal conditions for its growth. Think of it as a step-by-step adventure, where each stage brings you closer to your leafy companion.
Step 1: Selecting and Preparing Your Avocado Seed
The first, and perhaps most crucial, step is choosing the right seed. Not all avocado pits are created equal when it comes to germination. You want a healthy, mature seed from a ripe avocado. Overripe avocados might have damaged seeds, while underripe ones may not have a viable seed at all.
Choosing the Right Avocado
- Ripeness is Key: Gently squeeze the avocado. It should yield slightly to pressure but not be mushy.
- Seed Appearance: Once you’ve extracted the seed, rinse it thoroughly under cool water to remove any clinging flesh. Avoid using soap, as it can damage the seed’s protective layer.
- Inspect for Damage: Look for any cracks, mold, or soft spots on the seed. A healthy seed will be firm and smooth.
Removing the Seed Coat (optional but Recommended)
Some growers advocate for removing the brown outer skin of the avocado seed. This can sometimes speed up germination, as it allows the root to emerge more easily. However, it also exposes the seed to potential damage and drying out, so proceed with caution.
How to Remove the Seed Coat:
- Gently try to peel the brown skin away with your fingernail or a small paring knife.
- If it doesn’t come off easily, don’t force it. You can also try soaking the seed in water for a few hours to soften the coat.
- Once the coat is removed, you’ll see the lighter-colored seed underneath. Be careful not to damage the embryonic root at the bottom of the seed.
Important Note: If you choose not to remove the seed coat, that’s perfectly fine! Many avocado seeds germinate successfully with their protective layer intact.
Step 2: The Water Germination Method (the Classic Approach)
This is the most popular and visually engaging method for germinating avocado seeds. It allows you to witness the magic happen as roots and a stem emerge directly from the seed.
Gather Your Supplies
- Your prepared avocado seed
- Three or four toothpicks
- A glass jar or small vase
- Water (room temperature)
The Toothpick Technique
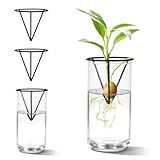
This technique is all about suspending the seed in water, with its bottom half submerged and its top half exposed to air. This encourages root development downwards and stem growth upwards. (See Also: How Much Does Real Christmas Tree Cost in 2023?)
- Insert Toothpicks: Carefully push three or four toothpicks into the sides of the avocado seed, about halfway up its height. Angle them slightly downwards. These toothpicks will act as a support system, resting on the rim of your jar.
- Find the Top and Bottom: It’s crucial to identify the top and bottom of the seed. The bottom is usually flatter and will have a small, circular indentation where the root will emerge. The top is more pointed.
- Position in Jar: Fill your glass jar with room-temperature water. Place the seed into the jar so that the toothpicks rest on the rim, suspending the seed. Ensure that the bottom half of the seed is submerged in the water, while the top half remains exposed to the air.
- Placement: Position the jar in a warm location that receives bright, indirect sunlight. Avoid direct sunlight, which can overheat and damage the seed.
Maintaining the Water Level
This is where a bit of regular attention comes in. The water level needs to be maintained consistently. As the water evaporates, the seed will dry out, hindering its progress.
- Check Daily: Make it a habit to check the water level every day.
- Top Up as Needed: Add more water to keep the bottom half of the seed submerged.
- Change Water Weekly: To prevent mold or bacterial growth, it’s a good idea to completely change the water in the jar once a week. Rinse the seed gently during this process.
What to Expect and When
Patience is your best friend here! Germination can take anywhere from 2 to 8 weeks, and sometimes even longer.
| Timeline | What to Look For |
|---|---|
| 1-2 Weeks | You might notice the seed coat starting to crack open. This is a good sign! |
| 2-4 Weeks | A small, white root should begin to emerge from the bottom of the seed. It will grow downwards into the water. |
| 4-8 Weeks (and beyond) | The root will lengthen significantly. A stem will then start to grow upwards from the top of the seed, eventually developing leaves. |
Step 3: Transitioning to Soil
Once your avocado seedling has a well-developed root system (at least a few inches long) and a healthy stem with a few leaves, it’s time to introduce it to the soil. This is a critical transition that requires careful handling.
When Is It Ready for Soil?
- Root Length: The roots should be at least 3-4 inches long and appear robust.
- Stem and Leaves: The stem should be sturdy, and you should see at least one or two sets of leaves unfurling.
- Seed Coat: Ideally, the seed coat will have fallen off naturally by this point. If it’s still clinging, you can try to gently remove it, but be very careful not to damage the emerging root or stem.
Choosing the Right Pot and Soil
The pot and soil you choose will significantly impact your young tree’s health. Drainage is paramount to prevent root rot.
- Pot Size: Start with a pot that is at least 6-8 inches in diameter. It should have plenty of drainage holes at the bottom. You can upgrade to a larger pot as the tree grows.
- Pot Material: Terracotta pots are excellent as they allow the soil to breathe and dry out more evenly. Plastic pots are also fine, provided they have good drainage.
- Soil Type: Use a well-draining potting mix. A good quality commercial potting mix designed for houseplants or cacti and succulents is ideal. You can also create your own by mixing potting soil with perlite or coarse sand to improve drainage. Avoid heavy garden soil, which can become compacted.
Planting Your Seedling
The goal here is to plant the seed so that the top half, where the stem emerges, is exposed, and the roots are covered by soil.
- Fill the Pot: Fill your chosen pot with the well-draining potting mix, leaving about an inch of space at the top.
- Create a Hole: Make a small indentation in the center of the soil, large enough to accommodate the root system.
- Gently Transfer: Carefully remove the avocado seed from the water. You may need to gently pull out the toothpicks. Try to disturb the roots as little as possible.
- Position the Seed: Place the seedling into the hole so that the roots are spread out and covered with soil. The top half of the seed should remain above the soil line. This is crucial for preventing rot.
- Water Thoroughly: Water the soil gently but thoroughly until water drains from the bottom of the pot. This helps settle the soil around the roots.
Step 4: Caring for Your Young Avocado Tree
Now that your avocado seedling is in its new home, it needs consistent care to thrive. Think of it as nurturing a baby plant!
Watering
The most common mistake new growers make is overwatering. Avocado trees, especially young ones, prefer their soil to dry out slightly between waterings.
- Check Soil Moisture: Stick your finger about an inch or two into the soil. If it feels dry, it’s time to water. If it feels moist, wait a few more days.
- Water Deeply: When you water, do so thoroughly until water runs out of the drainage holes. This encourages deep root growth.
- Avoid Waterlogging: Never let the pot sit in a saucer full of water, as this can lead to root rot.
- Seasonal Adjustments: You’ll likely need to water more frequently during warmer months and less during cooler, dormant periods.
Sunlight
Avocado trees love light, but they can be sensitive to intense, direct sun, especially when they are young.
- Bright, Indirect Light: Place your potted tree in a location that receives plenty of bright, indirect sunlight. An east-facing window is often ideal.
- Gradual Acclimation: If you’re moving your young tree outdoors during warmer months, gradually acclimate it to direct sunlight over a week or two to prevent leaf scorch.
- Signs of Too Little Light: Leggy, weak growth and pale leaves can indicate insufficient light.
- Signs of Too Much Light: Brown, crispy spots on leaves (leaf scorch) suggest the sun is too intense.
Temperature and Humidity
Avocado trees are tropical plants and thrive in warmth and humidity.
- Ideal Temperature: They prefer temperatures between 60-85°F (15-30°C). Protect them from frost and cold drafts.
- Humidity: Indoor environments can be dry, especially during winter. To increase humidity, you can:
- Mist the leaves regularly with water.
- Place the pot on a pebble tray filled with water (ensure the bottom of the pot doesn’t touch the water).
- Group your avocado tree with other plants.
Fertilizing
Once your avocado tree has established itself and is showing new growth, you can begin fertilizing. Start sparingly! (See Also: How to Stop a Pine Tree From Growing Taller)
- When to Start: Wait until your seedling has developed several sets of leaves and is actively growing.
- Type of Fertilizer: Use a balanced liquid fertilizer (e.g., 10-10-10 or a fertilizer specifically formulated for citrus or avocado trees) diluted to half strength.
- Frequency: Fertilize once a month during the growing season (spring and summer). Reduce or stop fertilizing during the fall and winter when growth slows down.
- Avoid Over-Fertilizing: Too much fertilizer can burn the roots. It’s always better to under-fertilize than over-fertilize a young plant.
Pruning for Bushier Growth
To encourage a bushier, more compact tree rather than a tall, spindly one, you’ll want to prune it.
- When to Prune: Once your seedling reaches about 6-12 inches in height, pinch or cut off the top set of leaves.
- Encouraging Side Shoots: This action stimulates the plant to produce side shoots, leading to a fuller plant.
- Subsequent Pruning: As new branches grow, you can continue to pinch them back to shape the tree as desired.
Step 5: Dealing with Common Issues and Troubleshooting
Even with the best care, you might encounter a few hiccups along the way. Here’s how to address them:
Yellowing Leaves
Yellow leaves can be a sign of several issues:
- Overwatering: This is the most common culprit. Ensure the soil is drying out between waterings.
- Underwatering: If the soil is consistently dry, the leaves may also yellow and droop.
- Nutrient Deficiency: If you haven’t fertilized in a while and the new growth is pale, a lack of nutrients could be the problem.
- Poor Drainage: Soggy soil can lead to root rot, which manifests as yellowing leaves.
Brown Leaf Tips or Edges
This is often an indication of low humidity or salt buildup from fertilizers or tap water.
- Increase Humidity: Use the methods mentioned earlier (misting, pebble tray).
- Flush the Soil: Periodically water the plant thoroughly until a large amount of water drains from the bottom. This helps wash away excess salts.
- Use Filtered Water: If your tap water is heavily chlorinated or contains a lot of minerals, consider using filtered or distilled water.
No Growth After Weeks
Don’t despair if your seed isn’t showing any signs of life. Remember, patience is key.
- Check the Seed: Is it still firm? If it has become soft, mushy, or moldy, it’s likely no longer viable.
- Water Quality: Ensure you’re using room-temperature water and changing it regularly.
- Temperature: Is the location warm enough? Avocado seeds prefer consistent warmth.
- Seed Viability: Sometimes, seeds are simply not viable. It’s worth trying again with a different seed.
Pests
Indoor plants can sometimes attract common houseplant pests.
- Identify the Pest: Common culprits include spider mites, mealybugs, and aphids. Look for webbing, sticky residue, or small insects on the leaves and stems.
- Treatment: Isolate the affected plant. You can often treat minor infestations by wiping the leaves with a damp cloth or a solution of mild soap and water. For more persistent issues, use an organic insecticidal soap or neem oil, following product instructions carefully.
Step 6: Long-Term Care and Expectations
Growing an avocado tree from seed is a long-term commitment, and it’s important to have realistic expectations.
Fruiting Potential
While it’s possible for an avocado tree grown from seed to eventually produce fruit, it’s not guaranteed, especially when grown indoors. Here’s why:
- Genetics: Avocado trees grown from seed are a genetic mix of their parent tree. The fruit they produce might not be the same quality or even taste as the avocado you ate.
- Time to Fruit: It can take anywhere from 5 to 13 years for a seed-grown avocado tree to reach maturity and potentially produce fruit.
- Pollination: Many avocado varieties require cross-pollination from another avocado tree to produce fruit.
- Indoor Limitations: The conditions required for fruit production (specific light, temperature, and pollination) are very difficult to replicate indoors.
Most people grow avocado trees from seed for their beautiful foliage and the joy of the growing process itself, rather than for fruit production.
Repotting
As your avocado tree grows, it will eventually outgrow its pot. You’ll know it’s time to repot when: (See Also: How Long for Honeycrisp Apple Tree to Bear Fruit?)
- Roots are growing out of the drainage holes.
- The plant dries out very quickly after watering.
- Growth has slowed significantly.
When repotting, choose a pot that is 2-4 inches larger in diameter than the current one. Use fresh, well-draining potting mix and be careful not to damage the root ball.
Outdoor vs. Indoor Growing
Indoor Growing: This is the most common method for seed-grown avocados. It allows you to control the environment and protect the plant from cold weather. Your indoor tree will likely remain a decorative houseplant.
Outdoor Growing (in suitable climates): If you live in a climate with mild winters (USDA hardiness zones 9-11), you can eventually plant your avocado tree outdoors. Ensure you choose a sunny location with well-draining soil. Be aware that even in these zones, young trees may need protection from frost.
Grafting (advanced)
For those serious about fruit production, grafting is the way to go. Grafting involves joining a cutting (scion) from a known fruiting variety onto the rootstock of a seed-grown tree. This ensures you get the desired fruit quality and can significantly speed up the time to fruiting (often 3-5 years).
However, grafting is a more advanced horticultural technique and is typically done by experienced growers or nurseries. For the home grower starting from a seed, focus on enjoying the journey of growing a beautiful plant.
The Joy of the Process
Growing an avocado tree from a seed is a journey of patience and observation. It’s a wonderful way to connect with nature and bring a bit of green into your life. Even if you never get a single avocado, the process of nurturing a seedling into a young tree is incredibly rewarding. You’ll learn about plant growth, the importance of light and water, and the satisfaction of cultivating something from a humble beginning.
Conclusion
Embarking on the journey of growing an avocado tree from its seed is a rewarding endeavor, offering a tangible connection to nature and a beautiful houseplant. While fruit production is a long shot and often requires grafting, the process itself is accessible and enjoyable for anyone. By following these steps—from preparing your seed and germinating it in water to carefully transplanting and nurturing your seedling—you’re well on your way to cultivating a unique green companion.
Recommended Products