Is your lawn looking a little… spongy? Does it feel like walking on a dense carpet, even when it’s dry? You’re likely dealing with a build-up of lawn thatch, a layer of dead and living organic material that accumulates between your grass blades and the soil surface.
This layer can be a real problem, preventing water, air, and nutrients from reaching your grass’s roots. If left unchecked, it can lead to a host of issues, from increased susceptibility to pests and diseases to a generally unhealthy and unsightly yard. But don’t despair! Getting rid of lawn thatch is achievable with the right knowledge and tools.
This guide will walk you through everything you need to know, from identifying thatch to implementing effective removal strategies. We’ll cover the causes, the signs, and the best methods to restore your lawn to its former glory.
Understanding Lawn Thatch: What It Is and Why It’s a Problem
Before we dive into how to get rid of lawn thatch, let’s first understand what it is and why it can be detrimental to your lawn’s health. Thatch is a natural process. It’s made up of dead grass stems, roots, and crowns that haven’t decomposed as quickly as they’re produced. Think of it as a natural cushioning layer that your lawn creates.
However, when this layer becomes too thick – generally more than 1/2 inch – it starts to cause problems. This thick layer acts like a barrier, impeding the essential elements your grass needs to thrive. Imagine trying to drink through a thick straw; it’s difficult, right? Your grass roots face a similar struggle when thatch becomes excessive.
The Downsides of Excessive Thatch
- Water Repellency: A thick thatch layer can prevent water from penetrating the soil, leading to dry spots and stressed grass, even after watering or rain.
- Reduced Airflow: Roots need oxygen. Thatch suffocates the soil, limiting the oxygen supply and hindering root development.
- Nutrient Blockage: Fertilizers and essential nutrients can get trapped in the thatch layer, never reaching the soil where the roots can absorb them.
- Pest and Disease Haven: The damp, dense environment of thick thatch is an ideal breeding ground for grubs, chinch bugs, and various fungal diseases.
- Weakened Root System: With limited water, air, and nutrients, the grass roots become shallow and weak, making the lawn more vulnerable to drought and traffic stress.
What Causes Thatch Build-Up?
Several factors contribute to the rapid accumulation of thatch:
- Over-fertilization: Especially with nitrogen-heavy fertilizers, which can promote rapid grass growth without adequate decomposition.
- Improper Watering: Frequent, shallow watering encourages shallow root growth, which can contribute to thatch.
- Compacted Soil: Compacted soil hinders the activity of beneficial microorganisms that break down organic matter.
- Mowing Practices: Mowing too high can lead to excessive leaf blade growth, contributing to thatch. Conversely, mowing too low can stress the grass, making it more susceptible to thatch.
- Grass Type: Some grass species, like perennial ryegrass and Kentucky bluegrass, are naturally more prone to thatch build-up than others, such as fescues.
- Poor Aeration: Lack of soil aeration prevents the necessary exchange of gases and microbial activity needed for decomposition.
Identifying a Thatch Problem
Before you can effectively get rid of lawn thatch, you need to confirm that you actually have a problem. Here’s how to tell:
The most common way to check for thatch is to cut a small plug of your lawn, about 4 inches deep, using a spade or a soil probe. Remove the plug and examine it. You’ll see distinct layers: the green grass blades at the top, then the soil, and in between, a spongy, brownish layer of organic matter. This is the thatch.
If this layer is thicker than 1/2 inch, it’s time to take action. (See Also: How to Overseed Lawn Spring: Get a Lush Green Yard!)
Other signs that might indicate thatch problems include:
- Your lawn feels spongy or excessively springy underfoot.
- Water doesn’t seem to penetrate the soil easily, and you notice a lot of surface runoff.
- Patches of your lawn are turning brown and appear dry, even when the soil beneath is moist.
- You see increased signs of insect pests or fungal diseases.
Methods for Lawn Thatch Removal
Now that you’ve identified a thatch problem, let’s explore the most effective ways to get rid of lawn thatch. The primary method involves mechanical removal, often referred to as dethatching or scarifying.
1. Dethatching with a Power Rake (scarifier)
A power rake, also known as a scarifier, is the most common and effective tool for removing thick thatch layers. It’s essentially a machine with rotating metal blades or tines that dig into the thatch layer and pull it to the surface.
How to Use a Power Rake:
- Timing is Key: The best time to dethatch is when your grass is actively growing. For cool-season grasses (like fescue, bluegrass, and ryegrass), this is typically in the early spring or early fall. For warm-season grasses (like Bermuda, zoysia, and St. Augustine), late spring or early summer is ideal. Avoid dethatching when the grass is dormant or under heat stress.
- Prepare Your Lawn: Mow your lawn to a shorter height than usual (about 1-2 inches) a day or two before dethatching. This makes it easier for the dethatcher to work and reduces the amount of green grass that gets pulled up.
- Set the Depth: Adjust the dethatcher’s tines or blades to penetrate about 1/4 to 1/2 inch into the thatch layer. You don’t want to dig into the soil itself, but rather skim the surface of the thatch.
- Dethatch in Two Directions: For maximum effectiveness, make a pass over your lawn in one direction (e.g., north to south), then make another pass perpendicular to the first (e.g., east to west). This ensures you catch as much thatch as possible.
- Collect and Dispose of Thatch: The dethatcher will pull up a significant amount of thatch, grass clippings, and debris. You’ll need to rake this material up and dispose of it. Large piles of thatch can be composted if you have a robust composting system, or they can be bagged and taken to a green waste facility.
- Follow-Up Care: After dethatching, your lawn will look quite ragged and stressed. Water it thoroughly and consider applying a starter fertilizer to encourage new growth. Overseeding can also be beneficial at this time, especially if your lawn has thinned out.
Pros of Power Raking: Highly effective for thick thatch, relatively quick for large areas.
Cons of Power Raking: Can be strenuous, requires renting or purchasing a machine, can be aggressive if not used correctly.
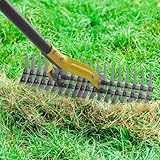
2. Dethatching with a Dethatching Rake (manual)
For smaller lawns or for those who prefer a more manual approach, a dethatching rake (also known as a scarifying rake) can be used. These rakes have stiff, often curved tines designed to pull thatch to the surface.
How to Use a Dethatching Rake:
- Timing: Same as for power raking – during active growth periods.
- Mow Shorter: Mow your lawn to a shorter height first.
- Rake Vigorously: Use the dethatching rake to vigorously pull it across the lawn. You’ll need to apply significant force to dig into the thatch. Work in sections.
- Collect Thatch: Rake up the loosened thatch and debris.
- Repeat: You may need to go over the lawn multiple times, especially if the thatch is thick.
Pros of Manual Raking: Affordable, good exercise, suitable for small areas.
Cons of Manual Raking: Very labor-intensive, time-consuming for larger lawns, less effective on very thick thatch.
3. Aeration for Thatch Management
While aeration doesn’t directly remove thatch in the same way as dethatching, it’s a crucial complementary practice that helps prevent thatch build-up and improves the soil’s ability to break it down. Aeration involves creating small holes in the soil, allowing air, water, and nutrients to penetrate deeper.
Core Aeration is the most effective type, pulling out plugs of soil. This process loosens compacted soil and allows the thatch layer to settle down into the soil, where it can decompose more easily. It also encourages deeper root growth, making your lawn more resilient. (See Also: How Many Inches of Topsoil for New Lawn? Your Guide)
How to Aerate Your Lawn:
- Timing: Aerate when your grass is actively growing, similar to dethatching.
- Use a Core Aerator: You can rent a core aerator. It’s a machine that punches holes into the soil and ejects the soil plugs.
- Aeration Pattern: Make passes over your lawn in a crisscross pattern.
- Leave the Plugs: The soil plugs that are ejected should be left on the lawn. They will break down naturally over a week or two, further enriching the soil.
- Post-Aeration: You can overseed and fertilize your lawn immediately after aerating.
Pros of Aeration: Prevents future thatch, improves soil health, reduces compaction, aids nutrient and water penetration.
Cons of Aeration: Doesn’t remove existing thick thatch on its own, can be disruptive to the lawn’s appearance temporarily.
4. Verticutting (less Common for Homeowners)
Verticutting is a more aggressive version of dethatching. A verticutter has a series of very sharp, thin blades that slice vertically into the turf. This is typically used by professional landscapers or on sports fields for severe thatch problems or to improve the density of certain turf types.
Pros of Verticutting: Extremely effective for severe thatch.
Cons of Verticutting: Very aggressive, can damage the lawn if not done correctly, usually requires professional equipment.
Post-Thatch Removal Care
Once you’ve successfully removed the thatch, your lawn will need some TLC to recover and thrive. This is a critical phase to ensure the long-term health of your turf.
1. Watering
After dethatching, your lawn will be stressed. Water it deeply and regularly to help it recover. Aim for about 1 inch of water per week, delivered in one or two deep watering sessions, rather than frequent, shallow sprinklings. This encourages deep root growth, which is essential for a healthy lawn.
2. Fertilizing
Apply a balanced, slow-release lawn fertilizer. A starter fertilizer with a higher phosphorus content can be beneficial at this stage to encourage root development. Follow the application rates recommended on the fertilizer packaging.
3. Overseeding
Dethatching often thins out the lawn, leaving bare patches. This is the perfect time to overseed. Choose a grass seed mixture that is suitable for your climate and existing turf type. Rake the seed into the loosened soil and keep the seeded areas consistently moist until germination.
4. Weed Control
With the thatch removed and the lawn recovering, it’s more vulnerable to weed invasion. Keep an eye out for weeds and address them promptly. You can hand-pull small infestations or use a selective herbicide if necessary, but be cautious about applying herbicides to a stressed lawn. (See Also: Beat Lawn Weeds: Your Ultimate Guide on How to Deal with…)
5. Mowing
Once your grass starts to recover and grow, resume normal mowing practices. Avoid mowing too short, as this can stress the grass. Gradually return to your preferred mowing height.
Preventing Future Thatch Build-Up
The best way to deal with lawn thatch is to prevent it from becoming a problem in the first place. Implementing good lawn care practices consistently will go a long way.
| Preventative Measure | Description | Frequency |
|---|---|---|
| Proper Watering | Water deeply and infrequently (1 inch per week) to encourage deep root growth. Avoid frequent, shallow watering. | As needed based on weather. |
| Appropriate Fertilization | Use slow-release fertilizers and avoid over-applying nitrogen. Follow soil test recommendations. | According to grass type and growing season (typically 2-4 times per year). |
| Correct Mowing | Mow at the correct height for your grass type (usually 2.5-3.5 inches). Never remove more than one-third of the grass blade at a time. Leave grass clippings on the lawn (mulching mower) as they decompose quickly if the thatch isn’t too thick. | Weekly or as needed. |
| Regular Aeration | Core aeration opens up the soil, allowing for better decomposition of organic matter and improved air/water penetration. | Once a year, or every 1-2 years for less problematic lawns. |
| Soil Health Management | Ensure good drainage and avoid soil compaction. Address compaction issues promptly. | Ongoing. |
| Choose Resilient Grass Types | If establishing a new lawn or renovating, consider grass varieties less prone to thatch. | During lawn establishment/renovation. |
By integrating these preventative measures into your regular lawn care routine, you can significantly reduce the likelihood of developing a problematic thatch layer. This proactive approach will save you time, effort, and money in the long run, leading to a healthier, more vibrant lawn.
When to Dethatch vs. Aerate
It’s important to understand that dethatching and aeration are not interchangeable. They serve different, though related, purposes:
- Dethatching: Primarily addresses existing, thick thatch layers. It’s a reactive measure when thatch has become a problem.
- Aeration: Primarily prevents thatch build-up and improves soil health. It’s a proactive measure that helps the natural decomposition process.
You might need to do both. If you have a thick thatch layer (over 1/2 inch), you’ll need to dethatch first. After dethatching, regular aeration will help prevent it from returning. If your thatch layer is thin (less than 1/2 inch), regular aeration might be sufficient to keep it in check.
Common Mistakes to Avoid
- Dethatching at the Wrong Time: Dethatching during extreme heat, drought, or when the grass is dormant can severely damage your lawn.
- Dethatching Too Aggressively: Setting the dethatcher too deep can rip out healthy grass and damage the soil.
- Not Collecting Thatch: Leaving large piles of thatch on the lawn can smother the grass and create an environment for disease.
- Neglecting Follow-Up Care: After dethatching, your lawn needs proper watering and possibly overseeding to recover.
- Over-watering: Even after dethatching, over-watering can still lead to shallow root systems and other issues.
By understanding these nuances and avoiding common pitfalls, you’ll be well on your way to a thatch-free and thriving lawn.
Conclusion
Effectively managing lawn thatch is crucial for a healthy, vibrant lawn. By understanding what thatch is, identifying a problem, and employing the right removal techniques like dethatching or power raking, you can restore your turf’s vitality. Remember to always follow up with proper care, including watering and fertilizing, and integrate preventative measures like regular aeration and correct mowing practices into your routine. A proactive approach is key to enjoying a beautiful, resilient lawn year after year.
Recommended Products