That stubborn tree stump in your yard doesn’t have to be an eyesore. Instead of opting for costly and labor-intensive removal, why not embrace a more creative and enchanting solution? Transforming a tree stump into a vibrant floral display can add a unique charm and a splash of color to your garden, making it a focal point rather than a nuisance.
This guide will walk you through the entire process of how to cover a tree stump with flowers. We’ll explore different methods, from simple planting to more elaborate designs, ensuring you can find a technique that suits your skill level and aesthetic preferences. Get ready to turn that woody remnant into a blooming masterpiece!
Embracing the Stump: Why Cover Instead of Remove?
Tree stump removal can be a daunting task. It often involves heavy machinery, significant physical effort, and can leave behind a considerable mess. For many gardeners, the cost and hassle simply aren’t worth it. Fortunately, there’s a far more aesthetically pleasing and environmentally conscious alternative: covering it with flowers. This approach not only hides the stump but also enhances your garden’s beauty, creating a living art installation.
Consider the benefits:
- Cost-Effective: Significantly cheaper than stump grinding or excavation.
- Environmentally Friendly: Avoids soil disturbance and the need for chemicals.
- Aesthetic Enhancement: Creates a beautiful, natural focal point.
- Biodiversity Support: Provides habitat and food for pollinators.
- Unique Garden Feature: Adds personality and character to your landscape.
Assessing Your Stump and Garden Space
Before you start digging or buying plants, take a moment to assess the stump itself and its surroundings. This initial step is crucial for planning the most successful and visually appealing floral display.
Stump Characteristics
The size, shape, and condition of your stump will influence your approach. Is it a large, imposing presence or a small, modest remnant? Is the wood still relatively solid, or has it begun to decay?
- Size: A larger stump can accommodate more elaborate designs and a wider variety of plants. A smaller stump might be best suited for a more delicate arrangement.
- Height: A taller stump can be treated almost like a raised planter, offering more planting depth. A flush stump requires a different approach.
- Texture: Rough, gnarled bark can provide interesting textures for climbing plants or a rustic base for potted arrangements.
- Decay: If the stump is significantly decayed, it might be easier to hollow out further to create a planting cavity. However, be mindful of structural integrity if you plan to place significant weight on it.
Sunlight and Drainage
The location of your stump is paramount. Observe the amount of sunlight it receives throughout the day and assess the drainage of the surrounding soil.
- Sunlight: Does the area receive full sun, partial shade, or deep shade? This will dictate the types of flowers you can successfully grow. Full sun lovers will struggle in shade, and vice-versa.
- Drainage: Does water pool around the stump after rain? Poor drainage can lead to root rot for your chosen plants. You may need to amend the soil or consider container planting.
Your Garden’s Style
Consider the overall aesthetic of your garden. Do you prefer a cottage garden feel, a modern minimalist look, or something in between? Your stump planting should complement, not clash with, your existing landscape.
Methods for Covering a Tree Stump with Flowers
There are several creative ways to transform a tree stump into a floral feature. Each method offers unique advantages and can be adapted to your specific stump and garden.
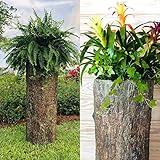
Method 1: Planting Directly Into the Stump
This is perhaps the most organic and integrated approach. It involves creating a planting space within the stump itself. (See Also: How to Properly Trim an Ash Tree for Health and Beauty)
Step-by-Step Guide:
- Prepare the Stump: If the stump is very tall, you might want to trim it down to a more manageable height using a chainsaw or handsaw. If the top is uneven, try to create a relatively flat surface.
- Hollow Out the Center: Using a chisel, an axe, or even a drill with a large bit, carefully remove wood from the center of the stump to create a cavity. Aim for a depth of at least 6-8 inches, depending on the root ball size of your chosen plants. The cavity should be wide enough to accommodate your plants and soil.
- Add Drainage: Drill a few drainage holes through the bottom of the hollowed-out section if possible. If not, ensure you have a good layer of gravel or broken pottery at the bottom before adding soil.
- Add Soil: Fill the cavity with a good quality potting mix or a blend of compost and garden soil. Ensure it’s well-draining.
- Plant Your Flowers: Choose plants that suit the sunlight conditions of your stump’s location. Small, compact flowering plants, trailing varieties, or even herbs can work well. Consider plants that don’t require extremely deep roots.
- Water and Mulch: Water your new plants thoroughly and add a layer of mulch to retain moisture and suppress weeds.
Suitable Plants for Stump Planting:
- Shade Tolerant: Hostas, ferns, impatiens, begonias, heucheras, astilbes, violets.
- Sun Tolerant: Petunias, marigolds, lobelia, sedums, succulents, creeping thyme, portulaca.
- Trailing Varieties: Trailing petunias, lobelia, ivy geraniums, vinca minor.
Tip: For very large stumps, you might be able to create multiple planting pockets around the sides as well.
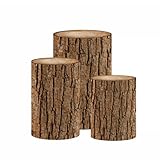
Method 2: Using the Stump as a Base for Planters
This method is less invasive to the stump itself and offers more flexibility in plant choice and arrangement.
Step-by-Step Guide:
- Level the Stump (Optional): If the top of the stump is very uneven, you might want to level it slightly to provide a stable base for pots.
- Choose Your Planters: Select pots or containers that are proportionate to the size of your stump. Terracotta pots, ceramic planters, or even rustic wooden crates can look attractive.
- Arrange the Planters: Place the planters on top of the stump. You can use one large planter or several smaller ones to create a cascading effect. Consider using a non-slip mat between the stump and the pots to prevent them from shifting.
- Fill with Soil and Plants: Fill the planters with a suitable potting mix and plant your chosen flowers. This method allows you to use plants that might require different soil conditions or depths than what the stump can provide naturally.
- Water and Care: Water your plants as needed and fertilize according to the plant requirements.
Creative Planter Ideas:
- Layered Look: Use planters of varying heights to create a tiered effect.
- Cascading Blooms: Plant trailing flowers in the top planters so they spill over the sides.
- Themed Arrangements: Create seasonal displays, such as spring bulbs or autumnal mums.
- Succulent Gardens: Succulents are low-maintenance and thrive in containers, making them ideal for stump planters.
Tip: For added stability, especially with taller stumps or heavier pots, you can secure the planters to the stump using L-brackets or strong outdoor adhesive. Ensure the stump is dry before applying adhesive.
Method 3: Encouraging Moss and Ground Cover
For a more natural and subtle approach, especially in shady, damp areas, you can encourage moss and low-growing ground cover to take over the stump.
Step-by-Step Guide:
- Soften the Surface: Lightly score the bark of the stump with a wire brush or sandpaper to create a rougher surface for moss to adhere to.
- Apply a Moss Starter: You can purchase commercial moss starters or make your own by blending buttermilk or yogurt with moss fragments and a bit of sugar. Apply this mixture liberally to the damp surfaces of the stump.
- Maintain Moisture: Keep the stump consistently moist, especially during the initial establishment phase. You may need to water it regularly or cover it with burlap to retain humidity.
- Plant Ground Cover Around the Base: In addition to encouraging moss on the stump itself, plant low-growing ground cover plants around the base to integrate it into the garden floor.
Recommended Moss and Ground Cover:
- Mosses: Sheet moss, cushion moss, and hair cap moss are good choices.
- Ground Covers: Creeping Jenny (Lysimachia nummularia), creeping thyme (Thymus serpyllum), ajuga (Bugleweed), vinca minor (Periwinkle).
Tip: This method works best in shady, humid environments where moss naturally thrives. It takes time to establish, so be patient!
Method 4: Creating a Fairy Garden or Miniature Scene
Turn your stump into a whimsical focal point by creating a miniature fairy garden or a charming scene.
Step-by-Step Guide:
- Prepare the Stump: Hollow out the top of the stump as described in Method 1, creating a planting area.
- Add Soil and Miniature Elements: Fill the cavity with potting soil. Then, let your imagination run wild! Add miniature houses, fairy figurines, tiny furniture, pathways made of pebbles, and small plants.
- Choose Miniature Plants: Select small, slow-growing plants that won’t outgrow the space too quickly. Think miniature succulents, small sedums, creeping herbs, or tiny ferns.
- Incorporate Decorative Items: Use small stones, twigs, moss, and even tiny pieces of broken pottery to create a magical landscape.
Fairy Garden Inspiration:
- Enchanted Forest: Use moss, small twigs, and miniature woodland creatures.
- Fairy Cottage: Add a tiny house, a picket fence, and flowering plants.
- Zen Garden: Incorporate raked gravel, small stones, and a miniature pagoda.
Tip: Consider adding a small solar-powered light to illuminate your fairy garden at night, adding an extra touch of magic.
Choosing the Right Flowers and Plants
The success of your stump transformation hinges on selecting plants that will thrive in the specific conditions your stump provides and complement your desired aesthetic.
Sunlight Requirements
This is the most critical factor. Be honest about how much sun the area receives. (See Also: How Often to Water Lime Tree in Summer: A Complete Guide)
- Full Sun (6+ hours of direct sunlight): Petunias, marigolds, zinnias, geraniums, sunflowers, lavender, sedums, portulaca, verbena.
- Partial Shade (3-6 hours of direct sunlight, or dappled light all day): Impatiens, begonias, fuchsias, hostas, heucheras, lobelia, pansies, violas, coleus.
- Full Shade (less than 3 hours of direct sunlight, or bright indirect light): Ferns, hostas, astilbes, impatiens, begonias, violets, mosses, woodland plants.
Plant Habit and Size
Consider how the plants will grow and fill the space.
- Trailing Plants: Ideal for spilling over the sides of the stump or planters, softening the edges. Examples include trailing petunias, lobelia, ivy geraniums.
- Mounding Plants: Create a full, rounded shape. Examples include impatiens, begonias, petunias.
- Upright Plants: Add height and structure. Examples include salvias, snapdragons, small ornamental grasses.
- Ground Covers: Excellent for planting around the base of the stump to create a seamless look.
Seasonal Interest
Plan for continuous blooms and color throughout the growing season.
- Spring: Tulips, daffodils, hyacinths, pansies, violas.
- Summer: Petunias, marigolds, impatiens, geraniums, zinnias, salvias.
- Fall: Mums, asters, ornamental kale, sedums, pansies.
Maintenance Needs
Choose plants that match your willingness to tend to them.
- Low Maintenance: Succulents, sedums, hostas, ferns, many perennial ground covers.
- Moderate Maintenance: Annuals that require regular deadheading and watering, some herbs.
- High Maintenance: Plants that need frequent feeding, pruning, or pest control.
Prepping the Stump for Planting
Proper preparation ensures your floral display has the best chance of success and longevity.
Dealing with Rot and Pests
A decaying stump can attract pests and may not be a stable base. While you don’t need to eradicate all decay, some steps can help.
- Remove Loose Wood: Use a chisel or axe to remove any soft, crumbly wood from the top and sides. This creates a cleaner surface and removes potential hiding spots for pests.
- Treat with Borax (Optional): For stumps that are excessively rotten or prone to insect infestation, you can sprinkle Borax powder into the hollowed-out areas. This acts as a natural deterrent.
- Monitor for Insects: Keep an eye out for ants, termites, or other wood-boring insects. If you see significant activity, you may need to address the infestation before planting.
Ensuring Stability
If you’re concerned about the stump’s stability, especially if it’s large or on an incline, consider these options.
- Trim to a Stable Base: If the stump is leaning, try to trim it to a more stable, flatter base.
- Anchor if Necessary: For very large stumps, you might consider driving rebar stakes into the ground around the base to help stabilize it, especially if you’re placing heavy planters on top.
- Natural Integration: If the stump is relatively stable, let nature do its work. Over time, roots from surrounding plants can help anchor it further.
Adding Soil and Amendments
The soil you use is vital for plant health.
- Potting Mix: For planting directly into the stump or in containers, a high-quality potting mix is essential. It provides good drainage and aeration.
- Compost: Mixing compost into the soil will enrich it with nutrients and improve its structure.
- Drainage Layer: For direct planting into the stump, a layer of gravel or broken pottery at the bottom of the cavity can improve drainage significantly.
Ongoing Care and Maintenance
Once your floral stump is established, regular care will keep it looking its best.
Watering
Watering needs will vary depending on the plants you choose, the weather, and the stump’s location. (See Also: How to Become a Certified Tree Climber: Your Guide)
- Check Soil Moisture: Stick your finger about an inch into the soil. If it feels dry, it’s time to water.
- Water Deeply: Encourage strong root growth by watering thoroughly until water drains from the bottom of the pot or cavity.
- Avoid Overwatering: Soggy soil can lead to root rot, especially in poorly draining conditions.
Fertilizing
Flowers need nutrients to bloom prolifically.
- Annuals: Most annual flowers benefit from regular feeding with a balanced liquid fertilizer every 2-4 weeks throughout the growing season.
- Perennials: Perennials generally require less frequent fertilization, perhaps once in spring and again in mid-summer.
- Slow-Release Fertilizers: These can be mixed into the soil at planting time for a more sustained release of nutrients.
Deadheading and Pruning
These simple tasks can significantly improve the appearance and bloom production of your flowers.
- Deadheading: Regularly remove spent flowers. This encourages the plant to produce more blooms rather than focusing on seed production.
- Pruning: Trim back any leggy or overgrown stems to maintain a tidy shape and encourage bushier growth.
Pest and Disease Management
Keep an eye out for common garden pests and diseases.
- Inspect Regularly: Check your plants for signs of damage or infestation.
- Natural Remedies: Many pests can be controlled with natural methods like hand-picking, insecticidal soap, or neem oil.
- Promote Air Circulation: Proper spacing between plants can help prevent fungal diseases.
Creative Touches and Advanced Ideas
Once you’ve mastered the basics, consider these ideas to elevate your stump transformation.
Incorporating Other Elements
Don’t limit yourself to just flowers!
- Edible Plants: Consider planting herbs like thyme, mint, or chives, or even small strawberries.
- Vines and Climbers: Plant climbing flowers like clematis or morning glories at the base of the stump and train them to grow up and over it.
- Decorative Accents: Add garden art, painted stones, or small statues to enhance the theme.
Seasonal Stump Decor
Change the look of your stump throughout the year.
- Spring: Plant bulbs and early-blooming annuals.
- Summer: Go for vibrant, long-blooming annuals.
- Fall: Use colorful mums, ornamental peppers, and gourds.
- Winter: Decorate with evergreen boughs, pinecones, and festive lights.
Stump Art and Sculptures
For the truly artistic, the stump can become a canvas.
- Carving: If the wood is suitable, consider carving simple designs into the stump before planting.
- Mosaic: Attach broken tiles or glass to create a mosaic effect on the stump’s surface.
- Living Sculptures: Train plants to grow in specific shapes around or on the stump.
Transforming a tree stump with flowers is a rewarding project that adds beauty, character, and a touch of magic to any garden. With a little planning and creativity, you can turn an unwanted obstacle into a stunning floral masterpiece.
Conclusion
Covering a tree stump with flowers is a delightful and achievable garden project. By assessing your stump’s characteristics and the surrounding environment, you can choose from various methods, including planting directly into the stump, using it as a base for planters, encouraging moss growth, or creating a whimsical fairy garden. Selecting the right plants based on sunlight, desired habit, and seasonal interest is key. With proper preparation and ongoing care, your floral stump will become a vibrant and enchanting focal point, proving that even the most stubborn remnants can be transformed into something beautiful.
Recommended Products