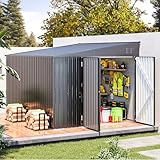
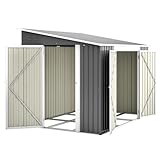
Are you tired of tripping over firewood or having it exposed to the elements? Building a lean-to wood shed is a fantastic solution. It’s a relatively straightforward DIY project that provides excellent protection for your firewood, keeping it dry and ready to burn. Plus, it can add a touch of rustic charm to your property.
This guide will walk you through, step-by-step, how to build a lean to wood shed. We’ll cover everything from planning and material selection to construction and finishing touches. By the end, you’ll have a sturdy, functional wood shed that will last for years. Ready to get started? Let’s dive in!
Planning Your Lean-to Wood Shed
Before you even think about picking up a hammer, proper planning is crucial. This step ensures your project runs smoothly and that you end up with a wood shed that meets your needs. Let’s break down the key planning considerations.
1. Determine the Size and Capacity
How much wood do you need to store? This is the most important question. Consider how much firewood you typically use in a year, and then size your shed accordingly. It’s always better to err on the side of slightly larger than smaller, as your wood pile will likely grow over time. A standard cord of firewood (4′ x 4′ x 8′) is a good unit of measurement. Think about how many cords you’ll need to store.
Where will you place the shed? Consider the location of the shed in relation to your house, access to your firewood source, and prevailing weather conditions. You’ll want it to be easily accessible, but also sheltered from the worst of the wind and rain. Also, check local building codes and HOA regulations regarding shed placement and size.
2. Choose Your Materials
The materials you choose will impact the shed’s durability, appearance, and cost. Here’s a breakdown of common materials: (See Also: How to Install a Rubbermaid Shed: Your Step-by-Step Guide)
- Framing: Typically, pressure-treated lumber is used for the framing. This lumber is resistant to rot, decay, and insect damage. 2x4s and 4x4s are common choices for the framing members.
- Sheathing: Plywood or OSB (Oriented Strand Board) can be used for the walls and roof sheathing. Plywood is generally more expensive but can be more durable.
- Siding: Options for siding include wood siding (such as cedar or redwood), lap siding, or even metal siding. Consider the aesthetic you want to achieve and the level of maintenance you’re willing to commit to.
- Roofing: Roofing materials can include asphalt shingles, metal roofing, or corrugated panels. Asphalt shingles are the most common and cost-effective, but metal roofing can last longer.
- Fasteners: Use exterior-grade screws, nails, and other fasteners that are designed for outdoor use and are corrosion-resistant.
- Foundation Materials: Consider gravel and concrete for the foundation.
Material List Example: (This is a simplified example; adjust based on your shed size and design)
| Material | Quantity (Approximate) | Notes |
|---|---|---|
| Pressure-treated 4x4s | 4 (for posts) | Length depends on shed height |
| Pressure-treated 2x4s | Various (for framing) | Length depends on shed size |
| Plywood or OSB | 2-3 sheets | For roof sheathing |
| Siding | Varies | Based on shed size |
| Roofing materials | Varies | Based on roof size |
| Fasteners (screws, nails) | Varies | Exterior grade |
| Gravel | Varies | For foundation |
| Concrete (optional) | Varies | For foundation |
3. Design and Blueprints
Even a simple lean-to shed benefits from a basic design. Sketch out your plans, including dimensions, the angle of the roof, and the placement of the posts. You can find many free shed plans online to use as a starting point, or you can design your own. Consider the following:
- Roof Pitch: The roof pitch (angle) determines how well the shed sheds rain and snow. A steeper pitch is better for areas with heavy snowfall. A pitch of 4/12 or higher is usually recommended.
- Height: Decide on the height of the shed. Ensure it’s tall enough to easily stack and retrieve firewood.
- Foundation: Will you use a concrete slab, gravel base, or simply build directly on the ground?
Pro Tip: Create a materials list based on your design. This will help you estimate the cost and ensure you purchase everything you need.
People Also Ask:
Q: What is the best wood for a wood shed?
A: Pressure-treated lumber is generally the best choice for framing due to its resistance to rot and insects. For siding, cedar or redwood offer natural weather resistance and a pleasing aesthetic, but they can be more expensive. Metal siding is another durable option. The best wood depends on your budget, aesthetics, and maintenance preferences. (See Also: How Much Does It Cost to Extend a Shed? Your Ultimate Guide)
Building Your Lean-to Wood Shed: Step-by-Step Guide
With your plan in place and materials gathered, it’s time to start building. Follow these steps to construct your lean-to wood shed.
1. Prepare the Site and Foundation
- Clear and Level the Area: Remove any vegetation, rocks, or debris from the area where you’ll build the shed. Level the ground as much as possible.
- Establish the Foundation:
- Gravel Base: A simple gravel base is a good option. Dig down a few inches, lay down landscape fabric to prevent weed growth, and then add a layer of gravel. Compact the gravel thoroughly.
- Concrete Slab (Optional): If you want a more permanent foundation, consider pouring a concrete slab. This requires more effort and cost but provides a very stable base.
- Mark the Corners: Use stakes and string to mark the corners of your shed, ensuring they are square. Measure the diagonals to confirm they are equal.
2. Build the Frame
- Set the Posts:
- For a gravel base: Set your pressure-treated 4×4 posts into the ground, ensuring they are plumb (perfectly vertical). Use a level to check. You can secure them with concrete or by burying them deeply.
- For a concrete slab: Use post anchors to bolt the posts to the concrete.
- Frame the Walls: Attach the 2x4s to the posts to create the wall frames. Use screws for a strong connection. Ensure the walls are square.
- Build the Roof Frame: Attach the rafters (angled 2x4s) to the top of the posts, creating the roof pitch. The higher side of the roof frame will attach to the existing structure or a higher set of posts. The lower side will be lower, creating the lean-to effect. Consider adding a ridge beam for extra support.
3. Sheathe the Walls and Roof
- Attach the Sheathing: Cut the plywood or OSB to fit the wall frames and attach it with screws.
- Sheathe the Roof: Cut the plywood or OSB to fit the roof frame and attach it with screws. Ensure the sheathing extends slightly over the edges of the frame for overhang.
4. Install the Siding and Roofing
- Install the Siding: Attach your chosen siding material to the sheathed walls. Follow the manufacturer’s instructions for installation.
- Install the Roofing:
- Asphalt Shingles: Start at the bottom and work your way up, overlapping the shingles. Follow the manufacturer’s instructions for nailing and spacing.
- Metal Roofing: Install the metal panels according to the manufacturer’s instructions, ensuring proper overlap and secure fastening.
5. Finishing Touches
- Add a Door (Optional): Construct a simple door frame and install a door.
- Add Trim: Install trim around the edges of the roof, walls, and door to create a finished look.
- Paint or Stain: If desired, paint or stain the shed to protect the wood and enhance its appearance.
- Ventilation: Consider adding vents to allow for airflow and prevent moisture buildup.
People Also Ask:
Q: How far off the ground should a wood shed be?
A: It’s generally a good idea to keep your wood shed slightly elevated off the ground to prevent moisture from wicking up into the wood. A few inches (2-4 inches) is usually sufficient. This can be achieved by using a gravel base, setting the posts on concrete blocks, or building a simple wooden frame to raise the floor.
Q: Do wood sheds need a floor?
A: Not necessarily, but a floor helps with organization and keeps the wood off the ground, which aids in drying and prevents rot. You can use a simple gravel base, a wooden floor, or build directly on the ground. A slatted floor allows for excellent airflow. (See Also: Do Dalmatians Shed? Learn How Much & How to Manage It!)
Tips for Success
- Use a Level: Throughout the entire process, use a level to ensure everything is plumb and square. This is critical for a structurally sound and aesthetically pleasing shed.
- Measure Twice, Cut Once: This age-old adage is especially important when working with wood. Double-check your measurements before making any cuts.
- Use Quality Fasteners: Invest in exterior-grade screws, nails, and other fasteners. They are designed to withstand the elements and will prevent rust and corrosion.
- Wear Safety Gear: Always wear safety glasses, gloves, and a dust mask when working with wood.
- Get Help: Building a wood shed can be a challenging project, especially if you’re working alone. Don’t hesitate to ask for help from a friend or family member.
- Weather Protection: Make sure your shed is adequately protected from the weather. The roof should properly shed water, and the siding should be weather-resistant. Consider adding a roof overhang to further protect the wood.
Common Mistakes to Avoid
- Poor Planning: Rushing the planning phase can lead to mistakes and wasted materials. Take your time to design your shed properly.
- Inaccurate Measurements: Incorrect measurements can cause significant problems during construction. Double-check all measurements.
- Using the Wrong Materials: Using the wrong type of wood or fasteners can lead to premature failure of the shed.
- Ignoring Building Codes: Failing to comply with local building codes can result in fines or the need to rebuild the shed.
- Insufficient Ventilation: Poor ventilation can lead to moisture buildup and wood rot. Ensure your shed has adequate airflow.
- Neglecting Site Preparation: Building on uneven ground or a poorly prepared site can compromise the shed’s stability.
Maintenance and Longevity
Once your lean-to wood shed is built, proper maintenance will extend its lifespan and keep your firewood dry. Here’s how to care for your shed:
- Inspect Regularly: Check the shed periodically for any signs of damage, such as cracks, rot, or loose fasteners.
- Clean the Roof: Remove any leaves, debris, or snow from the roof to prevent water buildup.
- Repair Damage: Address any damage promptly to prevent it from worsening.
- Repaint or Restain: Repaint or restain the shed as needed to protect the wood from the elements.
- Ventilation: Ensure the vents are clear and functioning correctly to maintain good airflow.
Alternatives to a Lean-to Shed
While a lean-to shed is a great option, other types of wood storage are available.
- Freestanding Wood Sheds: These are fully enclosed structures with four walls and a roof, offering maximum protection from the elements. They can be more expensive and require more space.
- Wood Racks: Simple wood racks are a cost-effective option for storing a small amount of firewood. They are easy to assemble and can be moved around.
- Covered Wood Piles: You can create a covered wood pile by simply stacking firewood and covering it with a tarp or a custom-built cover.
The best option for you depends on your needs, budget, and available space.
Final Verdict
Building a lean-to wood shed is a rewarding project that provides practical benefits and can enhance your property’s aesthetics. By carefully planning, choosing the right materials, and following these steps, you can create a durable and functional wood shed. Remember to prioritize safety and take your time. You’ll be enjoying dry firewood in no time!
Recommended Products