So, you want to learn how to build a gate in a fence? Great! Whether you’re aiming to enhance your property’s security, improve its aesthetic appeal, or simply gain easier access, building a gate is a rewarding DIY project. It might seem daunting at first, but with the right knowledge and a bit of elbow grease, you can create a functional and stylish gate that perfectly complements your fence.
We understand that starting a new project can feel overwhelming. That’s why we’ve put together this comprehensive guide. We’ll walk you through every step, from planning and gathering materials to the final installation. We’ll cover different gate types, materials, and construction techniques, ensuring you have all the information you need to succeed. Let’s get started and turn your fence into a welcoming entrance!
Planning Your Gate
Before you even think about picking up a hammer, proper planning is essential. This stage sets the foundation for a successful and long-lasting gate. Consider these key aspects:
1. Gate Type
The type of gate you choose will depend on your needs, space, and aesthetic preferences. Here are some common options:
- Swing Gates: These are the most common type, swinging open and closed on hinges. They are ideal for various applications and can be designed in numerous styles.
- Sliding Gates: These gates slide horizontally along a track. They are excellent for driveways where space is limited, as they don’t swing outward.
- Cantilever Gates: Similar to sliding gates, cantilever gates are suspended above the ground, eliminating the need for a ground track.
- Double Gates: These gates consist of two gate panels that meet in the middle. They are suitable for wide openings, such as driveways.
Each type has its pros and cons regarding space requirements, ease of installation, and cost. Consider what best suits your situation.
2. Gate Dimensions
Carefully measure the opening where your gate will be installed. Consider the following:
- Width: Measure the exact width of the opening. Add extra width if you want the gate to overlap the fence posts or allow for a gap for the gate to swing.
- Height: Determine the desired height of your gate. Consider the height of your existing fence and any privacy requirements.
- Swing Clearance (for Swing Gates): Ensure there’s sufficient space for the gate to swing open and closed without obstructions.
Accurate measurements are critical for ensuring your gate fits correctly.
3. Materials
Choose materials that are durable, weather-resistant, and aesthetically pleasing. Here are some popular options:
- Wood: A classic choice, offering a natural look. Options include cedar, redwood, and pressure-treated lumber.
- Metal: Provides strength and security. Options include steel and aluminum. Steel requires painting or powder coating to prevent rust. Aluminum is naturally rust-resistant.
- Composite: Made from a blend of wood fibers and plastic, offering durability and low maintenance.
Your choice of material will significantly affect the gate’s longevity and appearance. Think about your budget and maintenance preferences.
4. Design
Decide on the style and design of your gate. Consider the following:
- Panel Style: Solid, slatted, or lattice.
- Hardware: Hinges, latches, and handles.
- Decorative Elements: Consider adding decorative elements to match the style of your fence and property.
The design should complement your existing fence and enhance your property’s overall aesthetic. You can find inspiration online, in magazines, or by looking at existing gates in your neighborhood.
5. Building Codes and Permits
Before you begin, check local building codes and regulations. Some jurisdictions require permits for gate construction, particularly if the gate is for a driveway or is part of a larger fencing project. Failure to comply can result in fines or the need to remove the gate. (See Also: How to Separate Chain Link Fence: A Step-by-Step Guide (easy!))
Gathering Materials and Tools
Once you’ve finalized your plan, it’s time to gather the necessary materials and tools. Making sure you have everything before you start will save time and frustration.
Materials
The materials you’ll need will depend on your chosen gate type and design. Here’s a general list:
- Lumber or Metal: For the gate frame, pickets, and any decorative elements.
- Hinges: Choose hinges suitable for the weight and size of your gate. Consider the material of your gate (wood or metal).
- Latches and Handles: Select a latch and handle that are secure and easy to operate.
- Fasteners: Screws, nails, or bolts, depending on your chosen materials. Use weather-resistant fasteners for outdoor projects.
- Gate Posts (if needed): If your existing fence posts aren’t suitable, you’ll need to install new, sturdy gate posts.
- Concrete (for setting posts): If setting new gate posts.
- Optional: Paint, stain, or sealant to protect the gate.
Tools
You’ll need a variety of tools to build your gate. The specific tools required will depend on the materials you use and the complexity of your design.
- Measuring Tape: Accurate measurements are crucial.
- Level: To ensure everything is plumb and square.
- Saw: A circular saw, miter saw, or hand saw, depending on your material and project.
- Drill: For drilling holes for screws and bolts.
- Screwdriver or Drill with Screwdriver Bit: For driving screws.
- Hammer: If using nails.
- Clamps: To hold pieces together while assembling the gate.
- Post Hole Digger or Shovel (if setting posts): For digging post holes.
- Safety Glasses and Gloves: Protect your eyes and hands.
- Optional: Welding equipment (for metal gates), router (for decorative edges).
Make sure you have all the necessary tools before you begin. This will streamline the construction process.
Building the Gate Frame
The gate frame provides the structural support for your gate. Here’s how to build a basic rectangular frame (adjust as needed for your design):
- Cut the Frame Pieces: Using your measurements, cut the top, bottom, and side pieces of the gate frame from your chosen material (wood or metal).
- Assemble the Frame: Lay the frame pieces on a flat surface. Use clamps to hold the pieces together at the corners.
- Secure the Corners: There are several ways to secure the corners:
- Screws: Use screws and corner brackets for added support.
- Bolts: Drill holes and use bolts for stronger connections, especially for metal gates.
- Wood Joinery (for wood gates): Consider mortise and tenon joints or dovetail joints for superior strength.
A well-built frame is essential for a sturdy and long-lasting gate.
Adding Pickets or Panels
Once the frame is complete, you can add the pickets or panels to create the gate’s design. The method will depend on your chosen style.
For Picket Gates
- Spacing: Determine the spacing between pickets. Ensure consistent spacing for a uniform look.
- Attachment: Attach the pickets to the frame using screws or nails. Pre-drill holes to prevent splitting the wood.
- Alignment: Use a level to ensure the pickets are straight and aligned.
For Panel Gates
- Panel Size: Measure and cut the panels to fit within the frame.
- Attachment: Attach the panels to the frame using screws, nails, or adhesive, depending on the panel material.
- Secure the Panels: Ensure the panels are securely attached to the frame to prevent them from moving or falling out.
Take your time and pay attention to detail during this step. The appearance of your gate will depend on the neatness of the pickets or panels.
Installing the Gate
Installing the gate involves attaching it to the fence posts and ensuring it swings or slides smoothly.
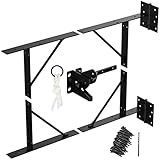
1. Installing Hinges
- Hinge Placement: Determine the placement of the hinges on the gate and the gate post. Generally, hinges are placed near the top and bottom of the gate.
- Mark and Drill: Mark the locations for the hinges and drill pilot holes.
- Attach Hinges: Attach the hinges to the gate and the gate post using screws. Ensure the hinges are aligned correctly.
- Check for Level: Use a level to ensure the gate is plumb. Adjust the hinges as needed.
2. Installing the Latch and Handle
- Latch Placement: Determine the location of the latch on the gate and the receiving post.
- Mark and Drill: Mark the locations for the latch and handle and drill pilot holes.
- Attach Latch and Handle: Attach the latch and handle to the gate and the post using screws.
- Test the Latch: Test the latch to ensure it functions correctly and securely.
3. Adjusting the Gate
Once the gate is installed, you might need to make adjustments to ensure it swings or slides smoothly. This might involve:
- Adjusting the Hinges: If the gate is rubbing against the post or the ground, adjust the hinges to improve the alignment.
- Adjusting the Latch: Adjust the latch to ensure it catches properly and securely.
- Adding Shims: Use shims to level the gate if the posts are not perfectly aligned.
Take your time to get the gate working properly. Proper adjustment is key to a functional and aesthetically pleasing gate. (See Also: Build a Beautiful Wood Lattice Fence: Your Ultimate Guide)
Finishing Touches
Once the gate is installed, you can add finishing touches to enhance its appearance and protect it from the elements.
- Painting, Staining, or Sealing: Apply paint, stain, or sealant to protect the gate from weather damage and enhance its appearance. Follow the manufacturer’s instructions.
- Adding Decorative Elements: Consider adding decorative elements such as finials, scrolls, or panels to enhance the gate’s aesthetic appeal.
- Checking for Smooth Operation: Test the gate to ensure it swings or slides smoothly and that the latch functions correctly.
- Regular Maintenance: Regularly inspect the gate for any signs of wear and tear. Tighten screws, lubricate hinges, and touch up paint or stain as needed.
These finishing touches will help your gate stand out and last for years to come.
Troubleshooting Common Problems
Even with careful planning and construction, you might encounter some common problems during the gate-building process. Here’s how to troubleshoot them:
- Gate Sagging: If the gate is sagging, check the following:
- Diagonal Braces: Ensure diagonal braces are installed and properly secured.
- Hinge Alignment: Check the hinge alignment and adjust as needed.
- Post Stability: Ensure the gate posts are stable and not leaning.
- Gate Rubbing: If the gate is rubbing against the post or the ground, check the following:
- Hinge Alignment: Adjust the hinges to improve the alignment.
- Gate Level: Ensure the gate is level.
- Obstructions: Clear any obstructions that might be interfering with the gate’s movement.
- Latch Issues: If the latch is not catching properly, check the following:
- Latch Alignment: Adjust the latch and the receiving post to ensure proper alignment.
- Striker Plate: Ensure the striker plate is properly installed.
- Gate Not Swinging/Sliding Smoothly: If the gate is not operating smoothly, check the following:
- Hinges/Track: Lubricate the hinges or the track to reduce friction.
- Obstructions: Remove any obstructions that might be interfering with the gate’s movement.
- Gate Alignment: Ensure the gate is properly aligned.
Troubleshooting these problems will help ensure your gate functions correctly.
Gate Automation (optional)
For added convenience and security, you can automate your gate. This involves installing a gate opener and associated components. Here’s a brief overview:
- Types of Gate Openers: There are different types of gate openers for swing gates and sliding gates. Consider the type of gate and the size of the gate when choosing an opener.
- Installation: Gate openers typically require professional installation, as they involve electrical wiring and safety features.
- Features: Gate openers often come with features such as remote controls, keypads, and safety sensors.
- Safety: It’s crucial to prioritize safety when installing and using a gate opener. Ensure the opener has safety features such as obstacle detection.
Gate automation can greatly enhance your property’s convenience and security.
Maintaining Your Gate
Regular maintenance is essential to keep your gate in good condition and extend its lifespan. Here are some maintenance tips:
- Regular Inspections: Inspect your gate regularly for any signs of wear and tear, such as loose screws, rust, or damage.
- Cleaning: Clean your gate regularly to remove dirt, debris, and mildew.
- Lubrication: Lubricate hinges and any moving parts to ensure smooth operation.
- Painting/Staining: Repaint or restain your gate as needed to protect it from the elements.
- Tightening Fasteners: Tighten any loose screws or bolts.
- Addressing Issues Promptly: Address any issues promptly to prevent them from worsening.
Proper maintenance will help ensure your gate lasts for many years.
People Also Ask
Here are some frequently asked questions about building gates:
- How much does it cost to build a gate? The cost varies depending on the materials, design, and size of the gate. Simple wooden gates can be relatively inexpensive, while more elaborate metal gates can be more costly.
- How long does it take to build a gate? The time it takes to build a gate depends on the complexity of the design and your experience. A simple gate can be built in a day or two, while more complex gates may take longer.
- What tools do I need to build a gate? The tools you need will depend on the materials you use and the complexity of your design. Generally, you’ll need a measuring tape, level, saw, drill, screwdriver, and clamps.
- Can I build a gate myself? Yes, with the right knowledge and tools, you can build a gate yourself. This guide provides step-by-step instructions to help you.
- What are the best materials for a gate? The best materials depend on your needs and preferences. Wood offers a natural look, metal provides strength and security, and composite offers durability and low maintenance.
Answering these frequently asked questions will help you better understand the process of building a gate.
What is the best wood for a gate? (See Also: Stop the Escape! How to Keep Your Dog From Getting Out of the Fence)
When selecting the best wood for a gate, consider factors like durability, weather resistance, and aesthetics. Here are some top choices:
- Cedar: Cedar is a popular choice due to its natural resistance to rot, decay, and insects. It also weathers well and has a beautiful appearance.
- Redwood: Redwood is another excellent option, known for its natural durability and rich color. It’s also resistant to moisture and insects.
- Pressure-Treated Lumber: Pressure-treated lumber is a cost-effective option that’s treated to resist rot and decay. It’s a good choice for areas with high moisture levels.
- Mahogany: Mahogany is a hardwood that offers exceptional durability and a luxurious look. It’s a more expensive option but provides excellent longevity.
- Ipe: Ipe is an extremely dense and durable hardwood that’s highly resistant to rot, decay, and insects. It’s a premium choice for gates that require maximum durability.
The best choice for you will depend on your budget, desired aesthetics, and the environmental conditions in your area.
How do you build a gate for a sloped yard?
Building a gate for a sloped yard requires some additional considerations to ensure proper functionality and aesthetics. Here’s a guide:
- Measure the Slope: Accurately measure the slope of the yard where the gate will be installed. Determine the height difference over the gate’s width.
- Choose the Right Gate Type: Consider a gate type that can accommodate the slope. Swing gates can work with some slope, but you may need to adjust the hinges or trim the gate to fit. Sliding gates are often a better choice for significant slopes. Cantilever gates can also be a good option.
- Adjust the Gate Frame: You may need to modify the gate frame to account for the slope. This could involve adjusting the bottom of the gate to match the ground contour or using a sloped bottom rail.
- Install Hinges Properly (for Swing Gates): For swing gates, install the hinges so the gate swings freely without hitting the ground. This might involve setting the gate higher on the uphill side.
- Adjust the Latch: Ensure the latch mechanism aligns correctly with the receiving post, even with the slope. You might need to adjust the latch or the strike plate.
- Consider a Custom Gate: If the slope is significant, you may need to have a custom gate built to ensure a proper fit and functionality.
- Ensure Drainage: Make sure the area around the gate has proper drainage to prevent water from accumulating.
Building a gate on a slope requires careful planning and adjustments to ensure it functions properly and looks good. It may involve custom modifications to accommodate the uneven terrain.
How do you reinforce a gate?
Reinforcing a gate is essential to increase its strength, durability, and resistance to damage. Here’s how to reinforce a gate:
- Use Strong Materials: Start with high-quality materials, such as durable wood species (cedar, redwood, Ipe) or sturdy metal (steel or aluminum).
- Reinforce the Frame: Add diagonal bracing to the gate frame to prevent sagging and twisting. Consider using corner brackets or metal straps to reinforce the joints.
- Choose Heavy-Duty Hardware: Use heavy-duty hinges, latches, and handles designed for the gate’s size and weight.
- Add Vertical Supports (for Tall Gates): For tall gates, add vertical supports to the frame to prevent bending or warping.
- Use a Solid Core (for Solid Gates): If you’re building a solid gate, consider using a solid core material, such as plywood or a composite panel, to add strength and stability.
- Secure Fasteners Properly: Use appropriate screws, bolts, or nails for the materials and ensure they are properly installed and tightened.
- Add a Bottom Rail: A bottom rail can provide additional support and prevent the gate from dragging on the ground.
- Consider a Metal Frame (for Wood Gates): For extra strength, build the gate with a metal frame and then attach the wood panels to the frame.
- Maintain the Gate: Regularly inspect the gate for any signs of wear and tear, and address any issues promptly. Tighten loose screws, lubricate hinges, and touch up paint or stain as needed.
Reinforcing a gate ensures it can withstand the elements, resist damage, and provide long-lasting security and functionality.
- How to Install Vinyl Fence: A Step-by-Step Guide for Diy Success
- How to Get Rid of Fence Rats: A Comprehensive Guide (effective Solutions)
- Pottery Barn Faux Plants: Stylish & Realistic Artificial Greenery
- Buy a Live Pineapple Plant: Varieties & Best Deals!
- China Doll House Plant: Miniature & Real Plant Options
Final Verdict
Building a gate in a fence is a rewarding project that can significantly improve your property. By following the steps outlined in this guide, you can create a functional and aesthetically pleasing gate. Remember to plan carefully, choose the right materials, and pay attention to detail throughout the construction process for a successful outcome. With patience and effort, you can enjoy the benefits of a well-built gate for years to come.
Recommended Products