So, you want to build a fence with a gate? You’ve come to the right place! We’ll walk you through everything, from planning and gathering materials to the final swing of the gate. Building a fence is a rewarding project that significantly boosts your property’s value and curb appeal.
This guide is for everyone, whether you’re a seasoned DIYer or just starting. We’ll break down each step clearly, with tips and tricks to make the process smooth and enjoyable. Get ready to transform your yard into a secure and stylish space. Let’s get started!
Planning Your Fence and Gate: The Foundation of Success
Before you even think about picking up a hammer, proper planning is essential. A well-planned fence and gate project is the key to a successful outcome. This initial phase involves several crucial steps that will save you time, money, and headaches down the road. Let’s dive in:
1. Define Your Purpose and Needs
What do you want your fence to achieve? Consider these questions:
- Privacy: Do you need to block views from neighbors or the street?
- Security: Are you trying to keep children or pets in, or unwanted visitors out?
- Aesthetics: Do you want to enhance your property’s appearance?
- Functionality: Do you need to define property lines or create separate areas within your yard?
Your answers will influence the fence’s height, material, and design. For example, a privacy fence might be taller and made of solid wood, while a decorative fence could be shorter and made of wrought iron.
2. Understand Local Regulations and Permits
This is crucial! Before you start, check your local building codes and homeowner’s association (HOA) regulations. These regulations dictate:
- Height restrictions: Maximum fence heights vary by location and zoning.
- Setback requirements: How far the fence must be from property lines.
- Material restrictions: Some materials might be prohibited (e.g., chain-link in certain areas).
- Permit requirements: You’ll likely need a permit before construction begins. Contact your local building department for information. Failure to obtain the necessary permits can result in fines and the need to remove or modify your fence.
3. Property Line Survey
Confirm your property lines. You can:
- Review your property deed: This document contains a legal description of your property.
- Hire a professional surveyor: A surveyor will accurately locate and mark your property lines. This is especially important if you’re unsure of the boundaries or if there’s any potential for disputes with neighbors.
Building your fence on your neighbor’s property or even partially over the line can lead to legal issues. (See Also: How to Build a Corrugated Iron Fence: A Step-by-Step Guide)
4. Choose Your Fence and Gate Materials
The materials you choose will impact the fence’s appearance, durability, and cost. Consider these common options:
| Material | Pros | Cons | Typical Cost (per linear foot) |
|---|---|---|---|
| Wood | Natural look, customizable, relatively affordable. | Requires maintenance (painting, staining), susceptible to rot and pests. | $15 – $50 |
| Vinyl | Low maintenance, durable, comes in various styles. | Can be more expensive than wood, can crack in extreme cold. | $25 – $75 |
| Chain-link | Affordable, durable, good for security. | Not aesthetically pleasing, can rust. | $10 – $30 |
| Metal (Aluminum/Steel) | Durable, low maintenance, stylish. | Can be expensive, can rust (steel if not treated). | $30 – $100+ |
When choosing materials, also think about the gate. The gate should match the fence in terms of material and style. Consider the gate’s size and how it will be used (pedestrian gate, driveway gate, etc.).
5. Design Your Fence and Gate
Sketch your fence and gate design. Include:
- Fence height and length: Measure the perimeter of your yard.
- Gate dimensions: Determine the width and height of your gate based on its purpose (e.g., pedestrian gate vs. vehicle gate).
- Post spacing: Typically, posts are spaced 6-8 feet apart, but this can vary depending on the material.
- Gate location: Consider the gate’s placement in relation to your driveway, walkways, and landscaping.
- Hardware: Plan for hinges, latches, and any other hardware needed for the gate.
Consider the slope of your yard. You might need to step the fence to accommodate changes in elevation or use a racking system.
People Also Ask:
What is the best type of fence for privacy? Usually, solid wood or vinyl fences provide the best privacy because they block the view completely.
Do I need a permit to build a fence? It depends on your local regulations. Always check with your local building department.
Gathering Your Tools and Materials
Once you’ve finalized your plans, it’s time to gather the necessary tools and materials. Having everything on hand will streamline the construction process and save you trips to the hardware store. Let’s break down what you’ll need: (See Also: How to Build a Modern Wood Fence: A Step-by-Step Guide)
1. Essential Tools
- Measuring Tape: For accurate measurements.
- Level: To ensure posts and rails are plumb and level.
- Post Hole Digger or Auger: For digging post holes (an auger is recommended for larger projects).
- Shovel: For digging and backfilling holes.
- Wheelbarrow or Mixing Tub: For mixing concrete.
- Hammer or Nail Gun: For attaching fence boards and rails.
- Circular Saw or Hand Saw: For cutting fence boards and rails.
- Drill: For drilling pilot holes and installing screws.
- Screwdriver: For installing screws.
- Safety Glasses and Gloves: Essential safety equipment.
- Work Gloves: To protect your hands.
- String and Stakes: For marking the fence line.
- Post Level: For ensuring posts are perfectly vertical.
- Clamps: For holding boards in place while attaching them.
- Wrench Set: For tightening hardware.
2. Materials Checklist
The materials you need will depend on your fence and gate design. Here’s a general list:
- Fence Posts: Choose the appropriate size and material for your fence (wood, vinyl, metal).
- Gate Posts: These posts need to be strong enough to support the gate’s weight. They’re often larger than the other fence posts.
- Fence Boards or Panels: The main material for the fence.
- Gate Frame and Panels: If you’re building a gate from scratch.
- Rails: Horizontal supports that connect the posts.
- Concrete: For setting the posts. Quick-setting concrete is often preferred for its ease of use.
- Gravel: For drainage at the bottom of the post holes.
- Gate Hardware: Hinges, latch, handle, and any other hardware needed for the gate.
- Fasteners: Screws, nails, or other fasteners suitable for your chosen material.
- Post Caps: To protect the tops of the posts.
- Wood Stain, Paint, or Protective Coating: If applicable, to protect and finish the fence.
- Safety Gear: Eye protection, gloves, and any other safety equipment.
3. Ordering and Delivery
Once you have your materials list, order your supplies. Consider these tips:
- Measure twice, cut once: Double-check your measurements to avoid ordering too little or too much material.
- Factor in waste: Add a percentage (e.g., 5-10%) to your material quantities to account for waste from cuts or mistakes.
- Compare prices: Shop around at different hardware stores and lumberyards to get the best prices.
- Arrange for delivery: Large quantities of materials can be difficult to transport. Have them delivered to your property.
Building Your Fence: Step-by-Step Instructions
With your plan, tools, and materials ready, it’s time to build your fence. This process involves several key stages. Let’s break it down:
1. Marking the Fence Line
Before digging any holes, accurately mark the fence line. This ensures your fence is straight and in the correct location.
- Use stakes and string: Drive stakes into the ground at the corners and along the fence line. Stretch string tightly between the stakes to define the fence line.
- Check for square: Ensure the corners are square by using the 3-4-5 method (or a framing square). Measure 3 feet along one side and 4 feet along the adjacent side. The distance between those points should be 5 feet to form a perfect 90-degree angle.
- Adjust as needed: Make any necessary adjustments to the string line to ensure the fence follows your desired path.
2. Digging the Post Holes
Properly setting the fence posts is critical for the fence’s stability and longevity. Follow these steps:
- Determine post hole depth: The depth of the holes should be at least one-third of the post’s above-ground height. For example, for a 6-foot-tall fence, the holes should be at least 2 feet deep.
- Dig the holes: Use a post hole digger or auger to dig the holes. Make the holes wide enough to accommodate the post and provide space for concrete.
- Spacing: Space the holes according to your design and material requirements. Typical spacing is 6-8 feet apart.
- Add gravel: Place a few inches of gravel at the bottom of each hole for drainage.
3. Setting the Posts
Now, set the posts into the holes. This is the foundation of your fence.
- Insert the posts: Place the posts in the holes, ensuring they are positioned correctly. The gate posts are typically larger and sturdier.
- Level the posts: Use a level to ensure each post is plumb (perfectly vertical) in both directions.
- Brace the posts: Use temporary bracing (2x4s and stakes) to hold the posts in place while the concrete sets.
- Mix and pour the concrete: Mix the concrete according to the manufacturer’s instructions. Pour the concrete into the holes around the posts, filling the holes to the appropriate level (usually a few inches below the ground surface).
- Trowel the concrete: Slope the concrete slightly away from the posts to allow water to drain away.
- Allow the concrete to cure: Let the concrete cure completely according to the manufacturer’s instructions (usually 24-72 hours) before proceeding.
4. Attaching the Rails (horizontal Supports)
Once the posts are set, attach the rails. (See Also: How Much Does It Cost to Fence a Backyard? 2024 Pricing Guide)
- Measure and cut the rails: Measure the distance between the posts and cut the rails to the correct length.
- Attach the rails to the posts: Use screws or nails to attach the rails to the posts. Ensure the rails are level. The number of rails will depend on your fence design.
- Spacing the rails: Ensure the rails are spaced evenly.
5. Installing the Fence Boards or Panels
This is where your fence starts to take shape.
- Measure and cut boards: Measure the distance between the rails and cut the fence boards to the correct length.
- Attach the boards to the rails: Use screws or nails to attach the boards to the rails, ensuring they are evenly spaced. Consider using spacers to maintain consistent gaps.
- Pre-made panels: If using pre-fabricated panels, attach them to the posts using screws or brackets.
- Check for level and plumb: Throughout this process, regularly check that the boards are level and the fence is plumb.
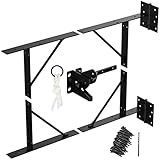
6. Building and Installing the Gate
Building and installing the gate is a crucial part of the project. This is a detailed process that requires precision and attention to detail.
- Gate Frame Construction (if building from scratch):
- Measure and cut the gate frame components.
- Assemble the frame using screws, nails, or joinery methods (e.g., mortise and tenon).
- Ensure the frame is square and stable.
- Attaching Gate Panels (if applicable):
- Attach the gate panels (boards, pickets, etc.) to the frame using screws or nails.
- Ensure the panels are evenly spaced and securely attached.
- Hanging the Gate:
- Install hinges on the gate and the gate post. The type of hinge will depend on the gate’s material and weight. Consider heavy-duty hinges for heavier gates.
- Ensure the hinges are properly aligned for smooth gate operation.
- Attach the hinges to both the gate and the gate post, using appropriate screws or bolts.
- Installing the Latch and Handle:
- Install the latch and handle on the gate and the fence post. Choose a latch that is secure and easy to operate.
- Ensure the latch engages properly.
- Testing and Adjustments:
- Test the gate to ensure it swings smoothly and closes properly.
- Make any necessary adjustments to the hinges, latch, or gate frame.
- Gate Support (for wide gates):
- For wider gates, consider adding a diagonal brace to prevent sagging.
- Use a drop rod or wheel to support the gate’s weight.
7. Finishing Touches
The final steps to complete your fence and gate project include:
- Post Caps: Install post caps on top of the posts to protect them from the elements and add a finished look.
- Staining, Painting, or Sealing: Apply a protective coating to the fence and gate to protect them from weathering and enhance their appearance.
- Clean Up: Remove any debris, tools, and materials.
- Inspect and Enjoy: Inspect your finished fence and gate. Enjoy the fruits of your labor!
People Also Ask:
How deep should fence posts be? The depth should be at least one-third of the post’s above-ground height. For example, a 6-foot-tall fence should have posts at least 2 feet deep.
How do you build a gate for a fence? You build a frame, attach panels, hang the gate with hinges, and install a latch.
Verdict
Building a fence with a gate is a rewarding project that can significantly enhance your property. By following these steps and paying attention to detail, you can create a beautiful and functional fence that meets your needs. Remember to prioritize safety and take your time. Enjoy the process!
Recommended Products