Are you dreaming of a vibrant spring garden bursting with color? Crocus flowers, with their cheerful, cup-shaped blooms, are a fantastic way to welcome the season. But before you get planting, you might be wondering about the best way to arrange these charming little flowers. Specifically, how many crocus bulbs to plant together to achieve the most visually stunning effect.
The answer isn’t a simple one-size-fits-all solution, as it depends on your desired aesthetic and the size of your planting area. This guide will walk you through everything you need to know, from choosing the right bulbs to preparing your soil and planting for success. We’ll explore various planting techniques, consider factors like spacing, and delve into the best practices for creating a spectacular crocus display that will have your neighbors envious.
Get ready to transform your garden with the beauty of crocuses! Discover the secrets to a breathtaking spring display and learn how to plant these delightful bulbs for maximum impact. Let’s delve into the world of crocus planting and unlock the secrets to a gorgeous spring garden!
Choosing the Right Crocus Bulbs
The first step in creating a beautiful crocus display is selecting the right bulbs. Not all crocus bulbs are created equal, and choosing healthy, high-quality bulbs is essential for ensuring vibrant blooms. Consider the different types available and assess the overall quality before making your purchase. This sets the foundation for a successful and visually appealing spring garden.
Variety Selection: Types of Crocus
Crocuses come in a variety of species and cultivars, each with its unique characteristics. Understanding the different types available will help you choose the best ones for your garden. Popular varieties include:
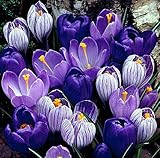
- Crocus vernus: These are the large-flowered crocuses, known for their bold colors and robust blooms. They are typically the first to appear in spring and come in a wide range of colors, including purple, white, yellow, and striped varieties.
- Crocus chrysanthus: Often called the ‘snow crocus’, these are smaller and more delicate than Crocus vernus. They are known for their early blooming and are available in a variety of colors, including yellow, orange, and white. They are also often more fragrant than the larger varieties.
- Crocus tommasinianus: This species is also known as the ‘tommies’ and is very easy to grow. They are generally smaller than Crocus vernus and often naturalize well. They tend to self-seed and spread.
- Species Crocus: These are smaller and more delicate than the large-flowered varieties. They are often the earliest to bloom and are known for their delicate beauty.
When selecting your crocus bulbs, consider the color palette you want to achieve. Do you want a monochromatic display, or a mix of colors? Consider the bloom time of each variety to ensure a continuous display throughout the spring. For example, some species crocuses bloom earlier than the large-flowered varieties. Think about the overall aesthetic you want to create.
Bulb Quality: What to Look For
The quality of your crocus bulbs is crucial for a successful planting. Inspect the bulbs carefully before purchasing them. Healthy bulbs are firm, plump, and free from any signs of damage or disease. Avoid bulbs that are soft, shriveled, or have mold. These are signs of poor quality and may not produce flowers. Look for bulbs that are of a decent size for their variety; larger bulbs typically produce larger and more numerous blooms.
When purchasing bulbs, consider the source. Reputable nurseries and garden centers typically offer higher-quality bulbs than big box stores. Check the packaging for information about the bulb’s origin and any guarantees offered. It’s also worth researching the specific varieties you’re interested in to understand their characteristics and bloom times. A little research upfront can save you disappointment later.
Bulb Size and Planting Depth
The size of the crocus bulbs can affect the size and quality of the flowers. Larger bulbs generally produce larger and more vibrant blooms. The planting depth is also important. As a general rule, plant crocus bulbs three times as deep as the bulb is tall. For example, if a bulb is 1 inch tall, plant it 3 inches deep. This depth provides adequate protection from temperature fluctuations and helps the bulbs establish a strong root system. Planting too shallow can lead to the bulbs drying out, while planting too deep can make it difficult for the shoots to emerge.
Also consider the spacing between bulbs when planting. This will impact the overall appearance of your display. Proper spacing allows for adequate air circulation and prevents overcrowding. We’ll discuss this in detail in the next section.
How Many Crocus Bulbs to Plant Together: Spacing and Planting Techniques
Now, let’s address the central question: how many crocus bulbs to plant together? The answer depends on your desired effect and the size of your planting area. There are a few different approaches you can take, each with its own advantages.
Dense Planting: For Maximum Impact
For a truly spectacular display, consider planting crocus bulbs densely. This technique creates a carpet of color and is particularly effective for large-flowered varieties. Close planting also helps to suppress weeds. How many bulbs you use depends on the size of the area, but aim for a spacing of about 2-3 inches between bulbs. (See Also: How to Plant in Cinder Blocks: A Complete Guide)
This planting style is ideal for creating bold drifts of color in borders, lawns, or rock gardens. However, it’s essential to ensure the soil is well-drained. Overcrowding in poorly drained soil can lead to bulb rot. Be mindful of the mature size of your chosen crocus variety. Some varieties spread more readily than others.
Naturalistic Planting: For a Relaxed Look
For a more natural and relaxed look, consider planting crocus bulbs in a less structured way. This technique mimics the way crocuses might grow in the wild. You can scatter the bulbs randomly across an area, or plant them in small clusters. This approach is particularly suitable for smaller gardens or areas where you want a more informal feel. This method also works well in lawns, where the crocuses can naturalize and spread over time.
When using this method, space the bulbs about 3-6 inches apart. Vary the spacing to create a more natural appearance. You can also mix different varieties and colors to add visual interest. This approach works well in lawns, where the crocuses can naturalize and spread over time. It creates a charming, informal display.
Clustering: For Focused Color
Planting crocus bulbs in clusters is another effective technique. This involves planting several bulbs together in small groups. This creates focal points of color and is ideal for highlighting specific areas of your garden. You can plant clusters of the same color for a cohesive look or mix different colors for added visual interest. Clusters work well in borders, rock gardens, or along pathways. Clusters also work well in containers.
When clustering, plant about 5-7 bulbs together, spaced 2-3 inches apart. The number of bulbs per cluster will depend on the size of the area and the desired effect. The key is to create small pockets of color that draw the eye. Experiment with different cluster sizes and arrangements to find what works best for your garden.
Spacing Guidelines: A Quick Reference
Here’s a quick reference guide for spacing crocus bulbs based on planting style:
| Planting Style | Spacing Between Bulbs | Best For |
|---|---|---|
| Dense Planting | 2-3 inches | Maximum impact, borders, lawns |
| Naturalistic Planting | 3-6 inches | Relaxed look, smaller gardens, lawns |
| Clustering | 2-3 inches (within a cluster), clusters spaced further apart | Focal points, borders, rock gardens |
Remember that these are general guidelines. Adjust the spacing based on the specific variety of crocus you’re planting and the overall look you want to achieve.
Preparing the Soil and Planting Crocus Bulbs
Proper soil preparation is essential for the successful growth and flowering of crocus bulbs. Crocuses prefer well-drained soil that is rich in organic matter. They are sensitive to waterlogged conditions, which can lead to bulb rot. Following these steps will help ensure your crocuses thrive and produce beautiful blooms.
Soil Preparation: Drainage and Enrichment
Before planting your crocus bulbs, prepare the soil by ensuring good drainage. Crocuses do not like to sit in water. If your soil is heavy clay, amend it with organic matter such as compost, well-rotted manure, or peat moss. This will improve drainage and aeration. You can also add some grit or sand to further improve drainage. The soil should be slightly acidic to neutral, with a pH of around 6.0 to 7.0.
Incorporate the organic matter into the soil to a depth of about 6-8 inches. This will help to improve the soil structure and provide essential nutrients for the bulbs. If your soil is already well-drained, you can skip this step. However, adding organic matter is always beneficial, as it helps to retain moisture and improve soil fertility.
Planting Time and Depth
The best time to plant crocus bulbs is in the fall, typically from September to November, depending on your climate. This allows the bulbs to establish roots before the ground freezes. Planting in the fall also gives the bulbs enough time to acclimate to their new environment. This is when they will prepare for the following spring’s bloom. (See Also: Learn How to Plant Adenium Cuttings: A Complete Guide)
As mentioned earlier, plant the bulbs three times as deep as their height. For instance, if a bulb is 1 inch tall, plant it 3 inches deep. Make sure the pointed end of the bulb is facing upwards. Space the bulbs according to the planting style you have chosen. After planting, water the area thoroughly to settle the soil around the bulbs.
Watering and Mulching
After planting, water the area thoroughly. This will help to settle the soil around the bulbs and encourage root growth. Continue to water the area regularly, especially if the weather is dry. However, avoid overwatering, as this can lead to bulb rot. Once the ground freezes, stop watering. Mulching can help protect the bulbs from extreme temperatures.
Apply a layer of mulch, such as shredded bark or straw, after planting. This will help to retain moisture, suppress weeds, and protect the bulbs from extreme temperatures. The mulch also helps to insulate the bulbs during the winter months. Be sure to remove the mulch in the spring to allow the crocus shoots to emerge. You can also add a light layer of mulch after the plants have bloomed to help protect the foliage.
Dealing with Pests and Diseases
Crocus bulbs are generally quite resistant to pests and diseases. However, there are a few things to watch out for. Rodents, such as squirrels and voles, can sometimes dig up and eat the bulbs. You can deter them by planting the bulbs in a wire mesh basket or by using a repellent.
Bulb rot can occur in poorly drained soil. To prevent this, ensure your soil has good drainage. Avoid overwatering and provide adequate air circulation. If you notice any signs of disease, such as soft or discolored bulbs, remove and discard them immediately. Proper soil preparation and care can prevent most pest and disease issues.
Caring for Crocus After Blooming
Once your crocus flowers have bloomed, there are a few things you can do to ensure they return year after year. Proper aftercare will help to strengthen the bulbs and encourage future blooms. This includes allowing the foliage to die back naturally, avoiding cutting the leaves, and providing the right amount of water and nutrients.
Deadheading and Foliage Care
After the crocus flowers have faded, it’s a good idea to deadhead them. This involves removing the spent flower heads. This prevents the plant from wasting energy on seed production and encourages the bulb to focus on storing energy for next year’s blooms. However, avoid cutting back the foliage until it has completely died back. The leaves are essential for photosynthesis, which provides the bulb with the energy it needs to thrive.
Allow the foliage to die back naturally. This process usually takes about 6-8 weeks. During this time, the leaves will turn yellow and brown. Avoid tying up or cutting back the foliage prematurely. This will weaken the bulb and may reduce the number of flowers in the following year. Let the leaves wither and die naturally.
Watering and Fertilizing
During the growing season, water your crocuses if the weather is dry. However, avoid overwatering, as this can lead to bulb rot. Once the foliage has died back, you can reduce watering. Crocus bulbs do not need much water during their dormancy period. They store their energy in the bulb and are ready to bloom again the following spring.
After the blooms have faded, you can fertilize your crocuses with a balanced fertilizer. This will provide the bulbs with the nutrients they need to store energy for the following year. Apply the fertilizer according to the package instructions. You can also add a layer of compost around the plants to provide nutrients. Fertilizing after blooming helps to replenish nutrients used during the flowering process.
Naturalizing Crocus: Long-Term Care
Crocuses are known for their ability to naturalize, which means they will spread and multiply over time. To encourage naturalization, avoid disturbing the bulbs. Let the foliage die back naturally, and avoid mowing or digging in the area until the foliage has completely disappeared. This will allow the bulbs to produce offsets and spread. Naturalizing crocuses will create an increasingly beautiful display year after year. (See Also: Maximize Your Harvest: How Much Yield Per Weed Plant Indoors?)
You can also encourage naturalization by providing the right growing conditions. Ensure the soil is well-drained and the plants receive adequate sunlight. You can also divide and replant the bulbs every few years to prevent overcrowding. This will help to maintain the health and vigor of your crocus display. With proper care, your crocuses will reward you with years of beautiful blooms.
Troubleshooting Common Crocus Problems
Even with the best care, you may encounter some problems when growing crocuses. Knowing how to identify and address these issues can help you maintain healthy and vibrant plants. Common problems include poor flowering, bulb rot, and pest infestations. Here’s how to troubleshoot some common crocus problems.
Poor Flowering: Causes and Solutions
If your crocus bulbs are not producing many flowers, there could be several reasons. One common cause is inadequate sunlight. Crocuses need at least 6 hours of sunlight per day to flower properly. Make sure your plants are getting enough sunlight. Another possible cause is poor soil conditions. Crocuses prefer well-drained soil that is rich in organic matter. Improve your soil by adding compost or other organic material.
Overcrowding can also lead to poor flowering. If your bulbs are too crowded, they may not have enough space to grow and produce flowers. You can solve this by dividing and replanting the bulbs every few years. Finally, a lack of nutrients can also contribute to poor flowering. Fertilize your crocuses with a balanced fertilizer after they bloom to help them store energy for the following year.
Bulb Rot: Prevention and Treatment
Bulb rot is a common problem in poorly drained soil. To prevent bulb rot, ensure your soil has good drainage. Amend heavy clay soil with organic matter to improve drainage. Avoid overwatering, as this can lead to the bulbs rotting. If you notice any signs of bulb rot, such as soft or discolored bulbs, remove and discard them immediately. Do not replant bulbs in the same area. Consider replanting in a different location with better drainage.
Fungal infections can also cause bulb rot. Treat fungal infections with a fungicide specifically designed for bulbs. Follow the instructions on the product label carefully. Good air circulation can help prevent fungal infections. Ensure that your plants have enough space to allow for good airflow.
Pest Infestations: Identification and Control
Crocuses are generally resistant to pests, but they can be susceptible to some infestations. Rodents, such as squirrels and voles, can sometimes dig up and eat the bulbs. You can deter them by planting the bulbs in a wire mesh basket or by using a repellent. Slugs and snails can also damage the foliage. Control these pests with slug bait or by handpicking them off the plants.
Aphids can sometimes infest the foliage. Control aphids with insecticidal soap or by spraying the plants with a strong stream of water. Mealybugs can also infest crocuses. Treat mealybugs with insecticidal soap or by wiping them off the plants with a cotton swab dipped in rubbing alcohol. Regularly inspect your plants for signs of pests, and take action promptly to prevent infestations from spreading.
Conclusion: Creating Your Crocus Paradise
Planting crocus bulbs is a rewarding experience that brings the joy of spring to your garden. By understanding how many crocus bulbs to plant together, the nuances of bulb selection, soil preparation, and aftercare, you can create a stunning display. Experiment with different planting techniques, colors, and arrangements to design a crocus paradise that reflects your personal style. Embrace the beauty of these delightful blooms and enjoy the magic they bring to your landscape.
Recommended Products