Are you captivated by the lush, vibrant foliage of the Dieffenbachia, also known as the Dumb Cane plant? Its striking patterns and ease of care make it a popular choice for indoor gardens. Imagine multiplying your own Dieffenbachia collection, filling your home with these stunning plants without spending a fortune. This guide will show you exactly how to propagate Dieffenbachia plants, ensuring your success and expanding your green haven.
Propagating Dieffenbachia is a rewarding experience, allowing you to share your plants with friends or simply enjoy more of these beautiful specimens yourself. The process is relatively straightforward, and with the right techniques, you can easily create new plants from existing ones. We’ll delve into the various methods, from stem cuttings to division, providing you with all the knowledge needed to thrive.
This comprehensive guide will cover everything you need to know about how to propagate Dieffenbachia plant, including selecting the right method, preparing your cuttings, and providing the optimal conditions for root development. We’ll discuss common challenges and how to overcome them, ensuring your propagation journey is smooth and successful.
Understanding Dieffenbachia Propagation
Dieffenbachia plants are relatively easy to propagate, making them an excellent choice for beginner plant enthusiasts. Propagation is essentially the process of creating new plants from a parent plant. This can be achieved through various methods, each with its own advantages and considerations. Understanding the basics of Dieffenbachia propagation is the first step towards successfully multiplying your plants.
The primary methods for propagating Dieffenbachia include stem cuttings, division, and sometimes even air layering. Stem cuttings are the most common and easiest method, while division is typically used for mature plants with multiple stems or clumps. Air layering is a less frequently used technique, but it can be effective for certain situations.
Successful propagation hinges on understanding the plant’s needs and providing the right environment for root development. This includes factors such as proper lighting, humidity, and the appropriate growing medium. With a little patience and the right approach, you can easily grow new Dieffenbachia plants.
Why Propagate Dieffenbachia?
Propagating your Dieffenbachia offers several benefits, making it an attractive endeavor for plant lovers. It’s a cost-effective way to expand your collection, allowing you to enjoy more of these beautiful plants without purchasing new ones. It also provides an opportunity to share your love of plants with friends and family.
Propagating allows you to rejuvenate older plants by starting new, healthy specimens. You can also use propagation to create backups of your favorite plants, safeguarding against potential losses due to pests, diseases, or environmental factors. It’s a fulfilling experience that connects you more deeply with the plant life cycle.
Furthermore, propagating Dieffenbachia is a rewarding way to learn more about plant care and cultivation. It allows you to experiment with different techniques and refine your skills, increasing your confidence as a plant parent.
Key Considerations Before You Begin
Before you dive into propagating your Dieffenbachia, there are a few key considerations to keep in mind. Understanding these factors will increase your chances of success and help you avoid common pitfalls. Proper preparation is essential for a smooth and rewarding propagation experience.
First, assess the health of your parent plant. Choose a healthy, vibrant Dieffenbachia with no signs of disease or pest infestation. The healthier the parent plant, the better the chances of successful propagation. Also, make sure you have all the necessary supplies readily available.
Consider the timing. The best time to propagate Dieffenbachia is during the growing season, typically spring and summer. This is when the plant is actively growing and has the energy to develop roots. However, propagation can be attempted at other times of the year, provided you provide the right conditions.
Methods for Propagating Dieffenbachia
There are several effective methods for propagating Dieffenbachia. The most common and easiest is stem cuttings, but division can also be used. Each method has its own set of steps and considerations. Understanding each method will allow you to select the best option for your plant and your experience level.
Propagating Dieffenbachia From Stem Cuttings
Stem cuttings are the most popular and easiest method for propagating Dieffenbachia. This involves taking a section of the stem from the parent plant and encouraging it to develop roots. The process is relatively simple, and with the right care, you can expect new roots within a few weeks. (See Also: Plant City to Winter Haven: How Far Is the Drive?)
This method works because Dieffenbachia stems contain nodes, which are points where leaves and roots can develop. When a stem cutting is placed in a suitable growing medium, these nodes will eventually sprout roots. This is a very common method used in the propagation of many house plants.
Here’s a step-by-step guide to propagating Dieffenbachia from stem cuttings:
- Gather Your Supplies: You will need a sharp, clean knife or scissors, a clean container, water or a suitable rooting medium (such as perlite, vermiculite, or a well-draining potting mix), and optionally, rooting hormone.
- Select and Prepare the Cutting: Choose a healthy stem from the parent plant. The stem should have at least one or two nodes. Cut a stem section that is approximately 4-6 inches long. Remove any leaves from the bottom inch or two of the cutting.
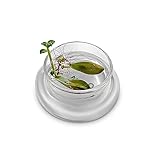
- Rooting in Water: Place the stem cutting in a container of water, ensuring that the bottom nodes are submerged. Change the water every few days to keep it fresh and prevent bacterial growth. Place the container in a location that receives bright, indirect light.
- Rooting in a Medium: Dip the cut end of the stem into rooting hormone (optional). Plant the cutting in a well-draining potting mix or other suitable rooting medium. Keep the medium consistently moist but not waterlogged. Place the pot in a location that receives bright, indirect light.
- Monitor for Root Development: Whether you choose to root in water or a medium, check for root development. In water, you’ll see the roots directly. In a medium, gently tug on the cutting to feel for resistance (roots). Rooting can take several weeks.
- Transplant (if rooted in water): Once the roots are several inches long, transplant the rooted cutting into a pot with a well-draining potting mix. Water thoroughly.
- Care for Your New Plant: Continue to provide your new Dieffenbachia with the same care as a mature plant, including bright, indirect light, regular watering, and occasional fertilization.
Propagating Dieffenbachia by Division
Division is another effective method for propagating Dieffenbachia, particularly for mature plants that have multiple stems or clumps. This method involves separating the plant into smaller sections, each with its own roots and stems. It is best done during the spring or early summer when the plant is actively growing.
This method is a bit more invasive than stem cuttings, but it can be a good way to rejuvenate an older plant or to create multiple new plants from a single parent. It’s important to handle the plant carefully to minimize stress during the division process.
Here’s a step-by-step guide to propagating Dieffenbachia by division:
- Prepare Your Supplies: Gather your supplies, including a sharp knife or garden shears, a clean pot with drainage holes, fresh potting mix, and optionally, rooting hormone.
- Remove the Plant from Its Pot: Gently remove the Dieffenbachia from its current pot. You may need to loosen the soil around the edges of the pot to help release the plant.
- Loosen the Roots: Gently loosen the soil and untangle the roots, being careful not to damage them excessively.
- Divide the Plant: Identify natural divisions in the plant, where you can see distinct clumps of stems and roots. Use your knife or shears to carefully separate these clumps. Make sure each division has a good portion of roots and at least one or two healthy stems.
- Prepare the New Pots: Fill the new pots with fresh, well-draining potting mix.
- Plant the Divisions: Plant each division in its own pot, ensuring that the roots are well-covered with soil. Water thoroughly after planting.
- Care for Your New Plants: Place the newly divided plants in a location that receives bright, indirect light. Water regularly, keeping the soil consistently moist but not waterlogged. Avoid fertilizing immediately after division; wait a few weeks until the plants have established.
Air Layering Dieffenbachia (less Common)
Air layering is a less common method for propagating Dieffenbachia, but it can be useful, especially when dealing with a tall, leggy plant. This method involves encouraging root development on a stem while it’s still attached to the parent plant. Once roots have formed, the stem is cut and planted.
Air layering offers the advantage of providing a more established root system before separating the new plant from the parent. This can increase the chances of success, particularly for larger cuttings. It does require more patience and careful execution.
Here’s a simplified guide to air layering Dieffenbachia:
- Select the Location: Choose a healthy stem section where you want to create roots.
- Prepare the Stem: Make a shallow cut or girdle (remove a ring of bark) around the stem at the selected location. This will encourage root growth.
- Apply Rooting Hormone (Optional): Apply rooting hormone to the cut area.
- Wrap the Area: Wrap the cut area with moist sphagnum moss. Secure the moss with plastic wrap and tie the ends tightly.
- Monitor and Water: Keep the moss consistently moist. You can occasionally mist the area to maintain moisture.
- Check for Root Development: After several weeks or months, check for root development. You can gently remove the plastic wrap to inspect the moss.
- Sever and Pot: Once roots have formed, sever the stem below the rooted area. Pot the new plant in a suitable potting mix.
- Care for Your New Plant: Care for the new plant as you would a stem cutting or a divided plant.
Essential Care for Propagated Dieffenbachia
Once you’ve successfully propagated your Dieffenbachia, providing the right care is crucial for its continued growth and health. This includes providing the right environment and consistent care practices. Proper care will ensure your new plants thrive and flourish.
Newly propagated Dieffenbachia plants are more vulnerable than mature plants, so extra attention is needed. Protect them from harsh conditions and provide them with the optimal growing environment to help them establish strong root systems and healthy foliage.
Here’s a guide to essential care for your newly propagated Dieffenbachia:
Light Requirements
Dieffenbachia plants thrive in bright, indirect light. Direct sunlight can scorch the leaves, while insufficient light can lead to leggy growth and reduced variegation. The ideal location for your propagated Dieffenbachia is near a window where it receives filtered light.
If you don’t have a suitable window, you can supplement with grow lights. Avoid placing your plants in direct sunlight, especially during the hottest parts of the day. Observe your plant for signs of light stress, such as yellowing or browning leaves. (See Also: Planting After Roundup: How Soon Can I Plant?)
Here’s a breakdown of light considerations:
- Bright, Indirect Light: This is the ideal condition.
- Avoid Direct Sunlight: Can scorch leaves.
- Monitor for Light Stress: Watch for yellowing or browning leaves.
- Consider Grow Lights: Supplement if needed.
Watering and Humidity
Proper watering is essential for the health of your Dieffenbachia. Water thoroughly when the top inch or two of soil feels dry to the touch. Avoid overwatering, which can lead to root rot. Make sure your pot has good drainage to prevent waterlogging.
Dieffenbachia plants appreciate humidity. If your home is dry, you can increase humidity by misting the leaves regularly, using a humidifier, or placing the pot on a tray of pebbles filled with water. The right humidity level will promote healthy leaf growth.
Here’s a guide to watering and humidity:
- Watering Frequency: Water when the top inch or two of soil is dry.
- Avoid Overwatering: Ensure proper drainage.
- Humidity: Dieffenbachia prefers higher humidity.
- Increase Humidity: Mist the leaves, use a humidifier, or place the pot on a pebble tray.
Soil and Potting
Use a well-draining potting mix for your Dieffenbachia. A mixture of peat moss, perlite, and vermiculite works well. This type of mix allows for good drainage, preventing root rot. Repot your plants every one to two years, or when they become root-bound.
Choose a pot with drainage holes to prevent waterlogging. The pot size should be appropriate for the size of the plant. A pot that’s too large can retain too much moisture, while a pot that’s too small can restrict growth.
Here’s a guide to soil and potting:
- Potting Mix: Use a well-draining mix (peat moss, perlite, vermiculite).
- Pot Size: Choose a pot with drainage holes, appropriate for the plant’s size.
- Repotting: Repot every 1-2 years or when root-bound.
Fertilizing
Fertilize your Dieffenbachia during the growing season (spring and summer) to promote healthy growth. Use a balanced liquid fertilizer diluted to half strength. Avoid fertilizing during the dormant season (fall and winter).
Over-fertilizing can lead to salt buildup in the soil, which can harm the plant. Always follow the instructions on the fertilizer package. Monitor your plant for signs of nutrient deficiencies, such as yellowing leaves.
Here’s a guide to fertilizing:
- Fertilizing Season: Fertilize during the growing season (spring and summer).
- Fertilizer Type: Use a balanced liquid fertilizer (diluted to half strength).
- Avoid Over-Fertilizing: Follow the fertilizer instructions.
- Monitor for Deficiencies: Watch for signs of nutrient deficiencies.
Common Problems and Solutions
Even with the best care, Dieffenbachia plants can encounter problems. Knowing how to identify and address these issues is crucial for maintaining your plants’ health. Common problems include pests, diseases, and environmental stressors.
By being vigilant and taking prompt action, you can often resolve these problems before they cause significant damage. Early detection and treatment are key to keeping your Dieffenbachia thriving.
Here are some common problems and their solutions: (See Also: How to Cover a Plant for Winter: A Comprehensive Guide)
- Pests: Mealybugs, spider mites, and scale can infest Dieffenbachia. Treat with insecticidal soap or neem oil.
- Diseases: Root rot can occur due to overwatering. Ensure proper drainage. Leaf spot can be caused by fungal infections; improve air circulation and treat with fungicide.
- Yellowing Leaves: Can be caused by overwatering, underwatering, insufficient light, or nutrient deficiency. Adjust watering and lighting accordingly. Consider fertilizing.
- Brown Leaf Tips: Often due to low humidity or inconsistent watering. Increase humidity and adjust watering habits.
- Leggy Growth: Indicates insufficient light. Move the plant to a brighter location.
Troubleshooting Propagation Issues
Even experienced plant parents can encounter challenges during propagation. Troubleshooting common issues can help you learn from mistakes and improve your success rate. Understanding why your propagation attempts might fail is key to future successes.
Many factors can affect the success of your propagation efforts, from the health of the parent plant to the environmental conditions. Identifying the root cause of any problems is crucial for finding the right solutions.
Here are some common propagation issues and how to address them:
- Failure to Root: The cutting may have been taken from an unhealthy parent plant, or the rooting environment may not be suitable. Ensure the parent plant is healthy and the growing medium is appropriate.
- Root Rot: Overwatering or poor drainage can lead to root rot. Use a well-draining potting mix and avoid overwatering.
- Leaf Rot: Fungal or bacterial infections can cause leaf rot. Improve air circulation and treat with fungicide.
- Pest Infestations: Pests can attack new cuttings. Inspect cuttings for pests before propagation and treat with insecticidal soap or neem oil.
- Slow Growth: Insufficient light or nutrient deficiencies can slow growth. Provide adequate light and consider fertilizing.
Frequently Asked Questions About How to Propagate Dieffenbachia Plant
Here are some of the most frequently asked questions about how to propagate Dieffenbachia plant. Addressing these common queries will help you navigate your propagation journey with confidence and provide you with all the answers you need.
These FAQs cover a wide range of topics, from selecting the best propagation method to dealing with common problems. It will help you quickly find answers to your questions and avoid potential pitfalls.
Can I Propagate Dieffenbachia From a Single Leaf?
While some plants can be propagated from a single leaf, Dieffenbachia typically requires a stem cutting with a node to successfully propagate. A single leaf will not usually produce new roots or a new plant. You need a piece of the stem that contains a node, where new growth can originate.
How Long Does It Take to Propagate Dieffenbachia?
The time it takes to propagate Dieffenbachia varies depending on the method and the environmental conditions. Stem cuttings typically root within 2-4 weeks, while division may show new growth within a few weeks. Air layering can take several months. Factors like temperature and humidity can influence the speed of root development.
What Is the Best Time of Year to Propagate Dieffenbachia?
The best time to propagate Dieffenbachia is during the growing season, typically spring and summer. During these months, the plant is actively growing and has more energy to produce roots. However, you can propagate Dieffenbachia at other times of the year, provided you provide the right conditions, such as adequate light and warmth.
How Do I Know If My Dieffenbachia Cutting Has Rooted?
If you are rooting your cutting in water, you will see the roots directly. Once the roots are a few inches long, it’s ready to be planted in soil. If you are rooting in a medium, you can gently tug on the cutting to feel for resistance, which indicates root development. You can also gently remove the cutting from the medium to check for roots.
What Kind of Soil Should I Use for Propagating Dieffenbachia?
For propagating Dieffenbachia, use a well-draining potting mix. A mixture of peat moss, perlite, and vermiculite works well. This type of mix allows for good drainage, preventing root rot. Avoid using heavy soils that retain too much moisture.
Conclusion
Learning how to propagate Dieffenbachia plant is a rewarding experience that allows you to expand your collection and share your love of plants. By following the methods outlined in this guide and providing the right care, you can successfully multiply your Dieffenbachia and enjoy the beauty of these stunning plants throughout your home. Remember to be patient, observe your plants, and adapt your care as needed to ensure their continued health and growth.
Recommended Products